• Skip to primary navigation
  • Skip to content
  • Skip to primary sidebar
  • Skip to footer

The Paleo Mama

Homegrown and Handmade

  • About
  • Blog
    • Podcast
  • Meal Plans
  • Essential Oils
  • Our Farm
    • Great Pyrenees Puppies
    • Goats
      • Goats for Sale
      • Goat Sales Policy
      • Nigerian Dwarf Bucks
        • Ranchocabra Lunar Eclipse

My Recipes

Homemade Bone Broth Recipe

February 11, 2015 by Jackie Ritz 3 Comments

This recipe was generously shared by Sylvie McCracken, author of The Gelatin Secret. CLICK HERE to check out this amazing book filled with simple, gelatin recipes! 

According to an old South American proverb, “good broth will resurrect the dead.” While that’s undoubtedly an exaggeration, it speaks to the value placed on this wholesome food, going back through the annals of time.

First and foremost, homemade bone broth is excellent for speeding healing and recuperation from illness. You’ve undoubtedly heard the old adage that chicken soup will help cure a cold, and there’s scientific support for such a statement. However, there are so many more benefits of homemade bone broth. 

Homemade bone broth benefits: 

  • Helps heal and seal your gut, and promotes healthy digestion
  • Inhibits infection
  • Reduces joint pain and inflammation
  • Fights inflammation
  • Promotes healthy hair and nail growth
  • Promotes strong and healthy bones

Sylvie McCracken, author of The Geletin Secret, stresses the importance of gelatin-rich bone broth. Using bones from pastured or wild ruminants and poultry will give you the most nutritious bone broth. 

If you are new to making bone broth, then Sylvie recommends you start with chicken bones, since it is the most palatable for beginners. 

What kind of bones to use: 

  • Chicken 
  • Beef 
  • Lamb
  • Fish

Homemade Bone Broth Recipe

shared from The Gelatin Secret! 

What you will need:

  • Slow cooker
  • 1–2 Tbsp Organic unfiltered Apple Cider Vinegar
  • Filtered water Quality bones: as little or as many as you want — 2lbs is a good starting point, either frozen or thawed


Slow Cooker Directions:

1. Turn the slow cooker on “High”

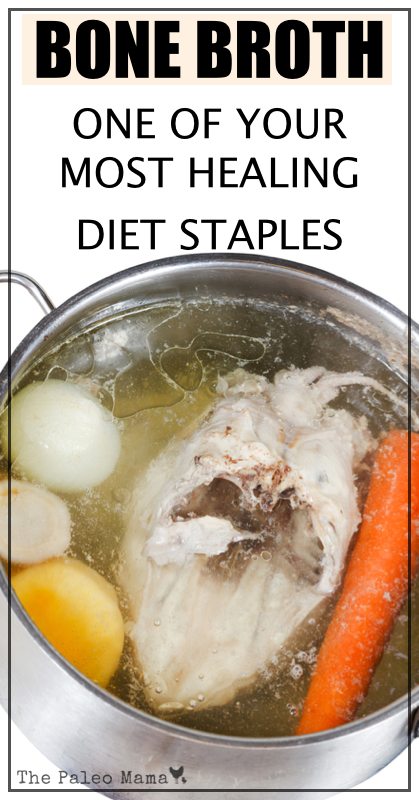
2. Add your bones to the slow cooker. They can be frozen or thawed. The more bones you add, the thicker the broth will be. I typically add the carcasses of 2 roast chickens and some extra chicken heads and feet I get from my local farmer.

3. If you’d like, add some vegetable scraps like onions, carrots, and celery for flavor. I usually keep it pretty minimal so I can salt and flavor later as needed depending on what I’ll be using it for.

4. Add 1–2 Tbsp apple cider vinegar. This is optional but recommended because the vinegar helps extract the minerals from the bones, but it also makes the broth slightly less palatable so don’t go overboard.

5. Add filtered water to the slow cooker until the bones are covered, leaving about an inch of room at the top.

6. Let it cook for at least 24 hours, ideally 48 or even longer!

7. Once you’re ready to harvest your broth, pour it through a strainer into a pot or bowl and allow it to cool.

8. Use it or freeze it for later! (See How to Store Bone Broth).

9. When it cools it may have a thick layer of fat at the top. You can certainly eat it but sometimes I find it tough to digest so I skim it off and cook with it instead.

10. If you’ve used a good amount of bones, your broth will likely gel in the fridge. This is great! Don’t fret if your broth doesn’t gel after cooling.

CLICK HERE to see more gelatin-rich recipes that are simple and nutritious! 

Bone-Broth-One-of-Your-Most-Healing-Diet-Staples-www.thepaleomama.com-.001

Filed Under: My Recipes

Homemade Baby Powder

January 20, 2015 by Jackie Ritz 15 Comments

Homemade Baby Powder

Sometimes you just need a dry barrier on your little ones bums and making your own homemade baby powder is so easy. Plus, the store-bought baby powders have TALC in them. Let me tell you about talc….

Think asbestos. 

Think cancer.

Don’t believe me? Go to Cancer.org and see for yourself. Breathing in talc is TERRIBLE for your lungs and your putting it on a baby’s genital area, is even worse. 

Now, now– don’t go feeling all guilty on me and start thinking you are a bad mom. You are now an informed mom, so you can make the changes you need! 

This recipe is simple, easy, and nourishing to your baby’s bottom and it’s cloth diaper safe (see my cloth diaper system HERE)! 

If you have a really irritated bum, then you might want to try my Healing Salve or Tallow Butt Balm recipe! 

Homemade Baby Powder 

makes a little over a cup! 

INGREDIENTS:

  • 1/4 cup of calendula flowers (where to buy)
  • 1/4 cup oatmeal (where to buy)
  • 1/2 cup of bentonite clay (where to buy) 
  • 1/4 cup of arrowroot powder (where to buy) 
  • 5 drops of therapeutic-grade lavender or chamomile essential oil (where to buy at a discount)

DIRECTIONS: 

  1. Put the calendula flowers and the oatmeal in a food processor and process until it is finely ground. 
  2. Add the clay and the arrowroot to the food process and pulse a few times to combine. 
  3. Put in a shaker bottle and apply as needed! 
  4. Let’s face it — some adults might need this too! 

Homemade Baby Powder  The Paleo Mama

Filed Under: DIY Beauty Recipes, essential oils, Living Sustainably, My Recipes, Natural Living, Paleo Baby

Fancy Bacon Peas

January 13, 2015 by Jackie Ritz 5 Comments


Fancy Bacon Peas

Have you ever ate something that made you angry? Like it was so good that it made you make a face that said, “Holy moly…how did you make this?“. Yea, that is the kind of reaction I get to my Fancy Bacon Peas. This simple, side-dish is sure to impress your family and friends…and it has bacon in it, so you can’t go wrong!

 Fancy Bacon Peas: 

INGREDIENTS: 

  • 16oz package of frozen peas, thawed out
  • 4 slices of thick-sliced bacon 
  • 1 shallot or 1/4th of a sweet onion
  • 1/4 cup of Mayonnaise (make it yourself)
  • 2 teaspoons of Lemon Juice 
  • 1/4 teaspoon of Pepper 
  • 1/4 teaspoon of Sea Salt 

 DIRECTIONS: 

  1.  Cook the bacon in a cast iron skillet over medium-high heat. 
  2. Remove bacon when crisp but leave the heavenly bacon grease.
  3. Saute the onions for 3-5 minutes until soft and tender. 
  4. Add the peas and cook for 3 minutes until soft and cooked. Remove from heat and put in a serving bowl. 
  5. Toss the mayo, pepper, salt and lemon juice till combined and smooth. 
  6. Add bacon to the serving bowl with the peas. 
  7. Pour the dressing over the peas, bacon and onions and toss. 
  8. Serve warm! 

Fancy Bacon Peas  The Paleo Mama

Filed Under: 21 Day Sugar Detox, My Recipes, Nutrition, Paleo Education

Coconut Oil Bites for Oil Pulling

January 6, 2015 by Jackie Ritz 37 Comments

Oil Pulling is an ancient detoxification practice that involves swishing oil around in your mouth for 15-20 minutes. The benefit of doing this is to reduce the amount of harmful bacteria, reduce dental plaque, remineralize your teeth, help with gum issues, and strengthen your gums. You can give your teeth an extra boost by oil pulling with essential oils.

When you swish oil around in your mouth, plaque get stuck to the oil and dissolve in the liquid oil. So you are removing a lot of bacteria, which is found in plague and leads to all kinds of oral health problems, every time you oil pull.

What Oil to Use:

Traditionally, sesame seed or sunflower oil was used among the early oil-pullers, however, my personal favorite is coconut oil because it has so many health benefits. You can use any oil that you like, just stay away from canola or vegetable oil.

Adding Essential Oils to Your Oil Pulling Regime:

Adding in therapeutic-grade, 100% pure, essential oils into your oil pulling regime is a great way to give your health a supercharge! Only use therapeutic-grade essential oils. These oils are safe to use as a dietary supplement (internally) and since you are swishing them around in your mouth, you need to use the safest. I buy my essential oils at wholesale price and I encourage you to do the same! You can CLICK HERE and learn how to get your essential oils from me at wholesale cost!

What Essential Oils to Use:

  1. Peppermint essential oil.
  2. Clove essential oil.
  3. Basil essential oil.
  4. Melaleuca essential oil.
  5. Myrrh essential oil.
  6. “Protective” blend essential oil.

Coconut Oil Bites for Oil Pulling:

INGREDIENTS: 

  • 1 cup of coconut oil (you will have a little amount left over)
  • 24-48 drops of therapeutic grade essential oil (see recommendations above)

DIRECTIONS: 

  1. Melt the coconut oil.
  2. Pour into silicone mold (I like this one. It is .3 ounce which is nearly a tablespoon…perfect amount to swish around) .
  3. Add 1-2 drops of essential oil to each individual mold.
  4. Stick in the fridge to harden.
  5. Once hard, pop out of the silicone mold and store on the counter or fridge. If you live in a warmer climate, you will want to keep it in the fridge.
  6. Happy oil pulling!

Coconut Oil Bites for Oil Pulling

Filed Under: DIY Beauty Recipes, essential oils, My Recipes, Natural Living

Matcha Mate Almond Latte

January 5, 2015 by Jackie Ritz Leave a Comment

Matcha Mate
By Angela, contributing writer
As someone with a sensitive digestive system, coffee has always been a nutritional gray area for me. It also exacerbates my teeth grinding and stresses my adrenals, so I’m trying to stop. In an attempt to wean myself off black tea and coffee, I’ve been playing with some fun alternatives. It’s hard to give up something you love without replacing it with something else. I look forward to my morning ritual of sipping something warm and creamy to ease myself awake. So I created this energizing and yummy drink Matcha Mate Almond Latte to distract myself from my coffee cravings.
Let me break down the ingredients…

Mate

Mate, like coffee, is well known for it’s energy enhancing properties, but for different reasons.
Yerba Mate is very high in anti oxidants. It also boasts 24 vitamins and minerals and 15 amino acids, and theobromine, an active ingredient in chocolate.
Mate is as popular in South America (particularly Argentina) as coffee is in North America. It has a milder taste than green tea and needs to be brewed for 10 minutes for maximum effectiveness.

Matcha

Match green tea powder is a super food of its own right. It’s touted to boost detoxification, immunity, energy levels, weight loss, memory, concentration and calm. You only need a tiny bit to get the benefits and it gives this almond milk latte such an amazing flavor.

Unsweetened almond milk

You can buy unsweetened, organic almond milk in most stores or learn how to make your own almond milk here. It’s pretty easy.

Sweetener

You can drink this latte without sweetener, but adding a touch of honey and maple syrup balances the mild bitterness of the matcha.
You can even add a banana for more sweetness and a thicker texture.

Flavoring

I sprinkled a bit of cardamom in my latte, but you can flavor yours with pumpkin pie spice, cinnamon, vanilla or almond extract. Or leave out the spices all together. It doesn’t need it.

Ingredients

  • 2 cups of unsweetened almond milk
  • 2 cups of brewed mate tea (buy it here)
  • 1 teaspoon of matcha green tea powder (buy it here)
  • 1 teaspoon of maple syrup or honey (buy it here)
  • Optional: A sprinkle of cardamom (buy it here)

How to

  1. Steep 2 tea bags of mate tea in 2 cups of boiled water for 10 minutes.
  2. Mix with 2 cups of almond milk, sweetener and matcha powder in a blender for a minute.
  3. If you would like the latte to be hotter, heat the almond milk on the stove until it just starts to bubble.
  4. Enjoy your satisfying and health promoting coffee and black tea substitute.

Matcha Mate Almond Latte

About the Author:

Angela Privin stumbled on the Paleo diet while trying to cure her symptoms from irritable bowel syndrome (IBS). After a year on a strict Paleo diet she was completely healed and her food allergies were reversed. She’ll always be grateful to her health challenges for making her learn to cook years ago. These days she’s Paleo because she loves the creative challenge of cooking delicious grain-free, real food. She spends much of her spare time experimenting in her Paleo Kitchen Lab and eating the experiments. You can check out her recipes here. 

Filed Under: 21 Day Sugar Detox, My Recipes, Nutrition

Baking Soda Free Deodorant

December 18, 2014 by Jackie Ritz 67 Comments

Baking Soda Free Deodorant

A few years ago I made the switch to a natural deodorant. The switch was going great until I started to develop red marks and a light rash on my arm pits. I had no idea what was causing it until someone mention that I probably have an underarm sensitivity.

Apparently, many people have the same sensitivity to baking-soda so I tried to find a recipe online that didn’t use a lot of baking soda. And I found a GREAT one and I loved it for months and months.  I still love it…however, the underarm sensitivity returned even though this recipe uses a very small amount.

So, my quest continued and I found this recipe that uses magnesium oil and essential oils. I never knew magnesium oil could help with underarm stink! We had some magnesium oil laying around the house so I tried it and SURE ENOUGH it’s been working great! However, I love a “stick-based” deodorant and decided to formulate a recipe that is baking-soda free, yet uses magnesium oil.

Note: Magnesium oil isn’t technically an oil so it won’t leave your pits oily…yuck! It has a SUPER low PH which is very helpful at keeping stink at bay…plus you get a nice boost of magnesium which we all need!  Some people experience a tingling when they apply magnesium on their skin. No worries — many feel this during the first few applications, especially if you are a little low in magnesium.

A few more things:

  • I use raw shea butter which is yellow. You can use a lighter shea butter or cacao butter.
  • I find that giving my underarms a spray with magnesium oil while getting out of the shower helps a ton with odor! I then apply this Baking Soda Free Deodorant recipe. You can also make a apple cider vinegar spray to use before you apply your homemade deodorant! If you workout and sweat alot, I would highly recommend a pre-squirt of magnesium oil or apple cider vinegar.
  • TEXTURE – this is not like store-bought deodorant. The texture is more “wet” but will absorb quickly into your skin. Also, if you are using this deodorant recipe in a area with hot climate or in the summer, then you will want to put it in a small jar and scoop it out with your fingers.

Baking Soda Free Deodorant:

Makes one full bar if using a recycled deodorant stick! 

INGREDIENTS: 

  • 1 Tablespoons of Magnesium Oil (where to buy)
  • 2 Tablespoons of Coconut Oil (where to buy)
  • 2 Tablespoons of Raw Shea Butter (where to buy) or Cacao Butter
  • 2 Tablespoons of Arrowroot Powder (where to buy)
  • 2 Tablespoons of Bentonite Clay (where to buy)
  • 5-8 Drops of Melaleuca Essential Oil (where to buy) 
  • 5-8 Drops of Geranium, Lavender, Lemon, Ylang Ylang, or Thyme (where to buy) – these essential oils pair well with Melaleuca and offer a nice fragrance

SUPPLIES NEEDED: 

  • Wide Mouth Mason Jar
  • Immersion Blender (where to buy)
  • Small Glass storage container or Recycled Deodorant Tube

DIRECTIONS: 

  1. Melt the coconut oil and shea butter in a double boiler. I stick the coconut oil and shea butter in a wide-mouth mason jar and put the mason jar in a pot of simmering water. Remove from heat when melted.
  2. Mix in the arrowroot and clay into the wet mixture with an immersion blender. I find the immersion blender necessary in properly mixing the oils and solids together and creating “emulsification”.
  3. Let cool for about 15 minutes. You may see some liquid rise to the top….that’s ok. We have one more mix!
  4. Ever so slowly pour in the magnesium oil while mixing with the immersion blender and mix until the mixture becomes creamy. This means you have properly emulsified the mixture.
  5. Add in your essential oils and mix and then blend again.
  6. Immediately pour into a small glass jar or a recycled deodorant tube.
  7. Allow to cool for a few hours before capping. If you are eager to use it, toss it in the fridge for 20-30 minutes!
  8. Slap on a pretty label and you got yourself a nourishing bar of deodorant that works great!

Baking Soda Free Deodorant  The Paleo Mama

Filed Under: DIY, DIY Beauty Recipes, essential oils, My Recipes, Natural Living

« Previous Page
Next Page »

Primary Sidebar

  • Facebook
  • Instagram
  • Pinterest
  • RSS
  • YouTube

Hi, I'm Jackie Ritz and welcome to The Paleo Mama! I'm a published author, certified herbalist, and voracious researcher of natural medicine and nutrition. I'm glad you're here and I hope you stick around for awhile!

Recent Posts

  • When God Says Pause: Why I Took a 5-Year Break from My Online Business
  • How to Quit Facebook but Keep Your Business Profile
  • Leaving the City for the Country
  • Natural Way to Heart Health

MEAL PLANS

Biblically clean meal plans that are for those love to cook real food

Read More

Footer

Our Blog

The Paleo Mama blog provides simple answers for healthier families through research, tutorials, recipes, and simple remedies for daily needs!

  • Health
  • Essential Oils
  • Recipes
  • Remedies
  • Natural Living
  • Meal Plans

Stick around!

You’ll get instant access to a library of natural remedies and real, paleo food, including our ebooks and free guides we send out.

  • Home
  • Disclosure/Disclaimer
  • Privacy Policy
  • Advertise
  • Contact Me

Copyright © 2025 · Wellness Pro on Genesis Framework · WordPress · Log in