• Skip to primary navigation
  • Skip to content
  • Skip to primary sidebar
  • Skip to footer

The Paleo Mama

Homegrown and Handmade

  • About
  • Blog
    • Podcast
  • Meal Plans
  • Essential Oils
  • Our Farm
    • Great Pyrenees Puppies
    • Goats
      • Goats for Sale
      • Goat Sales Policy
      • Nigerian Dwarf Bucks
        • Buttin’ Heads Natella Ferero “Nutty”
        • Ranchocabra Lunar Eclipse
    • American Jacob Sheep for Sale!

Paleo Baby

Kids and Essential Oils

May 6, 2015 by Jackie Ritz 9 Comments

Now that many of you have become avid users of essential oils, I’m sure that one of the questions you’ve had–as did I–is centered on how and if to use essential oils with your children. The truth is, essential oils are such a wonderful gift and so beneficial to all of us — including our kids! 

I am regularly using essential oils with my children…and they love them! Their nightly ritual includes a relaxing bath, followed by rubbing essential oils on their feet before bed. Some of their favorites are Lavender, a calming blend, and Frankincense.

ari frankie oilsThere are many other beneficial uses that I and others have found for essential oils with children.  Essential oils have been in use for thousands of years, and I want to share with you some ways you can use the natural power of plants and essential oils to assure that you are helping your children to reach optimal health and well-being. 

What essential oils can be used on children?

Therapeutic grade essential oils that have been certified pure are considered safe and effective for babies and children. When applying to young infants you will need to dilute the oils because of the sensitive nature of a babies neo-skin. A good ratio to start with is 1-2 drops of oil with 2 TBSP of fractionated coconut oil, just a few drops of that diluted mixture will be enough.

Children—especially infants and babies—react more strongly to things than adults do, so more caution is needed when using any type of medicine.  Remember these simple rules:

  • Introduce one essential oil at a time.
  • Watch for allergic reactions.
  • Do not use oils on babies less than 3 months old.
  • Essential oils should not be used internally on children.

Choose some of the gentler oils like:

  • Lavender
  • Frankincense
  • Melaleuca
  • Ginger
  • Lemon
  • Orange
  • Sandalwood
  • Roman Chamomile
  • Ylang Ylang
  •  “Digestive” Blend

You can get therapeutic grade essential oils at a discount from here.

The younger the child, the less essential oils you should use in proportion to the carrier oil. Here are some general guidelines:

  1. 3-6 months—1 drop essential oil to 4 tsp. carrier oil
  2. 6 months to 2 years—1 drop essential oil to 2 tsp. carrier oil
  3. 2-6 years—2 drops essential oil to 1 tsp. carrier oil
  4. 6 years plus—3 drops per tsp. on carrier oil

There are several oils you should avoid with children. Be sure to carefully research all aspects of choosing oils for children before you start. Two good resources are here and here. 

 When and why should I use essential oils for my children?

There are many possible times when your child may be feeling under the weather and with the application of an essential oil could experience real improvement in his or her health. Some of these possible uses and a suitable oil to apply include:

Babies

  • Melaleuca
  • Lemon
  • Lavender
  • Roman Chamomile
  • Geranium
  • Wild Orange

Children

  • Thyme
  • Lemon
  • Rosemary
  • Ginger
  • Lavender
  • Melaleuca
  • Peppermint
  • Cypress

You can get therapeutic-grade essential oils from here. 

How do I apply essential oils to my children?

The two safest ways to apply essential oils that are safe for children are by smelling them, or applying them to the skin diluted with a carrier oil. In recent years it has also become popular to mix essential oils to play dough, so you child gets the effect of the oil while playing with the dough. An excellent way to infuse essential oils to your children is through the use of a diffuser. In the photo to the right you can see my children enjoying the essential oils that I have put in the diffuser for them.

I have found it very helpful to give my kids a detox bath a few times a week before I roll their nighttime essential oils on their skin. You can read about how I do this by clicking here.

I have also developed a recipe for DIY Remineralizing Tooth Powder for Kids, which includes Peppermint and a Protective blend of essential oils.

There are many protocols for how to apply oils and where to apply them, and you should carefully research this information before you begin. The two resources I mentioned above would be a good place to start. 

A key part of using essential oils is to associate their smell with positive emotional situations so they will help to put your child is a positive state of mind when they are worried, annoyed, or not feeling well. Use essential oils when you play with your children so you can use those oils when they are troubled, and it should help to bring them back to a happier mood.

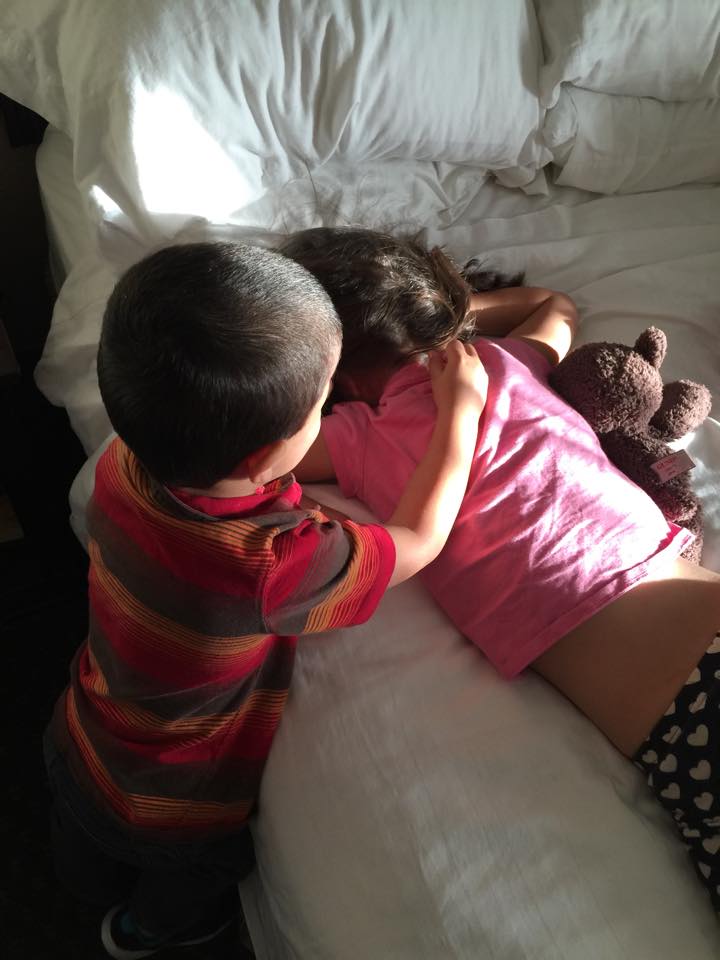
Before long you will discover that your children are able—and want—to take on some of the responsibility for using essential oils themselves. Below you will see a picture of my 3-year old son rolling oil on his big sister’s neck! 

frankie oils ari
Barefoot Boy rolls some essential oil on his big sister.

 What are the benefits of using essential oils with my children?

There are many benefits to using essential oils with your children. The plants from which the oils are made boost the body’s natural immune system. 

The aroma of essential oils can help to clear airways in kids who are suffering from respiratory ailments or times of seasonal distress. Essential oils that have been blended into a salve or rub can serve as remedies for when little ones are under the weather.

The fact that you know exactly what ingredients you are using to deal with your children’s needs is another powerful benefit. By diffusing an essential oil into your children’s bedroom or playroom you are providing an automatic calming effect where you are using an oil you have used with your child during a happy, positive moment.

There is another important benefit I have found from introducing my children to essential oils while they are young. My 6- year-old has become a valuable helper to me in my essential oil business. She has stuffed hundreds of goodie bags for me, labeled sample oils, introduced the winners in giveaway contests, and sealed many envelopes. I love knowing that she is learning a valuable work ethic at such a young age! 

Using essential oils on your children must be considered responsibly and with much research before you begin. But if you do the research, you will discover the wonderful benefits that can be yours as your use natural, healthy essential oils to respond to the physical and emotional needs your children may express.

How to Get Started Using Essential Oils:

  • If you are wanting to get started using essential oils on your children, then feel free to CLICK HERE to see my FAQ page on how to get started! 

Kids and Essential Oils 1 

Filed Under: DIY Beauty Recipes, essential oils, Natural Living, Paleo Baby, Paleo Toddler

How to Make Your Own Moby Wrap

March 2, 2015 by Jackie Ritz 5 Comments


Today I’m welcoming Darla from Dear Darla on the blog! You are going to love this post from Darla and see how easy it is to make your own “Fauxby” Moby Wrap (don’t you just love saying that?!). Mama’s, she is giving you your hands back and your little ones are going to love being safe and snug next to your heartbeat again! 

“Help! My Baby refuses to be put down!” Oh Mama, I have been in your skin. You have this new baby that you have waited so long for and you are beaming with love for your little one, but you’re also starving and you have to do a load of laundry or your daughter is going to have to wear her Elsa dress to church (again).  This is when we choose between making a salad with one hand,  or put the baby down and risk waking him and hearing him cry in protest. Well, there is another option. You can wear your baby.

It is growing in popularity to wear our babies. Not just because of the cute wraps and carriers available but also because of our baby’s needs and how they develop after birth. The concept of the “Fourth Trimester” is a helpful way of looking at it. My son, for example, spent 40 weeks happy and comfortable in the womb. He got to hear my heartbeat, breathing, speaking and singing. He was able to feel the ebb and flow of my body as it naturally moved throughout my day. It’s the only comfort he has ever known up to this point. Then, he was born. There were bright lights and the noises were much louder. All of a sudden, his world went from the close and quiet quarters of the womb, to the infinite and terrifying open air. It’s no wonder his instincts drove him right to mother’s skin. It is no wonder he “refuses to be put down” sometimes.  It’s no wonder he screams in protest and fear when he can’t find me.

DearDarlaFauxby5
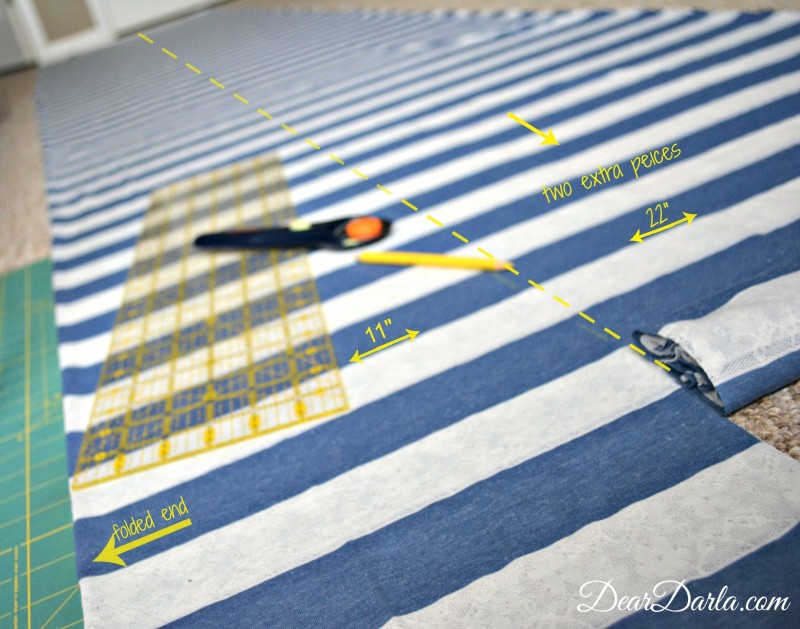
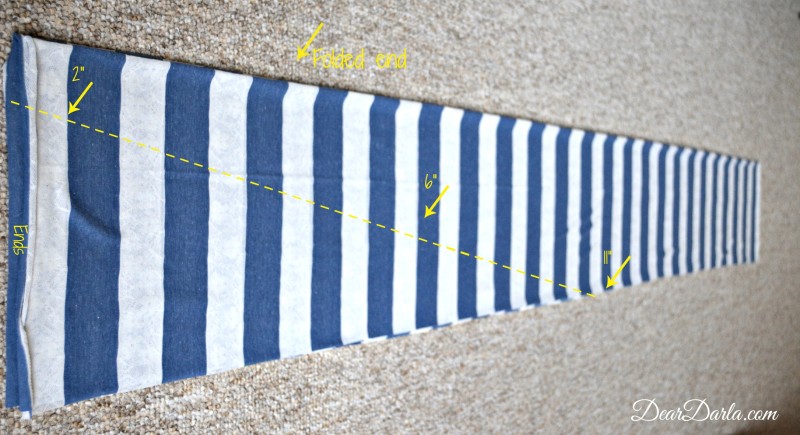
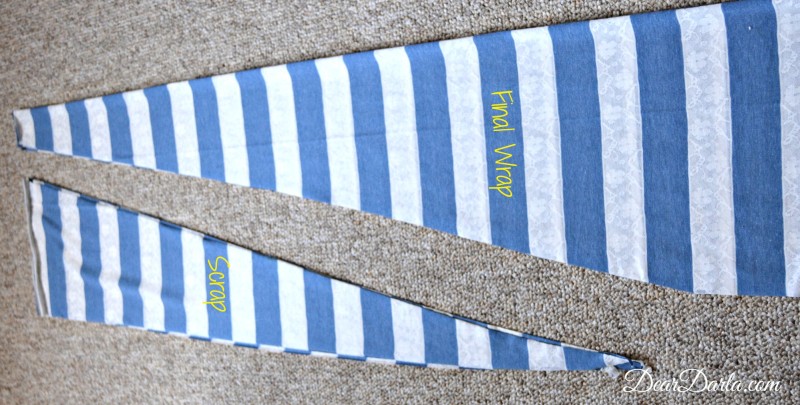
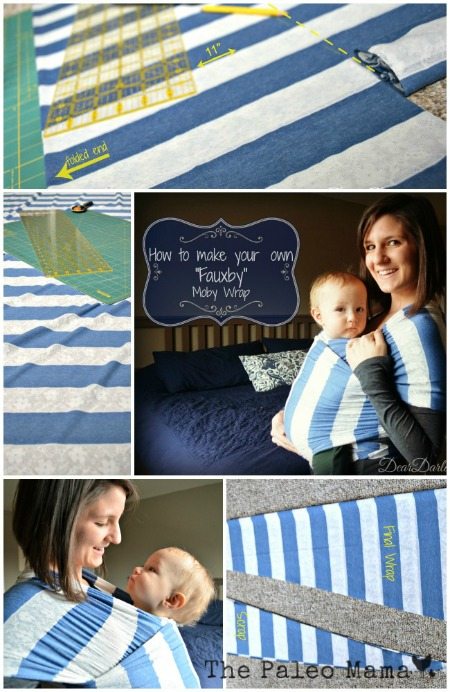
The transition from ‘Womb to World” takes a long time. Our patience and  sympathy will help our babies along the way.  You cannot spoil a newborn. They don’t have the cognition to muster manipulation, they just need your comfort and to know they can trust you. Wearing our babies kissably close helps them feel secure while helping us eat more than granola bars for the first few months. 


My favorite carrier is the Faux Moby Wrap I made at home. The “Fauxby”, if you will. It’s lightweight and easily transitions to fit as your and your baby’s bodies change. It’s easy to make, cheaper and you get to customize it for yourself.  If I had to put it in terms we can all understand, it’s about as easy to make as putting a king size duvet cover on. It takes a little math and calculated fineness, but it can be done and you’ll feel really proud of yourself afterwards.

I didn’t need much. I have this rotary cutting set. These are essential for crafting because I can’t cut a straight line to save my life. I would highly suggest using one for this project because we aren’t sewing so our edges will remain raw and visible.

DearDarlafauxby

 You’ll need 5-6 yards of a fabric of your choice. I made this wrap for a summer baby so I was looking for something lightweight and breathable. You want something stretchy, like a t-shirt or a jersey skirt. This is the hardest part of making your wrap! I know. Don’t be discouraged, there are so many options and it’s pretty intuitive and easy to figure it out once you get to the store. A few key words to look for in the fabric descriptions are: knit, rayon, polyester blends. Basically, anything stretchy in that section will work.  The original Moby is 6 yards long, I’ve found that to be too long for my small frame, so I trimmed mine to about 5 yards. Anywhere between 5 and 6 should be fine.  The fabric comes wide enough to get three wraps out of the deal too! So, you can be a really great friend and give a couple away as humble brag baby shower gifts. You’re awesome.

One more note on buying fabric, check coupons! There is always a sale going on!

Ok, enough chatting…let me show you how to make your own moby wrap! 

How to Make Your Own Moby Wrap:

ITEMS NEEDED: 

  • 5-6 yards of fabric 
  • Rotary Cutting Set

Step #1:

Measure the width of your fabric and then fold your fabric in half “hot dog style” so your salvage ends are together. Divide the width by three. (Mine was 66 inches wide so I had enough for three 22-inch-wide wraps.)  Take the folded end, and measure and mark in half of that number from the edge towards the lose ends. For me, that was 11 inches. Cut the whole length of the fabric 11 inches from the fold so when it opens up, you have three 22 inch wide strips of 5-6 yards.

DearDarlaFauxby1

 Step #2: 

Now you taper the ends so that they are more manageable to tie up.  Leave your first cut folded “hot dog style” and then fold it “hamburger style” so now the ends of your wrap are together and you have 4 pieces of fabric you’re cutting through.

DearDarlaFauxby2

 Step #3: 

At this point, my wrap had to taper from 11” to 2”. I did this over the course of 4’. I marked the ends at 2“, then 2’ in made a mark at 6” and then 2’ in again I marked the top at 11”. I drew a line to connect each mark and cut.

DearDarlaFauxby3

That is it! All you have to do now is check out the video below to learn how to put it on and carry your baby safely and you’re all set! It only took two cuts and now you have your own Fauxby wrap! You can cuddle and bond with your baby and eat a meal with both hands, you may even fold some laundry if you’re feeling bold.  I’m excited for you.

ABOUT THE AUTHOR: 

My name is Darla. I’m a lover and pursuer of many things. In the stage of life I’m in, there is so much to try and so much life to experience. The time is flying. The days are long but the months seem so short. I want to remember it all. I want to share what has worked for me. I want to process and protest some things that I used to just accept. Mostly, I long to grow. To become a stronger wife, a wiser, more intuitive mother and a daring and brave woman after Gods gracious heart.

Follow Darla: 

  • DearDarla.com
  • Facebook.com/Deardarlajean
  • Instagram @DearDarlaJean
  • www.pinterest.com/DearDarlaJean/

How to Make Your Own Moby Wrap

Filed Under: breastfeeding, Living Sustainably, Natural Living, Paleo Baby

Homemade Baby Powder

January 20, 2015 by Jackie Ritz 15 Comments

Homemade Baby Powder

Sometimes you just need a dry barrier on your little ones bums and making your own homemade baby powder is so easy. Plus, the store-bought baby powders have TALC in them. Let me tell you about talc….

Think asbestos. 

Think cancer.

Don’t believe me? Go to Cancer.org and see for yourself. Breathing in talc is TERRIBLE for your lungs and your putting it on a baby’s genital area, is even worse. 

Now, now– don’t go feeling all guilty on me and start thinking you are a bad mom. You are now an informed mom, so you can make the changes you need! 

This recipe is simple, easy, and nourishing to your baby’s bottom and it’s cloth diaper safe (see my cloth diaper system HERE)! 

If you have a really irritated bum, then you might want to try my Healing Salve or Tallow Butt Balm recipe! 

Homemade Baby Powder 

makes a little over a cup! 

INGREDIENTS:

  • 1/4 cup of calendula flowers (where to buy)
  • 1/4 cup oatmeal (where to buy)
  • 1/2 cup of bentonite clay (where to buy) 
  • 1/4 cup of arrowroot powder (where to buy) 
  • 5 drops of therapeutic-grade lavender or chamomile essential oil (where to buy at a discount)

DIRECTIONS: 

  1. Put the calendula flowers and the oatmeal in a food processor and process until it is finely ground. 
  2. Add the clay and the arrowroot to the food process and pulse a few times to combine. 
  3. Put in a shaker bottle and apply as needed! 
  4. Let’s face it — some adults might need this too! 

Homemade Baby Powder  The Paleo Mama

Filed Under: DIY Beauty Recipes, essential oils, Living Sustainably, My Recipes, Natural Living, Paleo Baby

Whipped Sleepytime Rub

July 3, 2014 by Jackie Ritz 125 Comments

Winding down at night can be tough at times. I know my mind keeps going for minutes and sometimes hours after I lay my head down on my pillow. The same goes for our kids.

Sometimes we expect that as soon as we shut the door, they are going to be sweet little angels and fall asleep. Most the time we are proven wrong!

Our nightly routine has become essential at our house. I notice that the nights we go from dinner to bed is CRAZY. The kids are not ready to rush rush rush and then get in bed. So, I stopped expecting it from them and started taking our bedtime routine a little more seriously.

Now we eat dinner at the table as family and then we slowly start getting ready for bed. The kids take a nice relaxing bath, sometimes a detox bath, with certain essential oils in it, and then we get all snuggled up in our pajamas and read books.

During our reading time I apply essential oils to my kids. They absolutely love this! The 3 main oils I choose to apply are Frankincense, Lavender, and Vetiver because these oils promote a nice, restful sleep.

Whipped Sleepytime Rub

makes 1/2 cup

INGREDIENTS: 

  • 1/4 cups of Cacao (or Cocoa) Butter (where to buy)
  • 1/4 cups of coconut oil (where to buy)
  • 20 drops of therapeutic grade Lavender (where to buy)
  • 12 drops of Vetiver (where to buy)
  • 10 drops of Frankincense (where to buy)

Other oils to use: you can substitute any of the above oils with Ylang Ylang, Roman Chamomile, Cedarwood, orClary Sage. All these oils promote relaxation and a restful night’s sleep!

DIRECTIONS: 

  1. Add the coconut oil and the cacao butter to a small pan and simmer till melted.
  2. Let rest on the counter for 10 minutes.
  3. Add the essential oils to the pan and then put it in the fridge for an hour.
  4. You want it to be firm but not too hard. Then whip it on high with an electric mixer until the mixture softens and forms peaks.

HOW TO APPLY: 

  • Take a small pea-sized amount and massage it into your feet or your children’s feet before bed.
  • Sleepy tight!

Whipped Sleepy-time Rub
2018-01-07 12:46:07
Yields 1
A luscious homemade body cream to apply to yourself before bedtime!
Write a review
Save Recipe
Print
Prep Time
15 min
Cook Time
10 min
Prep Time
15 min
Cook Time
10 min
Ingredients
  1. 1/4 cups of Cacao (or Cocoa) Butter
  2. 1/4 cups of coconut oil
  3. 20 drops of therapeutic grade Lavender
  4. 12 drops of Vetiver
  5. 10 drops of Frankincense
Instructions
  1. Add the coconut oil and the cacao butter to a small pan and simmer till melted.
  2. Let rest on the counter for 10 minutes.
  3. Add the essential oils to the pan and then put it in the fridge for an hour.
  4. You want it to be firm but not too hard. Then whip it on high with an electric mixer until the mixture softens and forms peaks.
By The Paleo Mama
The Paleo Mama https://thepaleomama.com/
Whipped-Sleepytime-Rub-www.thepaleomama.com_

Filed Under: DIY Beauty Recipes, essential oils, Natural Living, Paleo Baby Tagged With: bedtime, children, essential oils

Tallow Butt Balm

June 3, 2014 by Jackie Ritz 5 Comments

Tallow Butt Balm | www.thepaleomama.com.001

I’m so excited to have my friend Kate from Venison for Dinner (don’t ya just love that name!) sharing this AWESOME recipe on my blog today. Kate is a stay at home mom of 2 little boys living a homemade life on the West Coast of British Columbia. She enjoys to cook and bake from scratch. Through hunting and homesteading, Kate and her family produce more than enough to fill their own meat and dairy needs, happily helping others start their own homesteading journey along the way. Kate also has a passion for essential oils and home healing with natural medicine. You can follow her on HER BLOG and Facebook page as she hones her homesteading skills, making her ‘whey’ through one mountain of raw milk at a time. Maybe you too will be inspired to butcher your own deer or try your hand at natural medicine!

Please welcome Kate…

You know the scene, you’re changing a diaper, you open it up and baby’s got a sore bum. It hurts YOU to see their bum all red and you want that pain GONE!

So what do you reach for? You grab the the diaper rash cream and you smear it all over. But did you know that many of those commercial creams contain petroleum products, as well as oils that are most likely rancid, alcohols, and so many more ingredients I can barely pronounce! (And I’m a good reader!) Here a popular diaper rash cream company discloses every ingredient. I was shocked at how these are allowed to be put on our precious babies skin! Your other option is to buy natural creams, which, lets be honest, aren’t always that natural, or cost you a good chunk of change.

IMG_7390

After our second child was born we got serious about making all our own natural personal care products! My sister made us a fancy salve that we used and while terrific, it was complicated to make. I then came up with my 3 ingredient Diaper Rash Ointment and while it’s such a basic and effective ointment to whip together…Mama’s got a new balm in town!

TALLOW!

IMG_7389

When we originally made tallow from the milk cow we had to butcher, we only used it for cooking. Then recently we were lucky enough to be gifted loads of grass-fed Jersey fat from a friends steer and since it was fresh I got to work processing it. (using the same process as this lard.) After it was cooled down I made a balm since I’d seen ideas for it all over the web, and before I knew it, it had become my go-to “Butt Balm”! The beauty of this thick salve is that it’s pretty much the same texture at all average room temperatures (unlike the coconut oil based diaper rash ointment I also use that drastically fluctuates) and it works as a barrier cream AND a ‘medicated’ cream for rashes.

So what is Tallow vs Lard? Tallow is the rendered fat from a ruminant (Cow, Deer, Sheep, etc) whereas Lard is the rendered fat from a single stomached mammal (Pig, Bear, etc). Tallow has a stronger taste that lard so while it doesn’t pair as well with sweet foods, its amazing for savoury cooking. Why is our Tallow so yellow? Jerseys (And Guernseys to my knowledge) can’t process Beta Carotene. That’s what makes carrots orange, and it’s also in the hay and grass they eat. Instead of digesting it, they deposit it in fat! That’s why jersey cream is especially yellow (even more so in time of lots of green grass) and in the fat in their meat!


Why would I want to smear beef fat on my baby’s bum?! I bet you won’t take me just saying “Because you should!!: So here’s the top reasons we choose to make our own Tallow Butt Balm;

  • Tallow is high in saturated fats with a similar profile to those just below our skin, therefore it’s easily absorbed leaving skin feeling well nourished. This helps regenerate new skin. It’s important to use GRASS FED tallow to really reap the benefits.
  • Quality Control! I recommend you purchase therapeutic-grade essential oils. 
  • Frugal! I save loads of money by making my own Butt Balm. Yes I was given the beef fat for free, but even if you tracked down and bought it I bet you’d still save money. Better yet, if you’re buying 1/4 or 1/2 a cow, ask to get the fat back with it! You’ll find more uses that just a butt balm.
  • I want to use natural/as close to nature, well raised, animal products wherever I can because I believe good fats are good for you! (And I know Jackie agrees!) Petroleum products have no place on a person’s body!
  • Let’s just say Mama takes a dab for her face and hands on a regular basis two 😉 Might as well kill two lotion birds with one stone right!?

Tallow Butt Balm

Makes enough to fill a 1 cup ‘Salmon’ or ‘Jam’ jar. The amount of essential oils makes it a just below 1% dilution.

INGREDIENTS:

  • 3/4 c+ a generous TB (200 mls) of Grass Fed Tallow
  • 4 tsp OR 1 generous TB (20 mls) of Organic, Cold Pressed Olive oil  (This helps it stay a wee bit softer)
  • 20 drops EACH Frankincense, Melaleuca and Lavender Essential oils. (See above note)


DIRECTIONS:

  1. GENTLY melt tallow and olive oil together over LOW heat, just until melted. If you’ve accidentally heated too much, no fear, but let it cool down until you can comfortably hold you finger in before adding in essential oils.
  2. Now slather away knowing you’ve made a terrific ‘butt balm’ for your baby! (I won’t tell if you put it on your own skin!)

tallow butt balm pinterest.jpg

Filed Under: DIY Beauty Recipes, essential oils, Homesteading, Living Sustainably, My Recipes, Natural Living, Paleo Baby Tagged With: babies, diaper rash cream, essential oils, natural, tallow butt balm

15 of the Best Paleo Birthday Cakes on the Net (Grain & Dairy Free!)

April 30, 2014 by Jackie Ritz 6 Comments

15 Paleo Birthday Cakes

I wanted to post a nice collection of a good variety of Paleo birthday cake recipes. Many people ask me for a good recipe that I recommend. I, personally, always use this recipe because my kids love it. However, I know not everyone likes vanilla or coconut flour or they just want more options.

Let’s talk about butter. Many of these cakes use butter. I have found that substituting ghee in place of butter works perfectly! So, if you have a dairy-allergy, you should be able to use ghee in place of butter. Ghee is when butter is lightly cooked to remove all the milk solids (I love this ghee). It might be difficult to use ghee in place of butter when making a buttercream frosting, so if that is the case, try using a Paleo frosting like this one from Real Food Rn.

15 of the Best Paleo Birthday Cakes on the Net

Grain & Dairy Free!

(Click on photo to go to the recipe) 

Very Vanilla Cupcakes
Paleo Yellow Cupcake from A Girl Worth Saving
Chocolate Expresso Cake from And Here We Are
Grain-Free Chocolate Cupcakes from Honest Body
Barbie Birthday Cake from Real Food RN
The Grain-Free/Dairy-Free B-Day Smash Cake from Urban Poser
Deep Chocolate Cake from Butter Nutrition
Layered Chocolate Caramel Cake from Life Made Full
Paleo Citrus Celebration Cake from Grok Grub
Chocolate Banana Ice Cream Cake from Beauty & the Foodie
Indian Carrot Cake from My Heart Beets
Paleo Chocolate Cupcakes from Hollywood Homestead
Banana Mousse Cake from Strands of My Life
Grain-Free Birthday Cake from Thank Your Body
Vanilla Bean Cake with Chocolate Frosting from Paleo Fondue

15 Best Paleo Birthday Cakes  www.thepaleomama.com

Filed Under: My Recipes, Paleo Baby, Paleo Toddler, Round Up Tagged With: birthday cakes, dairy free, gluten-free, paleo

Next Page »

Primary Sidebar

  • Facebook
  • Instagram
  • Pinterest
  • RSS
  • YouTube

Hi, I'm Jackie Ritz and welcome to The Paleo Mama! I'm a published author, LMT, budding herbalist, and voracious researcher of natural medicine and nutrition. I'm glad you're here and I hope you stick around for awhile!

Recent Posts

  • How to Quit Facebook but Keep Your Business Profile
  • Leaving the City for the Country
  • Natural Way to Heart Health
  • Keto Peppermint Smoothie

MEAL PLANS

Meal planning will help you pull together a delicious meal in no time at all!

Read More

Footer

Our Blog

The Paleo Mama blog provides simple answers for healthier families through research, tutorials, recipes, and simple remedies for daily needs!

  • Health
  • Essential Oils
  • Recipes
  • Remedies
  • Natural Living
  • Meal Plans

Stick around!

You’ll get instant access to a library of natural remedies and real, paleo food, including our ebooks and free guides we send out.

  • Home
  • Disclosure/Disclaimer
  • Privacy Policy
  • Advertise
  • Contact Me

Copyright © 2023 · Wellness Pro on Genesis Framework · WordPress · Log in