• Skip to primary navigation
  • Skip to content
  • Skip to primary sidebar
  • Skip to footer

The Paleo Mama

Homegrown and Handmade

  • About
  • Blog
    • Podcast
  • Meal Plans
  • Essential Oils
  • Our Farm
    • Great Pyrenees Puppies
    • Goats
      • Goats for Sale
      • Goat Sales Policy
      • Nigerian Dwarf Bucks
        • Ranchocabra Lunar Eclipse

essential oils

Why I DIY & Why YOU Should, Too!

August 25, 2016 by Jackie Ritz 1 Comment

yoooo

By Dr. Eric Zielinski

Don’t miss your chance to attend the online and free Essential Oil summit and learn more about DIY and more! 

Most people don’t realize how lucrative “beauty” is. It is one of the fasting growing industries in the world, and recent reports suspect that the global beauty market will reach $265 billion in 2017! Now, don’t get me wrong, making money isn’t a bad thing. What concerns me is the real cost that the marketplace doesn’t like to talk about; namely, the health risks associated with a vast majority of products sold on store shelves today.

This, my friend, is why my wife and I DIY and why I hope you will, too!

Your Skin is a Sponge 

The reason why we’ve become aware of the harm that body care products can cause is because of the discovery that human skin is literally a sponge. Scientists have proven that more than 60% of the chemicals in our body care products absorb through our skin and into our blood stream, but this is just one part of the equation! Think about all the hairspray you inhale when doing your hair, the lipstick that you unconsciously lick throughout the day, or the minute mascara particles that enter your eyes!

If you’re using an abundant life giving concoction made with a healthy base and therapeutic grade essential oils, then you have nothing to worry about. You can do a happy dance because you’re doing your body good! On the other hand, if your favorite cosmetic line is filled with harmful fillers and preservatives, then you better on dance yourself to the doctor’s office for a early check-up because you’re poisoning yourself!

Yes, I jest, but this is no laughing matter. This is serious business, folks, and the safe rule of thumb to live by is if you won’t eat it, you shouldn’t put it on your skin!

Hidden Toxins in Your Body Care Products

It is becoming increasingly difficult to purchase pure, wholesome body care products and unsuspecting customers are duped by labels claiming they are “all natural, “organic” and “GMO-free.”  Yes, these qualities are all very important to maintain the integrity of your health, but they are not a guarantee of purity because harmful fillers and preservatives are oftentimes slipped in your favorite lotion or cream.

Some of the most dangerous (and common!) culprits to be on the lookout for are:

  • Coal Tar
  • DEA (Diethanolamine)
  • Formaldehyde
  • Fragrance/Parfum
  • Mineral oil
  • Lauryl sulfates
  • Parabens 
  • Propylene glycol (PEG)
  • Talc  

The bottom line is that you need to be avid label reader, and make sure that you are not being inadvertently poisoned by the products that you’re using every day!

Easy DIY Natural Solutions

Two of the most dangerous culprits in the beauty market are cosmetics and lotions; both of which are extremely easy to do-it-yourself (DIY).

Cosmetics

By and large, the vast majority of women use one or more cosmetic items to enhance their look. Sadly most of these are made up of synthetic ingredients that are caked on their face for hours on end. We mustn’t forget what we have already learned – these chemicals are blinked into your eyes, seeped into your pores, and accidentally licked into your mouths every single day of the year and this accumulates over your lifespan.

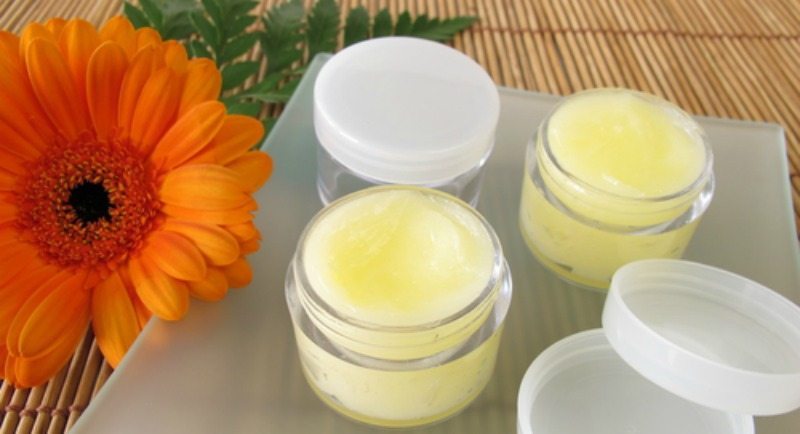
The primary way to stop this vicious cycle is to implement some easy-to-implement natural solutions and lipstick is the first place to start. Essentially a jazzed up lip balm, you can DIY by following this recipe:

Ingredients

  • 2 teaspoons sweet almond oil or coconut oil
  • 1 teaspoon beeswax / beeswax beads
  • 1 teaspoon cocoa or Shea butter
  • Dash coloring powder (beet, cinnamon or powder) 
  • Essential Oils (where The Paleo Mama recommend purchasing from)

Instructions

  1. Melt oil, beeswax and butter in a saucepan over low heat.
  2. Stir in optional coloring powder
  3. Remove from heat and stir in a drop or two of essential oil for fragrance and nourishment, like frankincense, geranium, lavender, lemongrass, nerloi, rose, or ylang ylang.
  4. Place mixture in lipstick tubes or a small tin container.
  5. Put in refrigerator to cool and use when desired.

As a word of caution, don’t forget that many cold-pressed citrus oils are phototoxic, meaning they can cause excessive sensitivity when exposed to the sun. If you’d like to use citrus oils in your lipstick, be sure to use the ones on this list:

  • Bergamot Oil (FCF)
  • Blood Orange Oil
  • Lemon Oil (Steam Distilled)
  • Lime Oil (Steam Distilled)
  • Mandarin Oil
  • Sweet Orange Oil
  • Orange Leaf Oil
  • Satsuma Oil (Cold/Expeller Pressed)
  • Tangelo Oil
  • Tangerine Oil
  • Yuzu Oil

Lotion

We all can use a little moisturizing love to take care of the skin that works so hard for us now and again, right? But, at what cost are we doing so? Granted, lotion is a very basic product (or should be), but most contain a mile-long list of chemicals that are a recipe for nothing good for our health!

Don’t forget to keep an eye out for the harmful fillers and preservatives like parabens, mineral oil and fragrance when purchasing your lotion. If you get discouraged because you can’t find one with the fragrance that you enjoy without all the junk in it, then doing it yourself is the way to go. And, oh, how simple it is! 

By and large, the easiest and most effective moisturizer is a simple ointment reminiscent of something our ancestors used to enjoy. All you need is a healthy, non-toxic base and some essential oils. Easy peesy!

  • 1 oz of the carrier oil of your choosing (fractionated coconut, jojoba, almond, olive, grape seed are all great options)
  • 5-7 drops of your favorite essential oil (geranium, helichrysum, frankincense, lavender, myrrh, rose and sandalwood are all good choices)

If you want a thicker lotion or cream-type of consistency, try:

  • 1/4 cup Shea butter
  • 1/8 cup sweet almond oil
  • 1 tablespoon beeswax 
  • 20 drops of essential oils

Don’t forget the warning about photosensitization and citrus oils. You certainly don’t want sunspots and excessive burns, because you’re going to be out in the sun too much one day.

Guest posted By Dr. Eric Zielinski (thanks Eric!) 

Filed Under: DIY, DIY Beauty Recipes, DIY Home Recipes, essential oils Tagged With: essential oils

Whipped Sleepytime Rub

July 3, 2014 by Jackie Ritz 125 Comments

Winding down at night can be tough at times. I know my mind keeps going for minutes and sometimes hours after I lay my head down on my pillow. The same goes for our kids.

Sometimes we expect that as soon as we shut the door, they are going to be sweet little angels and fall asleep. Most the time we are proven wrong!

Our nightly routine has become essential at our house. I notice that the nights we go from dinner to bed is CRAZY. The kids are not ready to rush rush rush and then get in bed. So, I stopped expecting it from them and started taking our bedtime routine a little more seriously.

Now we eat dinner at the table as family and then we slowly start getting ready for bed. The kids take a nice relaxing bath, sometimes a detox bath, with certain essential oils in it, and then we get all snuggled up in our pajamas and read books.

During our reading time I apply essential oils to my kids. They absolutely love this! The 3 main oils I choose to apply are Frankincense, Lavender, and Vetiver because these oils promote a nice, restful sleep.

Whipped Sleepytime Rub

makes 1/2 cup

INGREDIENTS: 

  • 1/4 cups of Cacao (or Cocoa) Butter (where to buy)
  • 1/4 cups of coconut oil (where to buy)
  • 20 drops of therapeutic grade Lavender (where to buy)
  • 12 drops of Vetiver (where to buy)
  • 10 drops of Frankincense (where to buy)

Other oils to use: you can substitute any of the above oils with Ylang Ylang, Roman Chamomile, Cedarwood, orClary Sage. All these oils promote relaxation and a restful night’s sleep!

DIRECTIONS: 

  1. Add the coconut oil and the cacao butter to a small pan and simmer till melted.
  2. Let rest on the counter for 10 minutes.
  3. Add the essential oils to the pan and then put it in the fridge for an hour.
  4. You want it to be firm but not too hard. Then whip it on high with an electric mixer until the mixture softens and forms peaks.

HOW TO APPLY: 

  • Take a small pea-sized amount and massage it into your feet or your children’s feet before bed.
  • Sleepy tight!

Whipped Sleepy-time Rub
2018-01-07 12:46:07
Yields 1
A luscious homemade body cream to apply to yourself before bedtime!
Write a review
Save Recipe
Print
Prep Time
15 min
Cook Time
10 min
Prep Time
15 min
Cook Time
10 min
Ingredients
  1. 1/4 cups of Cacao (or Cocoa) Butter
  2. 1/4 cups of coconut oil
  3. 20 drops of therapeutic grade Lavender
  4. 12 drops of Vetiver
  5. 10 drops of Frankincense
Instructions
  1. Add the coconut oil and the cacao butter to a small pan and simmer till melted.
  2. Let rest on the counter for 10 minutes.
  3. Add the essential oils to the pan and then put it in the fridge for an hour.
  4. You want it to be firm but not too hard. Then whip it on high with an electric mixer until the mixture softens and forms peaks.
By The Paleo Mama
The Paleo Mama https://thepaleomama.com/
Whipped-Sleepytime-Rub-www.thepaleomama.com_

Filed Under: DIY Beauty Recipes, essential oils, Natural Living, Paleo Baby Tagged With: bedtime, children, essential oils

Tallow Butt Balm

June 3, 2014 by Jackie Ritz 5 Comments

Tallow Butt Balm | www.thepaleomama.com.001

I’m so excited to have my friend Kate from Venison for Dinner (don’t ya just love that name!) sharing this AWESOME recipe on my blog today. Kate is a stay at home mom of 2 little boys living a homemade life on the West Coast of British Columbia. She enjoys to cook and bake from scratch. Through hunting and homesteading, Kate and her family produce more than enough to fill their own meat and dairy needs, happily helping others start their own homesteading journey along the way. Kate also has a passion for essential oils and home healing with natural medicine. You can follow her on HER BLOG and Facebook page as she hones her homesteading skills, making her ‘whey’ through one mountain of raw milk at a time. Maybe you too will be inspired to butcher your own deer or try your hand at natural medicine!

Please welcome Kate…

You know the scene, you’re changing a diaper, you open it up and baby’s got a sore bum. It hurts YOU to see their bum all red and you want that pain GONE!

So what do you reach for? You grab the the diaper rash cream and you smear it all over. But did you know that many of those commercial creams contain petroleum products, as well as oils that are most likely rancid, alcohols, and so many more ingredients I can barely pronounce! (And I’m a good reader!) Here a popular diaper rash cream company discloses every ingredient. I was shocked at how these are allowed to be put on our precious babies skin! Your other option is to buy natural creams, which, lets be honest, aren’t always that natural, or cost you a good chunk of change.

IMG_7390

After our second child was born we got serious about making all our own natural personal care products! My sister made us a fancy salve that we used and while terrific, it was complicated to make. I then came up with my 3 ingredient Diaper Rash Ointment and while it’s such a basic and effective ointment to whip together…Mama’s got a new balm in town!

TALLOW!

IMG_7389

When we originally made tallow from the milk cow we had to butcher, we only used it for cooking. Then recently we were lucky enough to be gifted loads of grass-fed Jersey fat from a friends steer and since it was fresh I got to work processing it. (using the same process as this lard.) After it was cooled down I made a balm since I’d seen ideas for it all over the web, and before I knew it, it had become my go-to “Butt Balm”! The beauty of this thick salve is that it’s pretty much the same texture at all average room temperatures (unlike the coconut oil based diaper rash ointment I also use that drastically fluctuates) and it works as a barrier cream AND a ‘medicated’ cream for rashes.

So what is Tallow vs Lard? Tallow is the rendered fat from a ruminant (Cow, Deer, Sheep, etc) whereas Lard is the rendered fat from a single stomached mammal (Pig, Bear, etc). Tallow has a stronger taste that lard so while it doesn’t pair as well with sweet foods, its amazing for savoury cooking. Why is our Tallow so yellow? Jerseys (And Guernseys to my knowledge) can’t process Beta Carotene. That’s what makes carrots orange, and it’s also in the hay and grass they eat. Instead of digesting it, they deposit it in fat! That’s why jersey cream is especially yellow (even more so in time of lots of green grass) and in the fat in their meat!


Why would I want to smear beef fat on my baby’s bum?! I bet you won’t take me just saying “Because you should!!: So here’s the top reasons we choose to make our own Tallow Butt Balm;

  • Tallow is high in saturated fats with a similar profile to those just below our skin, therefore it’s easily absorbed leaving skin feeling well nourished. This helps regenerate new skin. It’s important to use GRASS FED tallow to really reap the benefits.
  • Quality Control! I recommend you purchase therapeutic-grade essential oils. 
  • Frugal! I save loads of money by making my own Butt Balm. Yes I was given the beef fat for free, but even if you tracked down and bought it I bet you’d still save money. Better yet, if you’re buying 1/4 or 1/2 a cow, ask to get the fat back with it! You’ll find more uses that just a butt balm.
  • I want to use natural/as close to nature, well raised, animal products wherever I can because I believe good fats are good for you! (And I know Jackie agrees!) Petroleum products have no place on a person’s body!
  • Let’s just say Mama takes a dab for her face and hands on a regular basis two 😉 Might as well kill two lotion birds with one stone right!?

Tallow Butt Balm

Makes enough to fill a 1 cup ‘Salmon’ or ‘Jam’ jar. The amount of essential oils makes it a just below 1% dilution.

INGREDIENTS:

  • 3/4 c+ a generous TB (200 mls) of Grass Fed Tallow
  • 4 tsp OR 1 generous TB (20 mls) of Organic, Cold Pressed Olive oil  (This helps it stay a wee bit softer)
  • 20 drops EACH Frankincense, Melaleuca and Lavender Essential oils. (See above note)


DIRECTIONS:

  1. GENTLY melt tallow and olive oil together over LOW heat, just until melted. If you’ve accidentally heated too much, no fear, but let it cool down until you can comfortably hold you finger in before adding in essential oils.
  2. Now slather away knowing you’ve made a terrific ‘butt balm’ for your baby! (I won’t tell if you put it on your own skin!)

tallow butt balm pinterest.jpg

Filed Under: DIY Beauty Recipes, essential oils, Homesteading, Living Sustainably, My Recipes, Natural Living, Paleo Baby Tagged With: babies, diaper rash cream, essential oils, natural, tallow butt balm

DIY Remineralizing Toothpaste

December 16, 2013 by Jackie Ritz 196 Comments

Six months ago I went to the dentist and found out that I had six cavities. I could not believe it. It didn’t make sense because I eat a very clean, Paleo diet. I pinpointed some of the things that caused my cavities in this post that I wrote, “How I’m Healing My Cavities Without Dentistry.” This post has received a lot of attention and I’ve received many emails and messages about various things that I’m doing to heal my cavities. Well, good news…I went for a 6 month check-up at this dentist a few days ago to see how my cavities looked and to see if the remineralizing process was working…AND…I HAVE ZERO CAVITIES!!! I healed my teeth naturally with proper diet and nutrition and I did not have to pay a hefty dentist bill to have my teeth drilled and filled!

I mention in that post that I use a homemade toothpaste and because I have received so many emails about what that recipe is, I thought I would share my DIY Remineralizing Toothpaste recipe. I was having a hard time finding a toothpaste that did not have certain ingredients in them. When you are trying to remineralizing your teeth, you need to make sure you are not using a toothpaste with glycerin or xylitol in it. Glycerin coats your teeth and counteracts the remineralization process and this article explains why we don’t use xylitol. Our family avoids toothpaste with fluoride and preservatives, as well.

This recipe is great for remineralizing your teeth if you are following the Cure Tooth Decay protocol and have some cavities you are trying to reverse but it’s, also, a wonderful recipe to use just to maintain optimal oral health for your day-to-day life.

DIY Remineralizing Toothpaste:

INGREDIENTS: 

  • 1/3 cup of Bentonite Clay (where to buy)- this comes from pure sources of undisturbed deposits in the ground. What is special about bentonite clay is that it draws toxins out of the body.
  • 1/4 cup of boiling water
  • 1 Tablespoon of coconut Oil (where to buy) – coconut oil is amazing for oral health. It is highly effective with getting rid of viruses and bacteria in the mouth
  • 1/4 teaspoon of Real Salt (where to buy) – real salt is unrefined and full of natural minerals.
  • 1/2 teaspoon of REAL stevia  (where to buy)- this is the dry herb that is green and unprocessed in it’s natural form.
  • 15 Drops of Protective blend Essential oil (where to buy) 
  • 10 Drops of Peppermint Essential oil (where to buy) 

DIRECTIONS:

  • Step One: Put your bentonite clay in a bowl. Heat the water on the stove and then stir in the coconut oil till it is melted.
  • Step Two: With a hand mixer, mix on medium speed the bentonite clay and the water/oil mixture till blended through.
  • Step Three: Add the salt, stevia, and essential oils and continue to blend until it is completely blended.
  • Step Four: Keep in a covered jar!
  • *The mixture will harden a little bit as it sits because of the coconut oil. This makes it easier to add a bit to your toothbrush when you brush.

For more information on healing your cavities naturally, read this post and check out Cure Tooth Decay!

Want a kid-friendly version of this recipe? Check out my DIY Remineralizing Tooth Powder for KIDS! 


DIY Toothpaste

Filed Under: essential oils, My Recipes, Natural Living Tagged With: bentonite clay recipes, DIY remineralizing toothpaste, essential oils, gluten-free, heal cavities naturally, homemade toothpaste, paleo, primal, real salt

« Previous Page

Primary Sidebar

  • Facebook
  • Instagram
  • Pinterest
  • RSS
  • YouTube

Hi, I'm Jackie Ritz and welcome to The Paleo Mama! I'm a published author, certified herbalist, and voracious researcher of natural medicine and nutrition. I'm glad you're here and I hope you stick around for awhile!

Recent Posts

  • When God Says Pause: Why I Took a 5-Year Break from My Online Business
  • How to Quit Facebook but Keep Your Business Profile
  • Leaving the City for the Country
  • Natural Way to Heart Health

MEAL PLANS

Biblically clean meal plans that are for those love to cook real food

Read More

Footer

Our Blog

The Paleo Mama blog provides simple answers for healthier families through research, tutorials, recipes, and simple remedies for daily needs!

  • Health
  • Essential Oils
  • Recipes
  • Remedies
  • Natural Living
  • Meal Plans

Stick around!

You’ll get instant access to a library of natural remedies and real, paleo food, including our ebooks and free guides we send out.

  • Home
  • Disclosure/Disclaimer
  • Privacy Policy
  • Advertise
  • Contact Me

Copyright © 2025 · Wellness Pro on Genesis Framework · WordPress · Log in