• Skip to primary navigation
  • Skip to content
  • Skip to primary sidebar
  • Skip to footer

The Paleo Mama

Homegrown and Handmade

  • About
  • Blog
    • Podcast
  • Meal Plans
  • Essential Oils
  • Our Farm
    • Great Pyrenees Puppies
    • Goats
      • Goats for Sale
      • Goat Sales Policy
      • Nigerian Dwarf Bucks
        • Ranchocabra Lunar Eclipse

Living Sustainably

Why I Chose to Use doTERRA Essential Oils

September 10, 2014 by Jackie Ritz 26 Comments

I’ve been using doTERRA essential oils for 2 years now (updated 8/28/15)! I have been through almost every single essential oil brand and company but when I started using doTERRA, I started noticing a huge difference…in fact, one of doTERRA’s blends, Elevation, is what started my journey into doTERRA and changed my life! . 

Before I go into why I love doTERRA essential oils and address some of the common misconceptions about essential oils, I wanted to say one thing:I think it’s amazing that so many families are using herbs and essential oils. I love seeing testimonials from people who have used an oil and seen a drastic improvement. Regardless of the brand, I think it’s so great that people are turning to essential oils and natural healing and away from over-the-counter, synthetic drugs!

Why I Love doTERRA

1. I Like the Purity

doTERRA wanted to create a purity level that goes above and beyond organic. So they created an internal standard called Certified Pure Therapeutic Grade that is verified by 3rd party testing laboratories. They test their oils 7 different ways to make sure that they are pure and safe for therapeutic use. Even though doTERRA essential oils are not “certified organic“(read why in next paragraph), you can be assured that they are a step above organic.

Organic certification varies from country to country and state to state. doTERRA essential oils are sourced all over the world, so that is why organic certification is not possible. One of the ways they ensure their oils are free of pesticide, herbicide, extenders and solvents is through the GC/MS analysis process, which is one of the 7 ways they test the purity of their oils.

Have you heard different? There is many misconceptions and lies across the internet. Much of the untruth about the purity of doTERRA essential oils stems from a website that was anonymously published by one of doTERRA’s competitor. The website accused doTERRA’s peppermint of having a synthetic ingredient called “ethyl vanillin” in it. It was purposely set up to be anonymous and it was soon obvious who was behind the scandal of the fake test results. Thankfully, the truth of this website came out (doesn’t it always!) and the website has since been taken down.

Dr. Pappas, a world-reknown chemist, that does the third-party testing for doTERRA, along with other essential oil companies, published his testing results of doTERRA peppermint essential oil and stated:

As you can see from the report in which we looked at everything down to 0.01%, there is no finding of ethyl vanillin in the oil, despite what was claimed on certain other websites. So I guess it comes down to a matter of trust and who one chooses to believe on this issue.  Before making that decision on who to believe however,  it would at least be prudent for one to become educated about many aspects of the report which claims to have found ethyl vanillin. – source

2. I Like that they Do Third-Party Testing

Many people come to me with the concern that doTERRA uses third-party testing facilities. My first question is, “Why the heck is this a concern?” A company that uses an IN-HOUSE lab would be something that would concern me. I would be concerned about them being biased. So, I love that they use third-party testing of their essential oils!

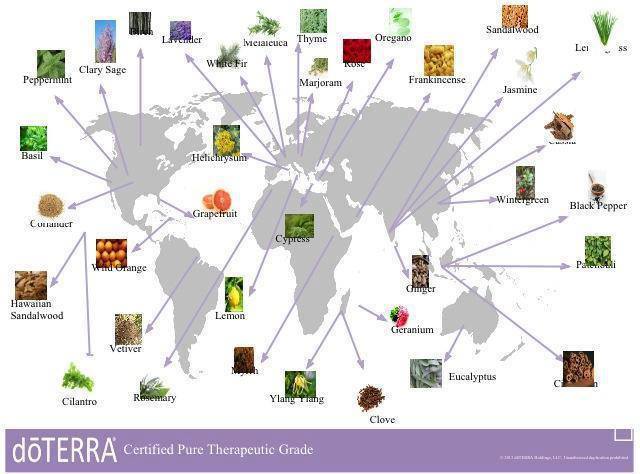
3. I Like that they Source their Oils All Over the World

This was really important to me. I don’t buy my wine from Idaho when I can get it from France. Some things are MUCH BETTER to get outside of the United States. This is when you want to forget your “American-made” pride and realize that some herbs do not grow good in the United States…some do..but not all. So, doTERRA carefully selects and sources their essential oils from where it grows at it’s prime! Here’s a great video by Emily Wright, one of doTERRA founders, talking about where they source their essential oils and a world-map below on where their oils are sourced.

doterra origins

4. I like that they are Driven by Charity

“The doTERRA Healing Hands Foundation is dōTERRA International’s registered 501(c)(3) non-profit organization committed to improving lives through partnering with organizations that offer hope to millions around the world. Healing Hands seeks to bring healing and hope to the world, for lives free of disease and poverty, and to ultimately empower impoverished communities with the tools needed to become self-reliant. dōTERRA International, LLC provides for all overhead and administrative costs of the dōTERRA Healing Hands Foundation, ensuring that 100 percent of all donations go directly to those receiving aid.”

You have the option of donating to the Healing Hands foundation every time you order! I love that they work so much in communities of need. This is important to me in a business, and especially a business that I represent.

5. I like that they Educate

The education and ongoing support that you get with doTERRA is incredible. I have learned so much about essential oils, the safety of them, and the proper way to use them. My team and upline have educational team calls that you can join in and participate in. There is so many online tools that you can use if you would like to make a business out of doTERRA. I’m in a hundred Facebook groups that share and educate on using essential oils. There is so much support and that is what I love about the company.

When I was using store-bought essential oils, I had ZERO support. I had no one to go to and talk to about how to use the oils.

6. I like How Clean they Smell

The smell test is a good indicator of purity. I read one blog article on how doTERRA essential oils smell good because they are not “first distillation“. This prompted me to research more into this and what I found out was GREAT! Essential oils SHOULD smell good. This quote from the chemist, Dr. Pappas, speaks volumes on how Peppermint essential oil is distilled and how the information you read on the internet is not always accurate:

The plant is distilled for basically 2 hours and its done, no more oil is coming out so they shut the still down. Its absolutely ridiculous to think that the distiller, after watching his oil come over, seeing that his oil level is not growing, shuts the still down and then later thinks to himself “gee, I bet if I fire this still back up (wasting thousands in feul and labor) we can get some more oil out of that spent mint leaf we distilled yesterday.” Where do people come up with this stuff!!?? Now the MINT OIL can, and often is (thank God), taken for some further redistilling and/or fractional vacuum redistilling that can take place to further improve the quality of the oil by removing nauseating components of the whole oil (just tiny amounts of very bad smelling components get removed in this process). But NOBODY distills the mint biomass a second or third time. This is generally true, not just for mint, but for essential oil distillations in general.  When I tried to explain it to the person posting this rubbish she basically did not believe me because her “research” of talking to retailers of essential oils apparently was of higher credibility. If people would just use some common sense they could look at this kind of misinformation and come to the conclusion that none of it makes sense. From an energy standpoint, why would anyone plan to shut down their distilling process just to start it up again later? The amount of energy required to get massive amounts of water boiling and enough steam generating to liberate the oil from large vats of biomass is quite astonishing and costly. Why not just keep distilling and just start collecting the oil produced at the tail end of the distillation in a separate container, if you want to collect what you think might be a different quality at the end of the run than at the beginning (by the way this is done with Ylang Ylang oil which is why there are the different grades of extra, I, II, III and complete). But aside from ylang ylang most all essential oil distillations are collected in one combined lot. And the only time I have ever seen a distiller shut down his process and restart it later was because of mechanical problems, running out of fuel, or just getting too physically tired to continue (in the case of sandalwood for example the distillation can go on for more than 24 hours and oil is still in the wood). I hope that this post will finally do some damage to this myth that has been circulated for decades now and we can finally put it to bed. – source

So, there ya have it. There is not 1st, 2nd, or 3rd distillations. The only that does undergo more than one distillation is Ylang Ylang, like Dr. Pappas describes above in the quote.

7. I Like that they Shoot for Quality, Not Quantity 

I hear so many people talk about how ______ company has more variety of oils. I know this can be disappointing when your company that you love does not have a specific essential oil that you may be looking for. The reason for this is because doTERRA will not compromise their quality for their quantity. This is why many oils have come and gone and why doTERRA is always looking for a more sustainable and reliable source that is high in quality. I love that. I would rather have a limited quantity of AMAZING oils than a large quantity of low-quality oils.

8. I LOVE the Business Model

The compensation plan of doTERRA is incredible! It’s extremely generous and I am so happy to say that it is our top income source. In fact, my husband doesn’t even need to work at this point. In less than 8 months I achieved the rank of Diamond in doTERRA. I did NOT expect to achieve diamond that quickly, nor did I set out to do that. But once I started sharing with how essential oils were changing my life, people started jumping on board and my team grew enormously!

This YouTube video is great at describing what doTERRA’s compensation plan is and how it is very different than our main competitor. If you are interested in joining doTERRA for growing a business, please read my blog post on how you can start working with this company!

Essential Oils are for EVERYONE!

Regardless of what company you love or choose, I am just so overjoyed to see you reaching for oils instead of over-the-counter medication that is filled with side-effects and God knows what else.

However, if you would like to start your journey into using doTERRA essential oils, I want you to know that I would love to help you! My team is so supportive and you will be able to join our exclusive team groups and learn so much about essential oils. CLICK HERE to take a look at my current monthly specials and to get started in using essential oils!

Any rude comments or comments including links promoting a certain brand will be deleted. The purpose of this post was to share why I love doTERRA for my family and to provide some links and research for those who are trying decide if doTERRA is right for them. 

Why I Chose doTERRA Essential Oils for My Family

Filed Under: essential oils, Living Sustainably, Natural Living

Oil Pulling With Essential Oils

August 6, 2014 by Jackie Ritz 14 Comments


Oil Pulling is an ancient detoxification practice that involves swishing oil around in your mouth for 15-20 minutes. The benefit of doing this is to reduce the amount of harmful bacteria, reduce dental plaque, remineralize your teeth, help with gum issues, and strengthen your gums. You can give your teeth an extra boost by oil pulling with essential oils.

When you swish oil around in your mouth, plaque get stuck to the oil and dissolve in the liquid oil. So you are removing a lot of bacteria, which is found in plague and leads to all kinds of oral health problems, every time you oil pull.

I added oil pulling to my life when I found out I had 6 cavities! I was able to heal these cavities naturally by eating a traditional diet with the proper nutrients and supplements added. You can click here to read more about how I healed my tooth decay. 

What Oil to Use:

Traditionally, sesame seed or sunflower oil was used among the early oil-pullers, however, my personal favorite is coconut oil because it has so many health benefits. You can use any oil that you like, just stay away from canola or vegetable oil.

Adding Essential Oils to Your Oil Pulling Regime:

Adding in therapeutic-grade, 100% pure, essential oils into your oil pulling regime is a great way to give your health a supercharge!  I buy my essential oils at wholesale price and I encourage you to do the same! You can CLICK HERE and learn how to get your essential oils from me at wholesale cost!

Here’s a few suggestions to help with oral issues:

  1. Peppermint essential oil.
  2. Clove essential oil.
  3. Basil essential oil.
  4. Melaleuca essential oil.
  5. Myrrh essential oil.
  6. OnGuard essential oil (my favorite choice).

How to Oil Pull:

  1. First thing in the morning, put 1 teaspoon-1 tablespoon of coconut/or sesame oil in your mouth. Use 1 teaspoon if you are just starting out or if you have a gag reflex. Swish it around till it melts.
  2. Open your mouth and add 2 drops of your favorite essential oil.
  3. Swish the oil around in your mouth (like you would with mouthwash) for 15-20 minutes. I like to push it through my teeth and around the sides of my mouth. Don’t swish hard or your cheeks will start to hurt! I do this while I’m doing my morning chores and milking the goat! But you can also do it while your getting ready in the morning!
  4. Spit the oil out in your trash can! Do not swallow it…it is now loaded with bacteria and toxins.
  5. Brush your teeth with a safe toothpaste! I use my homemade toothpaste, but THIS ONE is great if you can’t make your own!
  6. Happy Oil-Pulling!

 CLICK here to Start Using Essential Oils! 

Oil Pulling


Filed Under: DIY, DIY Beauty Recipes, essential oils, Living Sustainably, Natural Living, Nutrition

Spiced Chai Lip Balm Recipe

August 4, 2014 by Jackie Ritz 26 Comments

I love chai tea and the way the spices in a chai tea smell. I have been making my own lip balm for years now, usually I just put my All Purpose Salve on my lips, but I wanted something a little “fancier” so I created a delicious Spiced Chai Lip Balm recipe that I know you will enjoy.

I wanted to stay away from citrus essential oils because they are photo toxic and it is the summer! You can easily double or triple this recipe to make extras to give away to your friends!

A NOTE OF ESSENTIAL OILS: I only recommend therapeutic-grade essential oils. You can purchase therapeutic-grade essential oils at wholesale cost (CLICK HERE to learn more!).

DIY Spiced Chai Lip Balm

makes 10 3ml jars

INGREDIENTS: 

  • 1 Tablespoon of Coconut Oil 
  • 1 Tablespoon of Cacao Butter or Raw Shea Butter (can leave this ingredient out in the winter but it helps hold the balm together during the hot summer months)
  • 1 Tablespoon of Beeswax Pastilles
  • 1/4 Teaspoon of Castor Oil for shine
  • 1/4 Teaspoon of Vanilla
  • Essential Oils: 4 drops of Cinnamon Bark or Cassia, 4 drops of Ginger, and 4 drops of Clove. You can also substitute Black Pepper essential oil and/or Coriander Essential oil if you want! (where to buy)
  • Small Containers or reused lip balm tubes

DIRECTIONS: 

  1. Add the coconut oil to a small pan and simmer till melted.
  2. Add the beeswax pellets and cacao/or shea butter and simmer for about 5-10 minutes till melted.
  3. Add the castor oil. Stir and remove from stove.
  4. Let sit till the mixture is warm to the touch, but not thick. It’s easier to pour into containers when it is still liquid.
  5. Add in the vanilla and essential oils. Stir.
  6. Pour into your containers and enjoy!

Spiced Chai Lip Balm www.thepaleomama.com

Filed Under: DIY, DIY Beauty Recipes, essential oils, Living Sustainably, Natural Living

Tallow Butt Balm

June 3, 2014 by Jackie Ritz 5 Comments

Tallow Butt Balm | www.thepaleomama.com.001

I’m so excited to have my friend Kate from Venison for Dinner (don’t ya just love that name!) sharing this AWESOME recipe on my blog today. Kate is a stay at home mom of 2 little boys living a homemade life on the West Coast of British Columbia. She enjoys to cook and bake from scratch. Through hunting and homesteading, Kate and her family produce more than enough to fill their own meat and dairy needs, happily helping others start their own homesteading journey along the way. Kate also has a passion for essential oils and home healing with natural medicine. You can follow her on HER BLOG and Facebook page as she hones her homesteading skills, making her ‘whey’ through one mountain of raw milk at a time. Maybe you too will be inspired to butcher your own deer or try your hand at natural medicine!

Please welcome Kate…

You know the scene, you’re changing a diaper, you open it up and baby’s got a sore bum. It hurts YOU to see their bum all red and you want that pain GONE!

So what do you reach for? You grab the the diaper rash cream and you smear it all over. But did you know that many of those commercial creams contain petroleum products, as well as oils that are most likely rancid, alcohols, and so many more ingredients I can barely pronounce! (And I’m a good reader!) Here a popular diaper rash cream company discloses every ingredient. I was shocked at how these are allowed to be put on our precious babies skin! Your other option is to buy natural creams, which, lets be honest, aren’t always that natural, or cost you a good chunk of change.

IMG_7390

After our second child was born we got serious about making all our own natural personal care products! My sister made us a fancy salve that we used and while terrific, it was complicated to make. I then came up with my 3 ingredient Diaper Rash Ointment and while it’s such a basic and effective ointment to whip together…Mama’s got a new balm in town!

TALLOW!

IMG_7389

When we originally made tallow from the milk cow we had to butcher, we only used it for cooking. Then recently we were lucky enough to be gifted loads of grass-fed Jersey fat from a friends steer and since it was fresh I got to work processing it. (using the same process as this lard.) After it was cooled down I made a balm since I’d seen ideas for it all over the web, and before I knew it, it had become my go-to “Butt Balm”! The beauty of this thick salve is that it’s pretty much the same texture at all average room temperatures (unlike the coconut oil based diaper rash ointment I also use that drastically fluctuates) and it works as a barrier cream AND a ‘medicated’ cream for rashes.

So what is Tallow vs Lard? Tallow is the rendered fat from a ruminant (Cow, Deer, Sheep, etc) whereas Lard is the rendered fat from a single stomached mammal (Pig, Bear, etc). Tallow has a stronger taste that lard so while it doesn’t pair as well with sweet foods, its amazing for savoury cooking. Why is our Tallow so yellow? Jerseys (And Guernseys to my knowledge) can’t process Beta Carotene. That’s what makes carrots orange, and it’s also in the hay and grass they eat. Instead of digesting it, they deposit it in fat! That’s why jersey cream is especially yellow (even more so in time of lots of green grass) and in the fat in their meat!


Why would I want to smear beef fat on my baby’s bum?! I bet you won’t take me just saying “Because you should!!: So here’s the top reasons we choose to make our own Tallow Butt Balm;

  • Tallow is high in saturated fats with a similar profile to those just below our skin, therefore it’s easily absorbed leaving skin feeling well nourished. This helps regenerate new skin. It’s important to use GRASS FED tallow to really reap the benefits.
  • Quality Control! I recommend you purchase therapeutic-grade essential oils. 
  • Frugal! I save loads of money by making my own Butt Balm. Yes I was given the beef fat for free, but even if you tracked down and bought it I bet you’d still save money. Better yet, if you’re buying 1/4 or 1/2 a cow, ask to get the fat back with it! You’ll find more uses that just a butt balm.
  • I want to use natural/as close to nature, well raised, animal products wherever I can because I believe good fats are good for you! (And I know Jackie agrees!) Petroleum products have no place on a person’s body!
  • Let’s just say Mama takes a dab for her face and hands on a regular basis two 😉 Might as well kill two lotion birds with one stone right!?

Tallow Butt Balm

Makes enough to fill a 1 cup ‘Salmon’ or ‘Jam’ jar. The amount of essential oils makes it a just below 1% dilution.

INGREDIENTS:

  • 3/4 c+ a generous TB (200 mls) of Grass Fed Tallow
  • 4 tsp OR 1 generous TB (20 mls) of Organic, Cold Pressed Olive oil  (This helps it stay a wee bit softer)
  • 20 drops EACH Frankincense, Melaleuca and Lavender Essential oils. (See above note)


DIRECTIONS:

  1. GENTLY melt tallow and olive oil together over LOW heat, just until melted. If you’ve accidentally heated too much, no fear, but let it cool down until you can comfortably hold you finger in before adding in essential oils.
  2. Now slather away knowing you’ve made a terrific ‘butt balm’ for your baby! (I won’t tell if you put it on your own skin!)

tallow butt balm pinterest.jpg

Filed Under: DIY Beauty Recipes, essential oils, Homesteading, Living Sustainably, My Recipes, Natural Living, Paleo Baby Tagged With: babies, diaper rash cream, essential oils, natural, tallow butt balm

Cultured Dairy: How to Make 1 Stick of Butter, 1 Pint of Sour Cream, and 1 Pint of Buttermilk with JUST ONE Quart of Cream!

May 1, 2014 by Jackie Ritz 50 Comments

Cultured Dairy .001

Before you go jumping down my throat about posting this because it’s dairy, I want to make sure I mention that my family consumes raw dairy. I have always been open about that and I feel it is something that my family thrives on.

So, am I still Paleo? I don’t really like labeling myself as anything. We eat by a Paleo template and include raw dairy in our diet. You can click here to see why my family consumes raw milk. 

My goats are due to have babies in June, so the 2 months prior to birth, we are giving them a break from milking. It’s sad not to have fresh, raw goats milk everyday, but I am lucky to have lots of farms nearby that have raw milk. This past week I went with raw cow milk from Jersey’s….mostly cause raw goats milk is $12 a gallon! Yikes! I’ll just wait for my goats to kid in June!

Raw dairy is extremely nutritions, but cultured (fermented) dairy takes it to a whole new level. Culturing helps to break down casein, or milk proteins, one of the most difficult proteins to digest. It, also, restores enzymes that may have been destroyed during pasteurization including lactase, which helps to digest lactose (milk sugar) and numerous enzymes, which help the body absorb calcium and other minerals.

In addition, cultured dairy provides beneficial bacterial and lactic acid to help your digestive tract stay healthy. Click here to read all the benefits of raw cultured dairy. 

Fun with Cultured Dairy:

How to Make 1 Stick of Butter, 1 Pint of Sour Cream, and 1 Pint of Buttermilk with JUST ONE Quart of Cream! 

Tools Needed: 

  • Wooden Spoon
  • Food Processor 
  • One Quart of Cream (preferably raw, but not necessary)
  • 2 Pint sized mason jars
  • One Cheesecloth (not necessary, you can use your hands)

Directions: 

Step One: Culture Your Cream. Take your quart of cream and set it out on the counter for 8 hours to sour with the lid on.

IMG_9054

Step Two: Make the Cultured Butter. Take one pint (2 cups) of the cream and pour it into your food processor. Set the other 2 cups aside. Turn your food processor on high and allow the blades to “churn” the cream into cultured butter. This takes roughly 10 minutes. When you start to see clumps forming in your cream, turn off your food processor and use your wooden spoon to push the butter to one side.

IMG_9056

Scoop out the cultured butter and place it in a cheesecloth. Gently squeeze out all the cultured buttermilk back into the food processor bowl with the rest of the buttermilk.

IMG_9060

Place the butter in a bowl with ice water and use your spoon to really push out any more buttermilk. Make sure to get as much excess liquid out. The ice water helps to firm up your butter. Remove the butter and use your hands to squeeze out any more water and form into whatever shape you would like. You have cultured butter!

Step Three: Make Your Buttermilk. Pour all your buttermilk leftover from making the butter into a pint-sized mason jar. You have cultured buttermilk!

Step Four: Make Your Sour Cream, aka Cream Fraiche’: Now take the other 2 cups of cultured cream that you set aside, and pour it into a pint-sized mason jar. Take one tablespoon of the cultured buttermilk that you made and put it inside the jar with the cream. Put the lid on and shake the jar to incorporate the cultured buttermilk with the cream.

Leave your jar on your counter or in a warm spot for 12 hours to culture even more and thicken. Chill well! You have European Style Sour Cream!

You will love this European Style Sour Cream that is also known as Creme Fraiche’. It is just like sour cream but much tastier. Put it on your potatoes, in your soup, on your eggs, and anywhere else you like to put sour cream. To make more Creme Fraiche’, follow Step Four above but use one tablespoon of leftover Creme Fraiche’, instead of cultured buttermilk, to culture another pint of cream! You can do this 6-8 times before you need to start over with cultured buttermilk!

I hope you have fun doing this! Let your kids help you and make it a fun kitchen experiment! 

Cultured Dairy- How to Make butter, buttermilk, and sour cream from 1 quart of cream! .001


Filed Under: DIY, Homesteading, Living Sustainably, My Recipes, Natural Living

Is Natural Living Driving You Crazy?

April 3, 2014 by Jackie Ritz 25 Comments

Is Natural Living Driving You Crazy.001

Was life less stressful for you pre-crunchy? Were you happier before you *knew* all these dangers and toxins and BPA and OH MY GOD DOES IT EVER END?

Do you feel more guilty being a “natural” mom because now you have to live up to the persona? Now you have to make sure you freaking read everything?!

Did your transformation into living natural become a transformation into now feeling like you suck at everything? At least *before* you didn’t know you were choosing harmful ingredients or detergent that could blow up a house. You were oblivious to it, right? You just enjoyed your little, happy life without giving anything else a thought. It was nice.

But now you see all these warnings and labels and artificial food colorings and your brain is about to explode. How can you be a good mom now and CHOOSE to buy something that has corn syrup in it?

Now you have to soak your nuts (hehe!) for 100 hours, and dehydrate your own jerky. You literally cry when you drive through Chick-Fil-A because you are submitting your kids to such dangerous chemicals in the food.

You feel more guilt.

You feel more stressed.

You feel less happy.

You feel less functional.

You….feel……….miserable, exhausted, and anxious.

You don’t enjoy this beautiful life anymore cause you are more stressed about the ugliness in this world. You no longer enjoy learning about natural and healthy living, you stress out when new studies come out and more pressure is now on you.

You CANNOT read ANY more blogs or websites. It’s just too much. You’ve blocked them from your feed. You are on healthy education overload and you are about to throw in your natural living, crunchy towel for good.

You know what moms…AIN’T NOBODY GOT TIME FOR ALL THAT.

The point is that you are TRYING. You are learning. You are making your home the best place that you can for your children. Most moms forget to give their kids their supplements, use disposable diapers over cloth, and forget to soak their nuts. Hell, I order pizza on occasion for my family! It’s OKAY. My kids are not going to die.

Yes, ignorance was bliss before. You gave your dogs crappy kibble without a second thought and your kids loved those Gerber Puffs. C’mon moms! You aren’t going to damage your kids, or your dogs. It’s not the “once or twice” that hurts us, it’s the lifetime of it.

If the natural remedies aren’t working, there is an amazing thing known as medicine. It’s not evil if you do it the right way. It’s a gift.

This is not the granola olympics and we are not trying to win the award of the crunchiest mom. Stop trying to live up to your fantasy Pinterest world and if you have to stop reading all the new articles that come out (don’t stop reading mine!), then so be it!

Go back to the basics. Read my post on how you might not be perfect, but you are enough for your family or this post on how this mother is done trying to make her kid’s childhood magical.

What is it that is most important to you?

Write out 5 things that are the MOST important to you and go from there. If you love pizza and so do your kids? Then eat the damn pizza on occasion. Your kids aren’t going to look back at you and say, “geez mom, how come you let me eat pizza so much?”

What is important to you? Is breastfeeding important to you? Put your energy into that.

Are you literally HATING cloth diapering? Then stop and buy a safe alternative.

Is making your own detergent getting annoying? Then don’t.

Make a decision to do the best that you can and then leave the rest to grace. Grace covers our inadequacies and our guilt and it fills us up with joy.

Go look at your kids face. Do you see a child who is wishing for more from you?

Tomorrow is a new day, my friends!

Is Natural Living Driving You Crazy? | www.thepaleomama.com.001

Filed Under: family, Living Sustainably, Natural Living, Nutrition, Paleo Education

« Previous Page
Next Page »

Primary Sidebar

  • Facebook
  • Instagram
  • Pinterest
  • RSS
  • YouTube

Hi, I'm Jackie Ritz and welcome to The Paleo Mama! I'm a published author, certified herbalist, and voracious researcher of natural medicine and nutrition. I'm glad you're here and I hope you stick around for awhile!

Recent Posts

  • When God Says Pause: Why I Took a 5-Year Break from My Online Business
  • How to Quit Facebook but Keep Your Business Profile
  • Leaving the City for the Country
  • Natural Way to Heart Health

MEAL PLANS

Biblically clean meal plans that are for those love to cook real food

Read More

Footer

Our Blog

The Paleo Mama blog provides simple answers for healthier families through research, tutorials, recipes, and simple remedies for daily needs!

  • Health
  • Essential Oils
  • Recipes
  • Remedies
  • Natural Living
  • Meal Plans

Stick around!

You’ll get instant access to a library of natural remedies and real, paleo food, including our ebooks and free guides we send out.

  • Home
  • Disclosure/Disclaimer
  • Privacy Policy
  • Advertise
  • Contact Me

Copyright © 2025 · Wellness Pro on Genesis Framework · WordPress · Log in