• Skip to primary navigation
  • Skip to content
  • Skip to primary sidebar
  • Skip to footer

The Paleo Mama

Homegrown and Handmade

  • About
  • Blog
    • Podcast
  • Meal Plans
  • Essential Oils
  • Our Farm
    • Great Pyrenees Puppies
    • Goats
      • Goats for Sale
      • Goat Sales Policy
      • Nigerian Dwarf Bucks
        • Ranchocabra Lunar Eclipse

Ketogentic

Sheet Pan Brunch

January 24, 2019 by Jackie Ritz Leave a Comment

Sheet pan. It’s one pot meals on crack! Throw some meat, veggies and a drizzle of fat or oil and you are done mama! Sheet pan meals make clean up easier and don’t require any fancy equipment. Also, I’m a sucker for a one pot meal, because, let’s face it, there’s nothing worse than being hungry and having nothing to eat. So, why not have some ingredients on hand that you can whip up a quick

This past spring we raise two pigs for meat. Y’all — if you have never tasted homemade bacon, then you are missing out! We took the side meat and smoked it for a awhile and then sliced it into bacon-sized slices and it’s so dang good. 

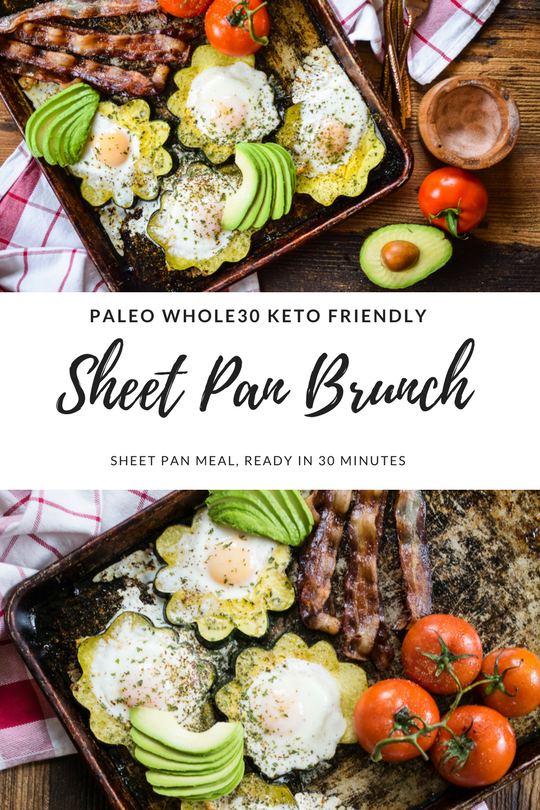
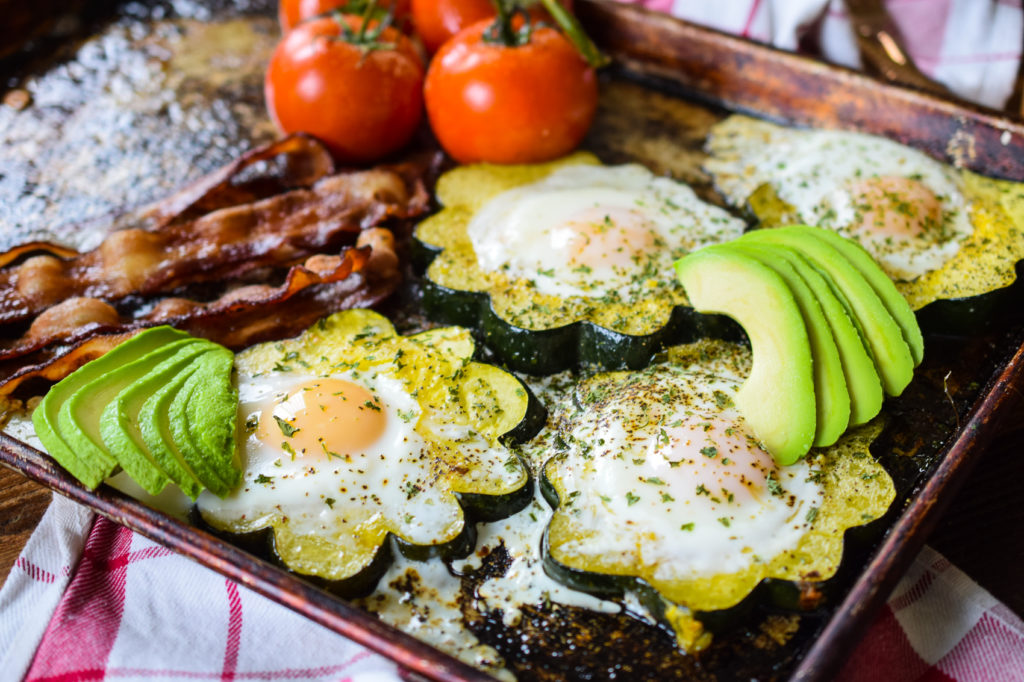
Pork has been at the center at most our meals for the last few months and I had to, just had to, share a fast and easy sheet pan brunch idea that you can make for breakfast or brinner! 

Sheet Pan Brunch

Prep Time: 5 minutes Cook Time: 25 minutes Serves 4

Ingredients: 

  • 1 small acorn squash
  • 4 vine ripe tomatoes
  • 2 teaspoons avocado oil
  • 1 teaspoon sea salt, divided
  • 1 teaspoon black pepper, divided
  • 1 teaspoon garlic powder, divided
  • 4 slices sugar free bacon
  • 4 large eggs
  • ½ teaspoon dried parsley

Directions: 

  1. Pre-heat the oven to 400F.
  2. Slice your acorn squash into ¼ inch rounds, remove the seeds. Line up 4 the rounds on a sheet pan. Put your vine ripe tomatoes next to them. Leave space for the bacon. Drizzle everything with avocado oil and sprinkle with ½ teaspoon of each of the seasonings.
  3. Set in the oven, middle rack and roast for 10 minutes. Then open the oven and add the bacon, lining up the slices next to each other. Close the oven, roast for another 10 minutes.
  4. Open the oven and carefully crack an egg into the center of each squash round.
  5. Sprinkle the eggs with the remaining seasonings, and the parsley.
  6. Bake for 5 minutes or until the eggs whites are cooked.
  7. Add avocado to the sheet pan if you like or fresh herbs! Serve right away, share and enjoy!

Filed Under: Food Recipes, Ketogentic

Super Seed Keto Chocolate Bark Recipe

February 2, 2018 by Jackie Ritz Leave a Comment

I’ve been on a mission to find a delicious substitute for my Lily chocolate bars that I buy from the store. They are SOOOO expensive and the only chocolate I will eat because they are low-carb. It’s hard to find a good low-carb, keto chocolate bark. You can buy some chocolate bars at the health food store that are sweetened with a low-carb sweetener like stevia or erythritol, however it comes at a hefty price tag. 

So I set out on a mission to make a keto chocolate bark that is delicious and inexpensive. And to make it healthy for you, I added some super seeds in the recipe that you are going to love and help fill you up! 

Enjoy! 

Jackie xoxo 

Super Seed Keto Chocolate Bark 


You will need:

  • 5×8 loaf pan
  • Parchment paper

 Ingredients:

  • ½ cup coconut oil
  • ¼ cup sunflower seed butter
  • ¼ cup cacao powder
  • ½ tablespoons pepitas (raw pumpkin seeds)
  • ½ tablespoons chia seeds
  • ½ tablespoons sunflower seeds
  • ½ tablespoons sesame seeds
  • 1 tablespoons erythritol (Keto-friendly sweetener)
  • pinch of salt

Directions: 

  1. Gently heat coconut oil and sunflower seed butter mixing until smooth. You can do this my microwaving for 30 seconds or heating over medium heat in a skillet (if you’re anti-microwave).
  2. Add sweetener and cacao powder and mix until smooth.
  3. Pour the chocolate mix into lined loaf pan.
  4. Sprinkle the seeds and salt over the chocolate.
  5. Place on a flat surface in the freezer to harden.
  6. Once set, cut into pieces and store in an airtight container in the freezer.
  7. Enjoy your keto chocolate bark with your friends this Valentines! 

Super Seed Keto Chocolate Bark
2018-02-02 13:08:55
Serves 6
A low-carb and keto-friendly chocolate bark recipe that is loaded with super seeds!
Write a review
Save Recipe
Print
Ingredients
  1. ½ cup coconut oil
  2. ¼ cup sunflower seed butter
  3. ¼ cup cacao powder
  4. ½ tablespoons pepitas (raw pumpkin seeds)
  5. ½ tablespoons chia seeds
  6. ½ tablespoons sunflower seeds
  7. ½ tablespoons sesame seeds
  8. 1 tablespoons erythritol (Keto-friendly sweetener)
  9. pinch of salt
Instructions
  1. Gently heat coconut oil and sunflower seed butter mixing until smooth. You can do this my microwaving for 30 seconds or heating over medium heat in a skillet (if you’re anti-microwave).
  2. Add sweetener and cacao powder and mix until smooth.
  3. Pour the chocolate mix into lined loaf pan.
  4. Sprinkle the seeds and salt over the chocolate.
  5. Place on a flat surface in the freezer to harden.
  6. Once set, cut into pieces and store in an airtight container in the freezer.
  7. Enjoy your keto chocolate bark with your friends this Valentines!
By The Paleo Mama
The Paleo Mama https://thepaleomama.com/

Filed Under: Ketogentic, My Recipes

Whole30 Instant Pot BBQ Chicken – plus a Sugar Free BBQ Sauce!

January 10, 2018 by Jackie Ritz Leave a Comment

Easy and delicious, this sugar free BBQ sauce is delicious and easy to make, blend it up and pour over the chicken. Ready in 30 minutes! I’m confident you are going to love this Whole30 Instant Pot BBQ Chicken recipe! Remember to snag these Whole30 Meal Plans to help support your meal planning when you aren’t using your Instant Pot. 

Be sure to check out my favorite Whole30 Instant Pot recipes here. 

Whole30 Instant Pot BBQ Chicken

Ingredients: 

  • 1 ½ pounds boneless skinless chicken thighs
  • 1 teaspoon salt
  • 1 tablespoon avocado oil or coconut oil

For the Sauce: 

  • ½ cup Whole30 compliant marinara sauce or tomato sauce
  • 2 tablespoon coconut aminos
  • 2 cloves fresh or dried garlic
  • 3 tablespoons coconut or red wine vinegar
  • 2 pitted medjool dates (optional)
  • 1 tablespoon Dijon mustard 
  • 1 tablespoon Red Boat fish sauce
  • 1 teaspoon Chinese 5 spice
  • 1 teaspoon onion powder
  • 1 teaspoon smoked paprika or ground black pepper 

Instructions: 

  1. Place the chicken with the salt and oil in your pressure cooker. 
  2. Combine all of the bbq sauce ingredients in your blender and blend until smooth. 
  3. Add half of the sauce to the pressure cooker with the chicken. 
  4. Set to cook on high for 15 minutes. 
  5. Release the pressure manually. Open the lid and set to reduce or sauté for 10 minutes.
  6. Use two forks to shred the chicken while it reduces, once the liquid in the pressure cooker has reduced by half stir in the remaining bbq sauce. Stir to combine and serve! 

  • Prep 5 minutes
  • Serves 6
  • Per serving: Calories 224, Fat 10.2, Carbs 4.5, Protein 27.5  

Whole30 Instant Pot BBQ Chicken
2018-01-10 22:05:55
Serves 6
Write a review
Save Recipe
Print
Prep Time
5 min
Cook Time
25 min
Total Time
30 min
Prep Time
5 min
Cook Time
25 min
Total Time
30 min
Ingredients
  1. 1 ½ pounds boneless skinless chicken thighs
  2. 1 teaspoon salt
  3. 1 tablespoon avocado oil
  4. ½ cup Whole30 compliant marinara sauce or tomato sauce
  5. 2 tablespoon coconut aminos
  6. 2 cloves garlic
  7. 3 tablespoons coconut or red wine vinegar
  8. 2 pitted medjool dates (optional)
  9. 1 tablespoon Dijon mustard
  10. 1 tablespoon Red Boat fish sauce
  11. 1 teaspoon Chinese 5 spice
  12. 1 teaspoon onion powder
  13. 1 teaspoon smoked paprika or ground black pepper
Instructions
  1. Place the chicken with the salt and oil in your pressure cooker.
  2. Combine all of the bbq sauce ingredients in your blender and blend until smooth.
  3. Add half of the sauce to the pressure cooker with the chicken.
  4. Set to cook on high for 15 minutes.
  5. Release the pressure manually. Open the lid and set to reduce or sauté for 10 minutes.
  6. Use two forks to shred the chicken while it reduces, once the liquid in the pressure cooker has reduced by half stir in the remaining bbq sauce.
  7. Stir to combine and serve!
Notes
  1. Serves 6
  2. Per serving: Calories 224, Fat 10.2, Carbs 4.5, Protein 27.5
By The Paleo Mama
The Paleo Mama https://thepaleomama.com/

Filed Under: Food Recipes, Ketogentic, My Recipes, Whole30

How to Make a Collagen Matcha Latte Recipe

January 9, 2018 by Jackie Ritz 13 Comments

There’s something about the chill in the air that makes me want to make my daily Collagen Matcha Latte recipe, sit down in our living room (which I recently won a year-long debate about why we should move our TV out of our living room…score!), read a book under a fluffy blanket, turn on the fireplace, and sip on the green, frothy, matcha ecstasy (I kid you not). 

This Collagen Matcha Latte recipe has become part of my daily rituals. I’ve posted about it many times on my Instagram page and figured it was time to share this recipe I have been keeping all to myself like a big block of Lily’s chocolate. 

What is Matcha?

Matcha tea —the green powdered tea imported from Japan—is all the craze right now, and rightly so. 

  • It relaxes you without making you sleepy.
  • It delivers caffeine into the bloodstream in a much more measured way than coffee.
  • Its caffeine effects last up to 4-6 hours, compared to coffee’s high and then quick crash.
  • There is evidence that it has some weight loss benefits.

There’s “a latte” of this Collage Matcha Latte recipe to go around. If you haven’t ever tried adding collagen to your drinks and smoothies, then let me convince you of this (new-ish) superfood that is taking over the Google trends. 

What is Collagen?

Collagen, the most abundant protein in the body is made of long chain amino acids. This protein is only found in animals. Even in humans from skin to blood vessels. The highest concentration is found in bones and connective tissue. 

Collagen is what makes our hair and nails strong, makes our skin bounce back and it even repairs the gut lining. Unfortunately, with age, the naturally occurring collagen in our bodies begins to decline. This is why we get wrinkly! 

Fortunately, quality collagen supplements are ever so popular and making them quite easy to purchase. The collagen supplements come in a powder form. Made from the bones and connective tissue of pastured animals. They are completely tasteless, which is why you can get away with adding it to your coffee or your new collagen matcha latte tea!

What is the difference between collagen and gelatin?

Collagen and gelatin supplements come from the same place. The gelatin however will gel liquids, while collagen is water soluble. The reason for this is that the collagen proteins are further broken down so they dissolve in cold fluid. That is why collagen supplements often say hydrolyzed collagen and/or collagen peptides. 

Benefits of collagen?

Supplementing with collagen has many benefits that include stronger and healthier hair, nails and skin. More importantly collagen proteins and amino acids heal and patch up leak gut, contributing to better overall health. 

Collagen is a fantastic source of protein too, with about 11g of protein per scoop. This allergen friendly, unflavored, unscented, clean protein supplement can be added to smoothies, soups, coffee and even tea!

Try adding in 2 scoops of collagen to your daily routine and see what benefits you experience! 

And you’re welcome 🙂 

Collagen Matcha Latte Recipe

Ingredients:

  • 12 ounces steamed water
  • 1 teaspoon matcha powder
  • 5-10 drops liquid stevia  
  • 1/2 teaspoon Ceylon cinnamon
  • 1 tablespoon coconut or MCT oil (if you have never added coconut oil or MCT oil to your hot beverages, then start by adding 1 teaspoon to avoid digestive discomfort)
  • 1 tablespoon grass fed butter or ghee (same tip here! Start with 1 teaspoon) 
  • 2 scoops collagen 

Instructions: 

  1. Heat 12 ounces water until steaming, not boiling. 
  2. Combine the hot water, matcha, stevia, cinnamon, coconut oil and butter in a blender. 
  3. Blend until frothy, lower the power and add in the collagen, blend for another 10 seconds until dissolved. 
  4. Sip, enjoy, and be sure to share this Collagen Matcha Latte Recipe with your friends and family! 

Collagen Matcha Latte
2018-01-06 18:59:45
Serves 1
A delicious frothy matcha latte that includes Collagen, one of the best superfoods for your health!
Write a review
Save Recipe
Print
Prep Time
5 min
Prep Time
5 min
Ingredients
  1. 12 ounces steamed water
  2. 1 teaspoon matcha powder
  3. 20 drops liquid stevia
  4. 1 teaspoon Ceylon cinnamon
  5. 1 tablespoon coconut or MCT oil
  6. 1 tablespoon grass fed butter
  7. 2 scoops collagen
Instructions
  1. Heat 12 ounces water until steaming, not boiling.
  2. Combine the hot water, matcha, stevia, cinnamon, coconut oil and butter in a blender.
  3. Blend until frothy, lower the power and add in the collagen, blend for another 10 seconds until dissolved.
  4. Sip, enjoy!
Notes
  1. Tips: If you have never added healthy fats to your hot beverages, start by just adding 1 teaspoon of each and then increase.
By The Paleo Mama
The Paleo Mama https://thepaleomama.com/

Filed Under: Food Recipes, Health, Ketogentic, My Recipes, Nutrition

Keto Pumpkin Cheesecake Bites

November 4, 2017 by Jackie Ritz Leave a Comment

Hey you pumpkin friend! I got you covered this year. I know you are probably trying to stay Keto, Paleo and low-carb this holiday season, so let me help you out. Keto Pumpkin Cheesecake Bites are just for you, love. And because I’m in Florida right now and don’t feel like turning on my oven only to have my entire RV home become 90 degrees….I’m giving you these NO-BAKE pumpkin cheesecake bites to you. 

You’re welcome 🙂 

Keto Pumpkin Cheesecake Bites

For the crust:

  • 2 cups fine ground almond meal
  • Pinch of salt
  • ¼ teaspoon keto-friendly sweetener (I use this one)
  • 1/3 cup melted coconut oil
  • 2 tablespoon water

For the filling:

  • 1 can pumpkin puree (unsweetened)
  • 2 teaspoons pumpkin spice
  • 2 TB of Keto-friendly sweetener (I use this one)
  • ½ teaspoon fine salt
  • 1 teaspoon vanilla extract
  • 2 tablespoons melted coconut oil
  • 2 tablespoons pastured gelatin
  • ½ cup warm water
  • 8oz full-fat cream cheese

You will need mixer, a 8×8 cake pan and parchment paper

Directions:

  1. Combine all of the dough ingredients in a bowl and mix with a hand mixer until a crumbly, moist dough forms.
  2. Line your loaf pan with parchment paper. Add the dough to the pan and press it down into one even layer with your fingers. Set in the freezer while you make the filling.
  3. Wipe out the same bowl and add in the pumpkin puree, monk fruit, coconut oil, spice and salt. Mix with hand mixer  until fully combined and smooth.
  4. Sprinkle in the gelatin and mix until combined. Then drizzle in the warm water until mix is smooth.
  5. Lastly add in the cream cheese beat again until the filling is smooth and light orange.
  6. Use a spatula to scrape all of the filling into the loaf pan. Spread evenly over the crust. Set back in the freezer to set for 40-60 minutes or in the fridge for at least 4 hours. It doesn’t need to freeze through; the gelatin will hold it together!
  7. To make sure it’s ready, give it a giggle or gently touch the center, it should be firm.
  8. Remove it from the freezer, lift the cheesecake up by the parchment paper and set on a cutting board.
  9. Cut into 10 even pieces, or more depending on how many bites you want to make!

Macros per square, makes 10 squares:

Cal 310, Fat 28.5, Fiber 3.5, Protein 5.3, Net Carbs 6.5

Keto Pumpkin Cheesecake Bites
2017-11-04 21:48:58
Serves 10
A delicious no-bake and gluten-free cheesecake for the pumpkin lovers!
Write a review
Save Recipe
Print
Prep Time
10 min
Prep Time
10 min
For the crust
  1. 2 cups fine ground almond meal
  2. Pinch of salt
  3. ¼ teaspoon monk fruit extract
  4. 1/3 cup coconut oil
  5. 2 tablespoon water
For the filling
  1. 1 can pumpkin puree (unsweetened)
  2. 2 teaspoons pumpkin spice
  3. 1-3 TB monk fruit sweetener
  4. ½ teaspoon fine salt
  5. 1 teaspoon vanilla extract
  6. 2 tablespoons coconut oil
  7. 2 tablespoons pastured gelatin
  8. ½ cup warm water
  9. 8oz full-fat cream cheese
Instructions
  1. Combine all of the dough ingredients in a bowl and mix with a hand mixer until a crumbly, moist dough forms.
  2. Line your loaf pan with parchment paper. Add the dough to the pan and press it down into one even layer with your fingers. Set in the freezer while you make the filling.
  3. Wipe out the same bowl and add in the pumpkin puree, monk fruit (start with 1TB and taste to see if you need more), coconut oil, spice and salt. Mix with hand mixer until fully combined and smooth.
  4. Sprinkle in the gelatin and mix until combined. Then drizzle in the warm water until mix is smooth.
  5. Lastly add in the cream cheese beat again until the filling is smooth and light orange.
  6. Use a spatula to scrape all of the filling into the loaf pan. Spread evenly over the crust. Set back in the freezer to set for 40-60 minutes or in the fridge for at least 4 hours. It doesn’t need to freeze through; the gelatin will hold it together!
  7. To make sure it’s ready, give it a giggle or gently touch the center, it should be firm.
  8. Remove it from the freezer, lift the cheesecake up by the parchment paper and set on a cutting board.
  9. Cut into 10 even pieces, or more depending on how many bites you want to make!
Macros per square, makes 10 squares
  1. Cal 310, Fat 28.5, Fiber 3.5, Protein 5.3, Net Carbs 6.5
By The Paleo Mama
The Paleo Mama https://thepaleomama.com/


Filed Under: Ketogentic, My Recipes

Souping – A Healthier Alternative to Juicing

October 27, 2016 by Jackie Ritz Leave a Comment


For years the best-known body system cleanse has been juicing. Juicing involves extracting the juice from fruits and vegetables using a cold-press juicer. The juice is loaded with vitamins, minerals, antioxidants, anti-inflammatory compounds and phytonutrients all in one easy drink. Juice cleanses have been widely used to cleanse the body and often are suggested as a sporadic fast of several days detox the body and kick start body systems into optimal function. But there have been negatives to juicing, including: the high cost of the fruits and vegetables as well as the expensive juicer you need to prepare the juices; negative symptoms like dizziness, headaches, weakness, and overwhelming hunger; and the high sugar/low fiber content of the juices after pressing.

What Is Souping?

Let’s start with this definition for souping:

It is a soup-only cleanse to heal and nourish your body with wholesome ingredients. It allows your body to detox naturally while simultaneously reducing inflammation, giving your body the nutrients it needs, and increasing circulation.[1]

Today many people have found juice cleanses to be too extreme, and are discovering that souping promises an easier detox than a juice cleanse. Just as there are many different approaches to juicing, so too there are many suggested approaches for souping. These include:

  • A 24-hour raw cleanse
  • A 3-day boost to your digestive system cleanse
  • The 5-day soup cleanse,
  • Following a prescribed program of specific soups
  • Choosing or making the soups you use for the cleanse

Each of these approaches share one common feature—you eat only soup for every meal of the day, and you follow this regimen for a chosen number of days.

I can easily see why souping is growing in popularity. There is nothing more soothing to me than a warm, tasty, homemade soup made with homemade bone broth (recipe here).  I want to take a closer look at this newer trend, and see if we can see what all the excitement is about!

What’s Healthier: Souping or Juicing?

Which is healthier is somewhat of a preference choice of the individual considering a cleanse. There are benefits and downsides to both. Take a look at some of the qualities of each in the table below: 

Souping Juicing
Offers variety Raw only product
Can be served in hot, warm or cold Served fresh (cold)
Contains fiber Almost no fiber, very high in carbohydrates and sugar
Contains proteins Enormous amounts of vitamins and minerals
Made from: fruits, vegetables, legumes, and even meat Made from vegetables and fruits only
More effective in suppressing hunger Easier to digest
More appropriate for long-term cleanses More appropriate for short-term cleanses
Lower in calories Higher in calories

Many people find that souping is more economical—if you are making your own soups. If you have tried juicing in the past, no doubt you’ve discovered that it takes a lot of fresh fruits and vegetables to get only a couple glasses of juice. Soups are really inexpensive to make, and you don’t need an expensive piece of equipment to make soup. In addition, you can store your soup in the fridge for several days, and for months in the freezer. Soups will not leave you feeling hungry, and you can use a wide variety of herbs, spices, and broth to make your soup.

How Many Days Do I Stay on the Soup Cleanse

There are a number of Soup Cleanse Programs that provide the soups you use and prescribe the number of days you stay on them, including:

  1. Splendid Spoon Soup Cleanse 
  2. Soupure 
  3. Dr. Oz’s 3-Day Souping Detox 
  4. Soupelina 
  5. Café West Express 

While these canned programs are handy to use and provide you with low calorie, low sodium, fiber-rich soups, you will find that they are pretty expensive to use. Since making soup is so easy, it is my recommendation that you take the plunge into making your own great tasting and often healthier homemade soups to use.

If you are making your own soups, and not following a Soup Cleanse Program the number of days you continue eating soups is up to you. However, like any other low-calorie plan, it is not advised that you eat only soups for more than a week or so.

What Kinds of Soup Do I Use?

Soup cleanses uses vegetables that are super low on the glycemic scale, which are also packed with fiber. Great veggies to include are: onions, beets, carrots, cauliflower, spinach, and dark, leafy greens and root vegetables. You can add fruits, legumes, and even meat, but this will raise the calorie count, so only 2-4 ounces of protein or legumes are recommended for each serving of soup.

The options are wide open for what you should include in your detox soup. You will want to use the healthiest, freshest ingredients possible. Stay away from any creamed soups, soups loaded with things like beans and beef (think chili), and soups filled with complex carbohydrates like root vegetables. Don’t add any grains (pasta, noodles) to your detox soups.

You can find many recipes for detox soups online. Note: One very important recommendation from me: Use only homemade bone broth as the base for your soups. Some of the variety of soups include:

  1. Vegetable only soup—There are dozens of good vegetable soup recipes online. One that you might want to consider can be found here. 
  2. Chicken Detox Soup—Chicken soup is loved by almost everyone, and it really doesn’t take a recipe to make. I love using my homemade bone broth, and throwing it into my slow cooker with some carrots, celery, maybe some onion, and my favorite spices (parsley, basil, rosemary, turmeric). But if you prefer to use a recipe, here is one that makes a great chicken detox soup. 
  3. Vegetarian Hot and Sour Soup—Traditionally this soup is made with pork or beef. I recommend using chicken or portabello mushrooms instead. You can find a recipe here.
  4. Potassium Balancing Soup—Potassium is one nutrient that can be lacking in a diet. This detox soup pays extra attention to it, and can bring it back into balance.
  5. Detox Green Machine Soup—This soup is all vegetables and herbs blanched, then pureed into a healthy, low-cal, detoxifying soup. (Here) 
  6. Carrot, Cumin and Ginger Detox Soup—Carrots are a good source of antioxidant Vitamin A and fiber. Cumin and ginger have curative properties and act as a cleansing agent for the body. You will find the recipe here. 

Why Should I Consider a Soup Cleanse?

Are feeling lethargic and fuzzy-headed? Have you gradually slipped off the healthy eating wagon and fell into a habit of eating unhealthy “Comfort” foods? Do you want to get healthier and to live a longer, more vibrant life? Are you trying to heal a chronic condition? Then cleansing is essential to your health and longevity. There are so many benefits to cleansing, including:

  • More energy
  • Healthier hair, skin and nails
  • Less frequent colds and flu
  • Reduced risk for chronic disease
  • Mental clarity and a sense of wellbeing
  • Freedom from food cravings
  • Freedom from joint and muscle pain and headaches
  • Sound and restful sleep
  • No more digestive distress
  • Enhanced libido
  • A much younger and more energetic body[2]

My Favorite Soup Recipes

I want to help you get started by sharing three of my favorite soup recipes. These will get you started, and are inexpensive and easy to make. Try them—you will like them!

1. Homemade Bone Broth

Homemade bone broth will be the base for just about any detox soup you make. I am absolutely passionate about making bone broth, and I make it at least once a week, using the bones from our own harvested chickens, or bones I’ve begged or purchased from neighbors, farm stands, farmer’s markets, and have even been known to beg for them from restaurants. I use either my slow cooker or instant pot to make the soup, which actually makes itself—all I have to do is throw the ingredients into the pot.

Items Needed

  • Slow cooker or Instant Pot (the instant pot is my preferred method now)
  • Approximately 2-3  good quality, organic bones (beef, pork, chicken, turkey, etc)
  • 1-2 Tbsp. of raw, apple cider vinegar (like this one) 
  • Vegetable scraps: I use 1 onion, 1 celery stalk, 1 carrot, 3 cloves garlic, 1 in knob of ginger, handful of herbs, salt and pepper

Instructions for Slow Cooker: 

Turn your slow cooker to high. Add your bones and vegetable scraps. Add raw apple cider vinegar (vinegar helps to extract minerals from the bones, but can alter the taste of the broth, so go easy with it). Add water to cover the bones, leaving about 1 inch of room at the top. Let it cook for 24 hours at least—48 hours or longer is ideal.

Allow it to cool a bit, and then pour it through a strainer and allow to cool fully. If you’ve used a lot of bones, your broth will gel in the fridge, but don’t fret if it doesn’t gel.

Instructions for Instant Pot (preferred method): 

Add your bones, 1 carrot, 1 celery stalk, onion, ginger, and apple cider vinegar to your Instant Pot. Add water to cover the bones. Press the “soup” button and adjust the time to 90 minutes. Allow it to naturally release. Cool for a little bit and pour it through a strainer and allow to cool fully. If you used a lot of bones, your broth will gel in the fridge, but don’t fret if it doesn’t gel (mine always gels in my Instant Pot…never in my Slow cooker). 

2. Homemade Chicken Vegetable Soup

There is nothing better than homemade chicken soup to soothe a cold or sniffles or to gobble up on a cold, blustery day. My homemade Chicken Vegetable Soup is adapted to the combination of spices and vegetables that my family loves. You can specialize it to your own preferences for your detox soup.

Ingredients

  • 4-5 cups of homemade chicken bone broth
  • 2-3 lbs. cut up or shredded chicken (we often use leftovers)
  • 2-3 cups carrots, chopped
  • 1-2 cups celery, chopped
  • ½ cup onion, chopped
  • 1 tsp, ginger, grated (or use ½ tsp. ginger spice)
  • 3-4 cloves garlic, minced
  • ½ Tbsp. basil
  • ½ Tbsp. parsley
  • 1 tsp. turmeric
  • Salt and pepper to taste
  • About 3-4 cups water

Instructions

Put your chicken broth in a crock pot and add your chopped vegetables and spices. Add water to cover your ingredients and leave an inch of water or so above the ingredients (depends on how juicy you want your soup). Cover the crock pot and cook on high for 4-5 hours, or low for 6-8 hours. Remove the chicken and shred it (if it wasn’t already shredded). Add it back to the crock pot and cook on low an additional hour. Adjust the salt and pepper before you serve it.

3. Homemade Turkey Soup

I love having enough leftover turkey after a great Thanksgiving meal to make some homemade turkey soup. My mother made sure she bought the biggest turkey available, and make turkey broth the day before Thanksgiving so she could throw the soup together right from the Thanksgiving table. I recommend my homemade turkey soup for anytime—not only during the holidays.

Ingredients

  • 1 gallon homemade turkey stock
  • 1 Tbsp. parsley
  • 1 Tbsp. pepper
  • 1 Tbsp. Himalayan sea salt
  • 1 tsp. oregano
  • 1 tsp. sage
  • 1 tsp. garlic salt
  • 1 tsp. poultry seasoning.
  • 1 lb. sliced or diced carrots
  • 1 bunch cut-up celery
  • At least 2 cups reserved turkey

Instructions

Put turkey stock in crock pot. Add spices and cut up vegetables. Mix well into stock. Cook on low 3-4 hours. Add reserved turkey pieces (cut into bite size pieces), and continue cooking 1-2 more hours. Taste and adjust seasoning as needed. This makes a great detox soup, and it freezes well.

Get Started

So…is the new trend of souping something you want to try. It is a pretty flexible plan, and you can make your choices of nutritious, low-calorie soups. Research online to find some of the best recipes you can for your family. You can soup cleanse for 3-7 days, eating only soups for each meal, or you can choose to eliminate one meal and substitute soup. Be sure that you are consuming only the most nutritious, healthy soups and/or other meal items. Be sure you drink lots of water while you are on the cleanse. This will help to move the toxins out of your body. I guarantee that when you finish, the negative symptoms that made you begin will be gone! 

Try it—you will like it.

souping an alternative to juicing

[1] https://www.harpersbazaar.com/beauty/diet-fitness/a14306/everything-you-need-to-know-about-souping/

[2] https://bodyecology.com/articles/your_body_needs_to_cleanse_pt2.php


Filed Under: 21 Day Sugar Detox, Budget, chickens, Grassfed Beef, Health, Homesteading, Ketogentic, Living Sustainably, My Recipes

Next Page »

Primary Sidebar

  • Facebook
  • Instagram
  • Pinterest
  • RSS
  • YouTube

Hi, I'm Jackie Ritz and welcome to The Paleo Mama! I'm a published author, certified herbalist, and voracious researcher of natural medicine and nutrition. I'm glad you're here and I hope you stick around for awhile!

Recent Posts

  • When God Says Pause: Why I Took a 5-Year Break from My Online Business
  • How to Quit Facebook but Keep Your Business Profile
  • Leaving the City for the Country
  • Natural Way to Heart Health

MEAL PLANS

Biblically clean meal plans that are for those love to cook real food

Read More

Footer

Our Blog

The Paleo Mama blog provides simple answers for healthier families through research, tutorials, recipes, and simple remedies for daily needs!

  • Health
  • Essential Oils
  • Recipes
  • Remedies
  • Natural Living
  • Meal Plans

Stick around!

You’ll get instant access to a library of natural remedies and real, paleo food, including our ebooks and free guides we send out.

  • Home
  • Disclosure/Disclaimer
  • Privacy Policy
  • Advertise
  • Contact Me

Copyright © 2025 · Wellness Pro on Genesis Framework · WordPress · Log in