• Skip to primary navigation
  • Skip to content
  • Skip to primary sidebar
  • Skip to footer

The Paleo Mama

Homegrown and Handmade

  • About
  • Blog
    • Podcast
  • Meal Plans
  • Essential Oils
  • Our Farm
    • Great Pyrenees Puppies
    • Goats
      • Goats for Sale
      • Goat Sales Policy
      • Nigerian Dwarf Bucks
        • Ranchocabra Lunar Eclipse

Natural Living

Spicy Paleo Lasagna

March 4, 2015 by Jackie Ritz 7 Comments

SpicyPaleoLasagna_H FB

Today I’m welcoming Angie from Simplicity in Bloom to the blog to share with you all her delicious, mouth-watering, Paleo Lasagna recipe! Thank you, Angie, for sharing this dairy-free and gluten-free lasagna with my readers! 

I love comfort foods and lasagna is one of the best!  It’s always filling, satisfying and is actually very easy to make.  One of my favorite things about lasagna is how many different ways it can be prepared.  Various types of meat, different levels of spice, even adding vegetables can change a tried-and-true comfort food into to a dish that is sure to please any family.

I usually prefer spicy food so I’m always looking for ways to add a little zing!  Recently I created a Paleo version of lasagna with lots of spice that I wanted to share.  No worries if spicy food isn’t for you – I’ve added notes in the recipe to tone it down for those with a milder palate.

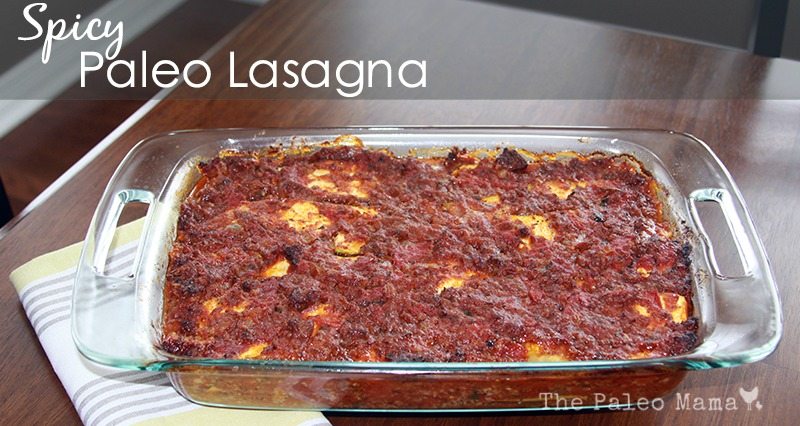
This recipe uses zucchini in place of traditional lasagna noodles and does not use cheese.  My kids were a little skeptical when I told them about this particular version of lasagna but after the first bite, they were asking when we could have it again.  BIG WIN!!  Give this recipe a try.  You will be pleasantly surprised!

Spicy Paleo Lasagna Recipe

INGREDIENTS: 

  • 2 lbs ground Italian sausage
  • 1 medium yellow onion, diced
  • 3 cloves garlic, minced
  • (2) 14.5oz cans diced organic tomatoes (I used Fire Roasted for more zing)
  • 6oz can tomato paste
  • 24oz pasta sauce (I used a spicy variety)
  • ¼ tsp cayenne pepper – optional
  • ½ tsp Italian seasoning
  • ½ tsp sea salt
  • ½ tsp ground black pepper
  • 2 Tbsp chopped fresh parsley
  • 2 Tbsp chopped fresh basil
  • 3 medium zucchini, sliced slightly thicker than a lasagna noodle

DIRECTIONS:  

SimmeringSauce

STEP ONE: Brown the meat in a large skillet.  Add the diced onions and garlic.  Once the meat is fully cooked, stir in the diced tomatoes, tomato paste, and seasonings.  Simmer uncovered for 1 ½ hours, stirring occasionally until the sauce has thickened.  

ZucchiniSlices

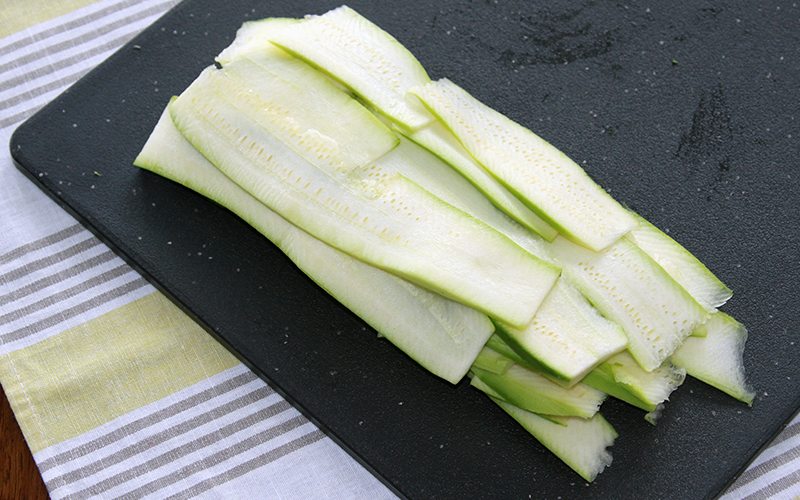
STEP TWO: While the sauce is simmering, peel the zucchini and slice it length-wise.  Make each slice a little thicker than a lasagna noodle.  A mandoline slicer would work well for this.  I don’t have one so my slices were less than perfect.  As it turns out, it didn’t matter.  Still tasted great! 

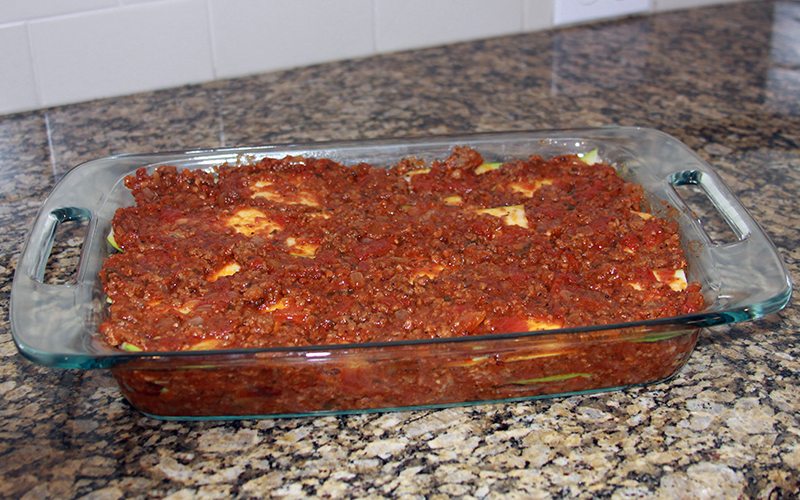
STEP THREE: Preheat the oven to 375 degrees F.  Grease your favorite lasagna baking dish (I used a 9”x13” glass pan).  

AssemblingLasagna

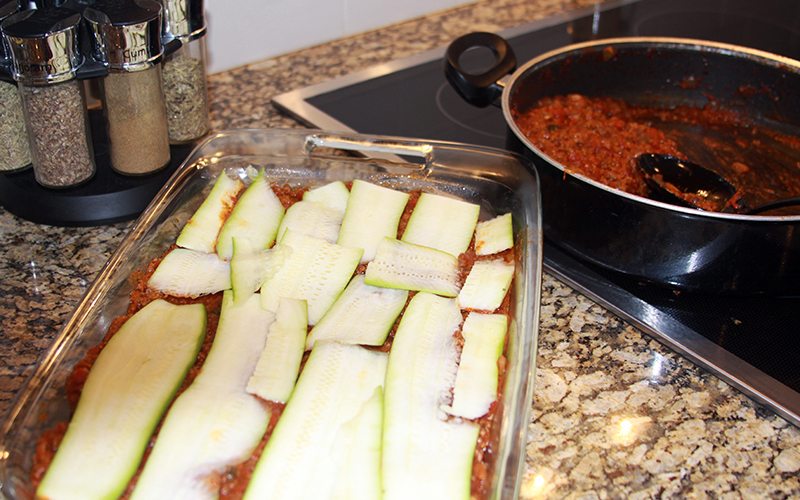
STEP FOUR: To assemble, spread a thin layer of meat sauce in the bottom of the baking dish.  Add a layer of zucchini slices.  Spread 1/3 of the remaining sauce over the zucchini.  Repeat layers ending with meat sauce on top.  Mine had three layers of zucchini slices and four layers of sauce including the sauce in the bottom of the baking dish.

ReadyToBake

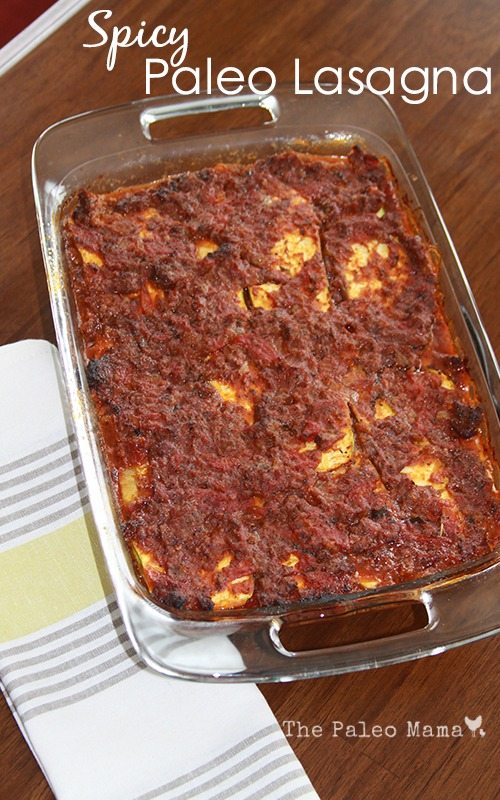
STEP FIVE: Bake in preheated oven for 30 minutes.

Just to prepare you – without noodles and a cheese mixture, this lasagna doesn’t maintain a neat stacked form.  It spreads out a bit on the plate.  That did not cause a bit of concern – we had 100% clean plates!  I hope your family enjoys this recipe as much as mine did.  Simply yours!  

ABOUT THE AUTHOR

AngieImageAngie is a wife, mother of three teenagers, proud owner of two spunky black labs, graphic designer, and blogger at Simplicity in Bloom.  She and her family enjoy an active lifestyle including sports, long walks with the dogs, and summer evenings in the backyard.

Because Angie feels that life has gotten too busy to appreciate “the here and now,” she is on a journey to find the simpler things.  She enjoys sharing the new ideas and experiences she encounters on her journey.  In her blog, Angie explores simplicity in many common areas: recipes, quick financial tips, thoughtful homemade gifts, home improvements, cleaning options, and using essential oils.  Look for simplicity on Angie’s blog, Facebook page, Pinterest page, Twitter, and Instagram.

SpicyPaleoLasagna_V PIN

Filed Under: Grassfed Beef, My Recipes, Natural Living, Starting Paleo

How to Make Your Own Moby Wrap

March 2, 2015 by Jackie Ritz 5 Comments


Today I’m welcoming Darla from Dear Darla on the blog! You are going to love this post from Darla and see how easy it is to make your own “Fauxby” Moby Wrap (don’t you just love saying that?!). Mama’s, she is giving you your hands back and your little ones are going to love being safe and snug next to your heartbeat again! 

“Help! My Baby refuses to be put down!” Oh Mama, I have been in your skin. You have this new baby that you have waited so long for and you are beaming with love for your little one, but you’re also starving and you have to do a load of laundry or your daughter is going to have to wear her Elsa dress to church (again).  This is when we choose between making a salad with one hand,  or put the baby down and risk waking him and hearing him cry in protest. Well, there is another option. You can wear your baby.

It is growing in popularity to wear our babies. Not just because of the cute wraps and carriers available but also because of our baby’s needs and how they develop after birth. The concept of the “Fourth Trimester” is a helpful way of looking at it. My son, for example, spent 40 weeks happy and comfortable in the womb. He got to hear my heartbeat, breathing, speaking and singing. He was able to feel the ebb and flow of my body as it naturally moved throughout my day. It’s the only comfort he has ever known up to this point. Then, he was born. There were bright lights and the noises were much louder. All of a sudden, his world went from the close and quiet quarters of the womb, to the infinite and terrifying open air. It’s no wonder his instincts drove him right to mother’s skin. It is no wonder he “refuses to be put down” sometimes.  It’s no wonder he screams in protest and fear when he can’t find me.

DearDarlaFauxby5
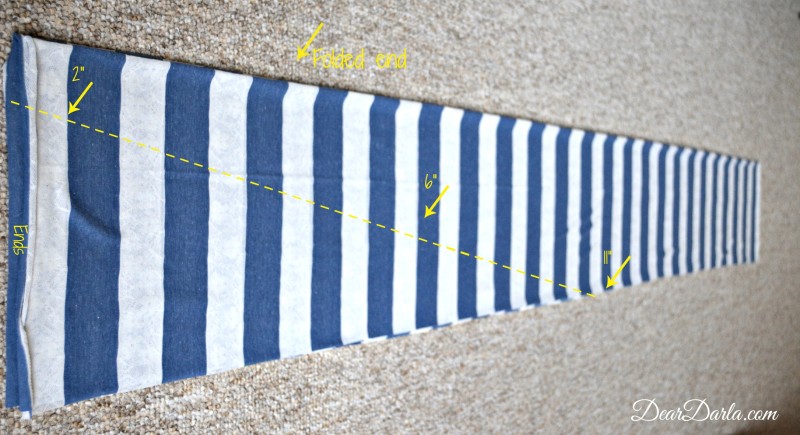
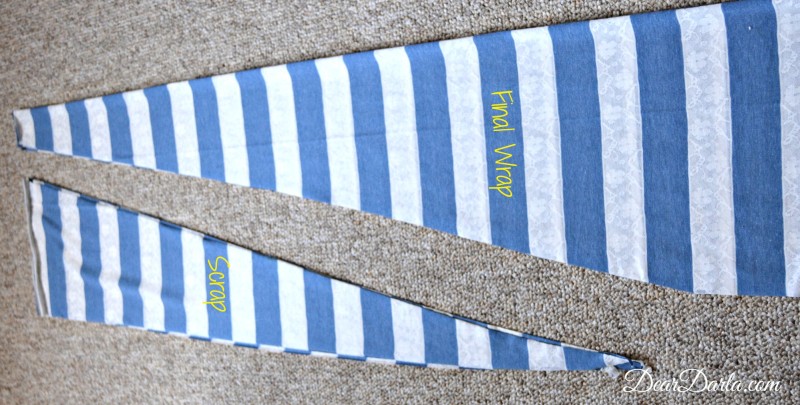
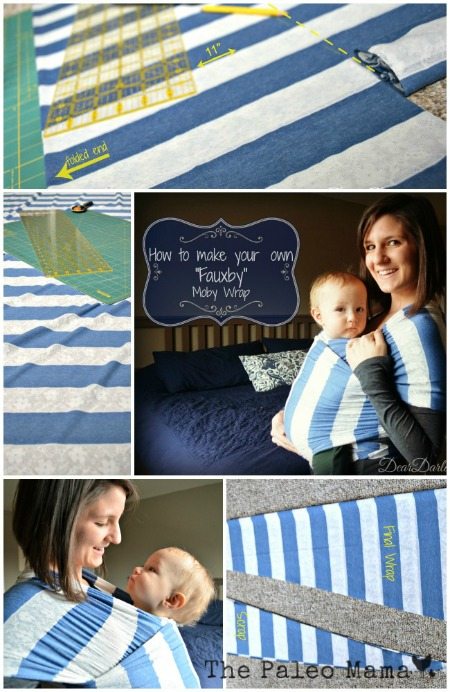
The transition from ‘Womb to World” takes a long time. Our patience and  sympathy will help our babies along the way.  You cannot spoil a newborn. They don’t have the cognition to muster manipulation, they just need your comfort and to know they can trust you. Wearing our babies kissably close helps them feel secure while helping us eat more than granola bars for the first few months. 


My favorite carrier is the Faux Moby Wrap I made at home. The “Fauxby”, if you will. It’s lightweight and easily transitions to fit as your and your baby’s bodies change. It’s easy to make, cheaper and you get to customize it for yourself.  If I had to put it in terms we can all understand, it’s about as easy to make as putting a king size duvet cover on. It takes a little math and calculated fineness, but it can be done and you’ll feel really proud of yourself afterwards.

I didn’t need much. I have this rotary cutting set. These are essential for crafting because I can’t cut a straight line to save my life. I would highly suggest using one for this project because we aren’t sewing so our edges will remain raw and visible.

DearDarlafauxby

 You’ll need 5-6 yards of a fabric of your choice. I made this wrap for a summer baby so I was looking for something lightweight and breathable. You want something stretchy, like a t-shirt or a jersey skirt. This is the hardest part of making your wrap! I know. Don’t be discouraged, there are so many options and it’s pretty intuitive and easy to figure it out once you get to the store. A few key words to look for in the fabric descriptions are: knit, rayon, polyester blends. Basically, anything stretchy in that section will work.  The original Moby is 6 yards long, I’ve found that to be too long for my small frame, so I trimmed mine to about 5 yards. Anywhere between 5 and 6 should be fine.  The fabric comes wide enough to get three wraps out of the deal too! So, you can be a really great friend and give a couple away as humble brag baby shower gifts. You’re awesome.

One more note on buying fabric, check coupons! There is always a sale going on!

Ok, enough chatting…let me show you how to make your own moby wrap! 

How to Make Your Own Moby Wrap:

ITEMS NEEDED: 

  • 5-6 yards of fabric 
  • Rotary Cutting Set

Step #1:

Measure the width of your fabric and then fold your fabric in half “hot dog style” so your salvage ends are together. Divide the width by three. (Mine was 66 inches wide so I had enough for three 22-inch-wide wraps.)  Take the folded end, and measure and mark in half of that number from the edge towards the lose ends. For me, that was 11 inches. Cut the whole length of the fabric 11 inches from the fold so when it opens up, you have three 22 inch wide strips of 5-6 yards.

DearDarlaFauxby1

 Step #2: 

Now you taper the ends so that they are more manageable to tie up.  Leave your first cut folded “hot dog style” and then fold it “hamburger style” so now the ends of your wrap are together and you have 4 pieces of fabric you’re cutting through.

DearDarlaFauxby2

 Step #3: 

At this point, my wrap had to taper from 11” to 2”. I did this over the course of 4’. I marked the ends at 2“, then 2’ in made a mark at 6” and then 2’ in again I marked the top at 11”. I drew a line to connect each mark and cut.

DearDarlaFauxby3

That is it! All you have to do now is check out the video below to learn how to put it on and carry your baby safely and you’re all set! It only took two cuts and now you have your own Fauxby wrap! You can cuddle and bond with your baby and eat a meal with both hands, you may even fold some laundry if you’re feeling bold.  I’m excited for you.

ABOUT THE AUTHOR: 

My name is Darla. I’m a lover and pursuer of many things. In the stage of life I’m in, there is so much to try and so much life to experience. The time is flying. The days are long but the months seem so short. I want to remember it all. I want to share what has worked for me. I want to process and protest some things that I used to just accept. Mostly, I long to grow. To become a stronger wife, a wiser, more intuitive mother and a daring and brave woman after Gods gracious heart.

Follow Darla: 

  • DearDarla.com
  • Facebook.com/Deardarlajean
  • Instagram @DearDarlaJean
  • www.pinterest.com/DearDarlaJean/

How to Make Your Own Moby Wrap

Filed Under: breastfeeding, Living Sustainably, Natural Living, Paleo Baby

Get a Month’s Worth of Paleo Meal Plans for FREE!

February 25, 2015 by Jackie Ritz 14 Comments

Fresh raw food ingredients for Paleo diet

Are you thinking about trying Paleo but you aren’t sure how to make it work for your family? 

Are you on a budget and think that eating Paleo is too expensive? 

Or maybe you have been eating Paleo for awhile and would like some more guidance and simplicity on meal planning. 

You are in the right place! 

I’ve created a WHOLE MONTH of budget-friendly meal plans for you! The best part? These are EASY to make. You will not be in the kitchen forever…maybe 30 minutes max to prep a healthy and whole meal for your family! 

To get 4 weeks of meals plans PLUS a printable grocery list, sign up below by leaving your name and email. 

You will get your first week of meal plans TODAY and then, one email a week, for four weeks! If you don’t see the form below, click here. 

SUBSCRIBE TO OUR FREE MEAL PLANS!

* indicates required


Fresh raw food ingredients for Paleo diet

Filed Under: Budget, Budget Shopping, Living Sustainably, My Recipes, Natural Living, Starting Paleo

Essential Oils and Hormone Support

February 24, 2015 by Jackie Ritz 1 Comment

 Today I’m welcoming Lora from The 21st Century Mama to my blog! She is going to share a wealth of information on essential oils and hormone support!  Let’s give it up to my expat friend Lora! 

When we talk about hormones in every day life, we are usually talking about our menstrual cycles and periods and PMS. However, there is much more to it than just the so called “women’s problems”. 

While hormones do control the reproductive system and therefore your periods and your PMS, they also controls the internal balance of the body’s systems; our body’s response to stress and injury and even our body’s energy levels. 

There are no less than ten glands or organs that control our hormone production, and balance each hormone relative to the other hormones in our body so that our bodies can function properly.

Below I have looked at the five most problematic organs that can be supported by essential oils.  

So the support you give your endocrine system in terms of a healthy diet; adequate exercise and adequate sleep is really important because it directly affects how you feel, and how your body functions on a day-to-day basis. When any one of these glands or organs becomes sluggish or over excited, they can change the level of one or several hormones, which can throw off the delicate balance of the entire body. 

In addition to the support you give your body via your lifestyle choices, there are some essential oils that can also provide some support to the various glands or organs of the endocrine system. I’ve listed some of these essential oils below.

The Thyroid – Frankincense and Lemongrass: 

The thyroid gland controls your body’s metabolic rate and digestive system as well as the function of the heart and brain development. It does this by producing two hormones: thyroxine and triiodothyronine. 

The Pancreas – Cinnamon, Rosemary and Basil:

The Pancreas is a gland that controls the production of digestive enzymes, which break down and digest food after you eat. It also produces hormones that control the glucose levels in the blood, such as insulin and glucagon. 

Maintaining steady glucose levels in the blood is important as it ensures that the body has a steady supply of energy. This energy is used for the body’s metabolism, when we exercise and to fuel the parts of the brain that use glucose.

Cinnamon supplements, when taken for a period of three months, has been found to significantly improve blood glucose control in Chinese patients with type 2 Diabetes taking Gliclazide (a prescribed diabetic medication) Source. 

Basil leaf extract was shown to help maintain an already healthy blood glucose in diabetes patients, suggesting that Basil could be used as dietary therapy to help strengthen the immune system (source).

Pituitary Gland – Frankincense, Sandalwood and Vetiver: 

The pituitary gland is the “master gland” of the hormone system. It senses the body’s needs and sends signals to other glands and organs throughout the body to regulate their function. For example it secretes hormones that regulates the function of the thyroid, the adrenals and the ovaries or testes. 

The pituitary gland controls metabolism, reproduction, growth and blood pressure, along with many other functions. 

Giving your pituitary gland the right support is extremely important as it controls the function of so many other glands and organs in the body. 

Adrenal Glands – Basil and Rosemary:

The adrenal glands control the level of salt and water levels in the blood, which in turn controls blood pressure along with producing male sex hormones such as testosterone. They also produce cortisol and adrenaline which deal with stress responses in the body and helps control the body’s metabolism. 

Ovaries – Rosemary and Geranium: 

The ovaries are part of a woman’s reproductive system and they produce eggs for fertilization alongside the reproductive hormones oestrogen and progesterone. 

Both oestrogen and progesterone levels need to be balanced for optimal reproductive health. An imbalance of these hormones can lead to a decrease in fertility and alterations to a woman’s menstrual cycle. 

How to Apply & Diluting for Topical Use: 

I would dilute the essential oils according to the recommend guidelines in the chart below and apply them over the organ or gland you want to support and on the reflex points in the feet. With the “hotter” oils, like cinnamon, rosemary, basil, and lemongrass, you will want to use a higher dilution. 

You dilute essential oils with a carrier oil such as: fractionated coconut oil, almond oil, or jojoba oil. 

Dilution Chart

Where to Buy High Quality Essential Oils at a Discount: 

I recommend that when using essential oils to support your hormones, that you use the highest and most therapeutic quality you can find. CLICK HERE to see my brand of choice and how you can purchase them at a discount. 

Hopefully this blog post gives you some ideas on ways to support the endocrine system, but if you have any symptoms of an endocrine disorder, please consult a doctor. These recommendations are, simply, to support your overall wellness. 

ABOUT THE AUTHOR: 

Lora is an expat, currently living in Dubai in the Middle East, although the UK is where she was born and raised. She arrived in Dubai newly married and within three years has had two under two. A chequered career history of actress and lawyer (and a general need to talk too much), along with the new career of being a Stay At Home Mum led her to the world of blogging. She spends her time chasing the two year old, cleaning the one year old and liberally applying Balance to the kids and herself to get through the day unscathed! You can find her on her blog, Facebook page or Instagram. 
 
field of grass and perfect sky

Filed Under: essential oils, Guest Posts, Living Sustainably, Natural Living

Oxtail Soup

February 18, 2015 by Jackie Ritz 6 Comments

Oxtail Soup
Today I am so excited to welcome Ashley from Crowe About Farm on The Paleo Mama blog! Ashley and her husband raise grass-fed beef and pastured chickens, turkeys, ducks and eggs.  She is also taming her first milk cow. You are going to love this delicious recipe for Oxtail Soup! 
 
Wait…don’t leave!  I promise you this will be good.  Three years ago I would have promptly clicked the “x” the second I saw the title of this post…but, my friends, my life is forever changed due to one pot of soup.
 

Do you know that cattle have boney tails?  It’s true.  Do you also know that those boney tails contain delicious, marbley chunks of meat that can be used to create one killer pot of soup?  Also true!

Lucky for me I have a husband who pushes me to be the best version of myself, culinarily speaking, otherwise my palate would’ve never have had the pleasure of experiencing this tasty soup.  
 
You see, we are beyond organic farmers who raise most of our own food.  We become friends with the animals that bless us, and others, with nourishment.  Out of respect for those animals, we don’t waste one. single. thing.  
 
When I brought the first beef we raised home from the butcher, I stuck all of the “weird parts” in the back of the freezer.  I didn’t know what to do with them, and I was secretly hoping my husband would forget they were in there.  
 
That didn’t happen.  
 
Instead, and fortunately for me, he would pick one “weird part” to cook each Sunday.  Over the past 3 years, we have been experiencing some of the best, most nourishing meals of our lives…all from cuts that most people would never try.  
 
photo1
 
That first Sunday, I reluctantly tasted the tail…and it was out of this world!  I couldn’t wait for the next steer to make it home from the butcher.  I needed another oxtail STAT!
 
Now, don’t worry.  If you don’t have packages of tail residing in your freezer, you can easily substitute a roast or any other tough cut of meat.  It will still be mighty tasty!  
 
BUT…if you ever have the chance to get your hands on an oxtail, or any organ meat for matter, grab it, get yourself to the nearest kitchen and get cookin’!

Oxtail Soup

You Will Need:
  • 3-4 lbs. Oxtail (Beef Tail) or Roast
  • 1 Medium Onion
  • 8 Carrots
  • 6 Stalks of Celery
  • 4 Cups Diced Potatoes (I used Yukon Gold & Red, but you can use any kind including Sweet Potatoes)
  • 2 Bay Leaves
  • 4 Sprigs of Parsely
  • 2 Tbs. Butter
  • 4 Tbs. Ghee, Coconut Oil or Tallow-melted
  • 8-10 Cups Beef Broth (see my recipe)
  • 12 Oz. Dark Beer
  • Salt & Pepper
Cooking Instructions:
 
Step 1: Dice the onion.  In a large pot, sauté the onion in 2 Tbs. of butter until translucent.  Meanwhile, place the oxtail in a bowl and cover with melted oil (or ghee/tallow), salt and pepper.  Mix well with your hands.
 
photo2
 
Step 2: Heat a skillet over high heat, add the oxtail and sear all sides (about 2 minutes per side).
 
photo3
 
Step 3: Add the seared oxtail to the pot.  Add about a half of a cup of beef broth to the skillet and deglaze, scraping up all of those brown bits.  Add to the pot and cover the oxtail with about 8 cups of beef broth and beer.  Add bay leaves and parsley to the pot.
 
photo4
 
Step 4: Simmer on low for about 6 hours until the meat falls off the bones.  Add more beef broth as necessary as it cooks down.
 
Step 5: When the meat is falling off the bones, remove the oxtail from the pot, pick off the meat and shred.  
 
photo5
 
Wanna see what the bones look like?
 
bones
 
Step 6: Add the meat, carrots, and celery to the pot and simmer for 10 minutes.  Add the potatoes and simmer until potatoes are fork tender.
 
Step 7: Season with salt and pepper and ENJOY! CLICK HERE to print this recipe.
 
photo6
 
Will you be taking the “taste the tail challenge?”  I double dog dare you ;)!!  And if tasting the tail isn’t adventurous enough for you, I will be sharing my toddler approved tongue recipe on my blog very soon.    
 
ABOUT THE AUTHOR:
 
headshotAshley Crowe is a wife, mama, farmer and blogger at Crowe About Farm.  She and her husband raise grass-fed beef and pastured chickens, turkeys, ducks and eggs.  She is also taming her first milk cow.  
 
Ashley thinks producing food is a beautiful process and that it is important we have a connection with our food.  She is passionate about sharing her connection with her animals from pasture to plate. Hop on over to Ashey’s Facebook page, Blog, Pinterest page, or Twitter and follow her for more recipes and homesteading goodies! 


Oxtail Soup  The Paleo Mama

Filed Under: Grassfed Beef, Homesteading, Living Sustainably, My Recipes, Natural Living

You Can Grow Blueberries No Matter Where You Live

February 17, 2015 by Jackie Ritz 10 Comments

You Can Grow Blueberries

Today I’m welcoming Sally from Garden Valley Homestead as she shares her knowledge on how to grow blueberries ANYWHERE! 

Ever have one of those moments when you think, “I wish I knew that sooner!”. That’s what I thought when I learned you can grow blueberries just about anywhere in the United States. I was under the impression that blueberries only grow in cold climates of the northeastern United States. 

Not so! 

Know Your Chill Hours

Well, yes, it’s true they grow well—very well, in the northeastern United States. But, guess what? They grow very well in a lot of other states, too! You simply need to know your average number of chill hours for your area and choose a blueberry bush accordingly. 

What’s A Chill Hour and Where Can I Find One?

A “chill hour” is any hour where the temperature is under 45 degrees Fahrenheit. (If you’re growing any kind of fruit tree, it’s good to know your chill hours.)

If you’re a weather geek and own a fancy weather station, you can track it yourself. (I mean that in a nice way. Gardeners are usually interested in the weather. We kinda have to be….) Or, do what I do: contact your local agriculture extension department. They keep track of that sort of information for you.

Chill Hour Cheat Sheet

  • If you live in Zones 5-9, your average number of chill hours is 500
  • If you live in Zones 4-7, your average number of chill hours is 1000+

Why is this important? Blueberries need a specific number of cold hours each winter to regulate their growth. If a blueberry bush doesn’t experience enough cold in the winter, the flower buds might not open at all in spring, or they might open unevenly.

Your best bet to ensure your successful blueberry growing experience is to call your local agriculture extension office or Master Gardener’s program to ask for the average number of chill hours. They might publish the information on their web site. Look and see. 

Match Your Blueberry Plant to Your Chill Hours

Now that you have a firm grip on the chill hours for your area, choose blueberry plants that thrives in that environment. Most likely, you’ll choose a Northern Highbush or a Southern Highbush. I recommend buying bare root plants from a reliable grower. I order bare root plants and trees from Peaceful Valley Nursery 

  • If your chill hours average 800-1,000, choose a Northern Highbush.
  • If you chill  hours average 150-700, choose a Southern Highbush.

Rabbiteye variety is native to the southern United States. Chill hours needed for this type of blueberry bush are 350-700. 

However, Northern Highbush and Southern Highbush are the two most common varieties. Blueberries from these plants varieties are those you most often find in stores.

Pick Two or Three Varieties for Cross-Pollination

Blueberry plants need to be cross-pollinated with other blueberry plants of a different variety. So when you’re choosing your Northern or Southern Highbush plants, pick two or three different kinds to ensure they will bear fruit. Also, study the plants to learn whether they are early-, mid-, or late-bearing plants. Pick a variety to extend your growing and harvesting season. 

Now you know how many chill hours you have in your garden and which plants thrive in your environment. Next, you need to prepare your soil.

Blueberry Bushes Like Acidic Soil

Blueberry bushes of all kinds are acid-loving plants. They like a pH level of 4.0-5.0. If you don’t live in the arid West, your soil pH is probably near the 4.0-5.0 range already. But, if you live in the West, your soil is probably alkaline and you need to amend it to bring down the pH level. 

Use a simple soil testing kit like this one  to discover the pH level of your soil. You should be able find soil testing kits at your local garden center.

Growing blueberries in containers makes it easy to maintain soil pH. Bonus: You don’t have to dig a hole! I grow just about everything in SmartPots.  

Blueberry bushes like this soil recipe:

  • 1 part organic potting soil for nutrients
  • 1 part peat moss or coco peat for moisture
  • ½ lb. Acidic mix per cubic foot of soil.

Plant Your Bare Root Plant in Containers or Directly Into The Ground

  • If you’re using a container, choose one the allows for 20 inches of root depth. I plant blueberries in 30 gallon SmartPots. 
  • Fill your pot with soil and amendments. Use the recipe above, if you like.
  • Plant your blueberry bush to the same depth it was planted when you received it.
  • Mulch well (3 inches deep) with straw, shredded leaves, pine needles, wood chips or well-aged sawdust from wood NOT treated with a preservative. 
  • Water well. Blueberries need one-to-two inches of water each week.

If you’re planting straight into the ground:

  • Work up a planting area approximately 2-1/2 feet in diameter and one foot deep. 
  • Remove 1/3 to 1/2 of the soil. Add the soil recipe above.
  • Plant your blueberry bush to the same depth it was previously planted.
  • Water and mulch.
  • Don’t fertilize until spring.

Caring for Your Blueberry Bushes’ During It’s First Year in Your Garden

Blueberry bushes are moisture sensitive. They like their soil to stay moist, but not soaking wet. Your plant’s leave will tell you if the water content is too much of too little.

Things To Do:

  1. When your plant’s flowers begin to bud in the late winter or early spring, pinch off the flowers to encourage a strong root system. Sorry. You have to wait for the second or third season to begin harvesting your beautifully nutritious berries. Blueberry  blossoms
  2. Prune away any damaged, blotchy and dead branches, twigs, or side shoots.
  3. Fertilize your plant(s) in the early and late spring with an acid fertilizer like this one, and again in the fall. But, use half as much fertilizer in the fall.
  4. Freshen up the mulch.
  5. When the berries start to “show color”, protect them from birds with netting. I like to create PVC arches over the plants and secure them so the nets don’t blow away and birds can’t sneak inside the nets. Pinwheels stuck inside the beds next to the bushes seem to work to scare birds away. You can buy pinwheels from the Dollar Store then “plant” them with blueberries.
  6. If deer cross through your property, you already know to keep your blueberry bushes behind deer fencing.

If you follow these steps, you should enjoy a delicious harvest of berries to eat fresh or preserve any number of ways. Hint: Flash freezing washed berries on trays is EASY and maintains the most nutritional value. Plus, you’ll have a stash of fresh berries available well beyond the growing season.

ABOUT THE AUTHOR: 

Profile Pic_RoundSally Olson is a homesteader, writer, wife, homeschool mom, and an idealist. She blogs to encourage others to pursue their homestead-DIY-healthy living dreams. All her posts are gluten-free at Garden Valley Homestead. Sally, her husband of 25 years, two sons, horses, Labradors, and hens are blessed to call the Sierra-Nevada Foothills home. You can find her on Facebook, Pinterest, and Twitter! 

You Can Grow Blueberries | The Paleo Mama

Filed Under: Homesteading, Living Sustainably, Natural Living, Shopping Local

« Previous Page
Next Page »

Primary Sidebar

  • Facebook
  • Instagram
  • Pinterest
  • RSS
  • YouTube

Hi, I'm Jackie Ritz and welcome to The Paleo Mama! I'm a published author, certified herbalist, and voracious researcher of natural medicine and nutrition. I'm glad you're here and I hope you stick around for awhile!

Recent Posts

  • When God Says Pause: Why I Took a 5-Year Break from My Online Business
  • How to Quit Facebook but Keep Your Business Profile
  • Leaving the City for the Country
  • Natural Way to Heart Health

MEAL PLANS

Biblically clean meal plans that are for those love to cook real food

Read More

Footer

Our Blog

The Paleo Mama blog provides simple answers for healthier families through research, tutorials, recipes, and simple remedies for daily needs!

  • Health
  • Essential Oils
  • Recipes
  • Remedies
  • Natural Living
  • Meal Plans

Stick around!

You’ll get instant access to a library of natural remedies and real, paleo food, including our ebooks and free guides we send out.

  • Home
  • Disclosure/Disclaimer
  • Privacy Policy
  • Advertise
  • Contact Me

Copyright © 2025 · Wellness Pro on Genesis Framework · WordPress · Log in