• Skip to primary navigation
  • Skip to content
  • Skip to primary sidebar
  • Skip to footer

The Paleo Mama

Homegrown and Handmade

  • About
  • Blog
    • Podcast
  • Meal Plans
  • Essential Oils
  • Our Farm
    • Great Pyrenees Puppies
    • Goats
      • Goats for Sale
      • Goat Sales Policy
      • Nigerian Dwarf Bucks
        • Ranchocabra Lunar Eclipse

Budget

How to Ditch the City and Start a Farm

March 27, 2014 by Jackie Ritz 130 Comments

Well, it’s been nearly 8 months since we gave up our big city-living and moved to the backwoods of Western North Carolina. My husband and I were both raised in large cities, so raising our children the same way just felt normal.

However there always was this itch and this itch just started to grow and grow. It would be in small ways at first…like me traveling hours to visit small farms to let my kids play with the animals or to pick blueberries. Then it grew much bigger…we started searching for homes in the suburbs that allowed chickens and possibly goats. Our realtor thought we were crazy and didn’t understand us.  We hit roadblock after roadblock and after *almost* buying a very expensive house on ONE acre (which we thought was a lot of land), because that was all there was, we felt like our dreams of homesteading were crushed.

What If

I remember the first time we played the “what if” game. My husband said to me one night, “what if we moved somewhere else.” At first, I was caught off guard that he was entertaining the same thought I was. Then I played “devil’s advocate” and said that we were raised in Orlando, this is where our families live, this is where we *should* live……….right?

This went on for months and we started going deeper with our feelings. My husband asked me where I always dreamed of living…he knew my answer but it’s just a dream….right? I mean, it’s just a game you play, like MASH as a little girl. You don’t really go and live in your dream place. You just dream about it...right?

Ok, so you get the drift of how confusing of a time this was for us. We both loved Western North Carolina. We loved visiting it and we even rented a cute little cabin near Asheville one year. We finally agreed that WNC was our dream place to live and we finally entertained the thought that we had the choice to move there *one day*. Sigh….one day….there it is again.

And then I said it. I said, “Why one day?” And my husband looked at me and felt the same way. Let’s do this NOW! Life is too short to not live and do what you dream of doing! And that was how it all began!

1094975_10152282796887013_870159395_n

How We Ditched the City and Started Farming

1) We Found a Job

This is much harder for some people…I know that. But, it’s worth trying, right? So, we drew a 100 mile radius around our dream city, Asheville, NC on a map and my husband applied at all the jobs in that radius that fit his career. We heard back from a few and we chose one! We came and visited the nearby city and we fell in, complete, love with the place. Actually how it really happened when we sealed the deal was like this: we went to a nearby vineyard and sat down and looked out at the beautiful mountains. I looked over at my husband and said, “let’s do it“!

2) We Found a Rental Home

We still weren’t ready to buy. We have been aggressively paying off debt for a year now following the Dave Ramsey plan. So, we knew that we needed to find a rental home that allowed us to start doing our homestead dreams. We found a perfect home on Craigslist that had 4 acres of land, a barn, a huge chicken coop, and a beautiful fenced pasture. We plan on staying in this home for a few more months till we are ready to buy.

3) We Said Our Goodbyes & Sold a Ton of Stuff

This was the hardest part of the move. It’s hard to leave your family, but it’s so rewarding to follow your dreams. So, we downsized and sold a lot of stuff to make the move easier. We sold our king set (we just sleep on a mattress on the floor now!), dining room table, and all our large furniture. This isn’t necessary but we wanted a fresh start and we needed the money for the move. In fact, we are just now (8 months later) starting to buy furniture again! We waited till we were 100% out of debt, which we are now!

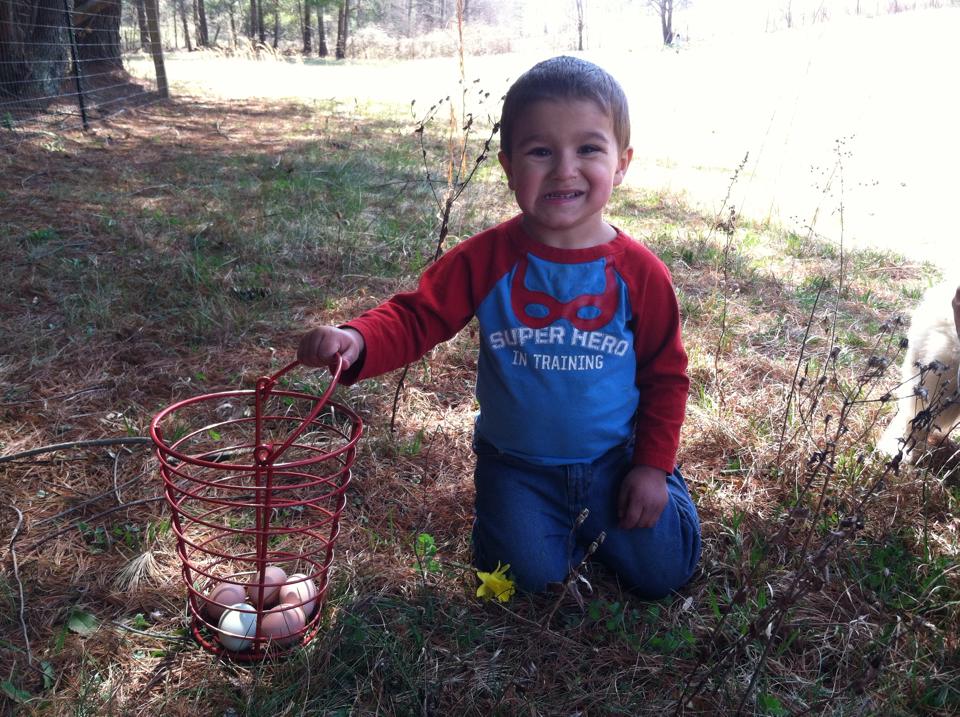
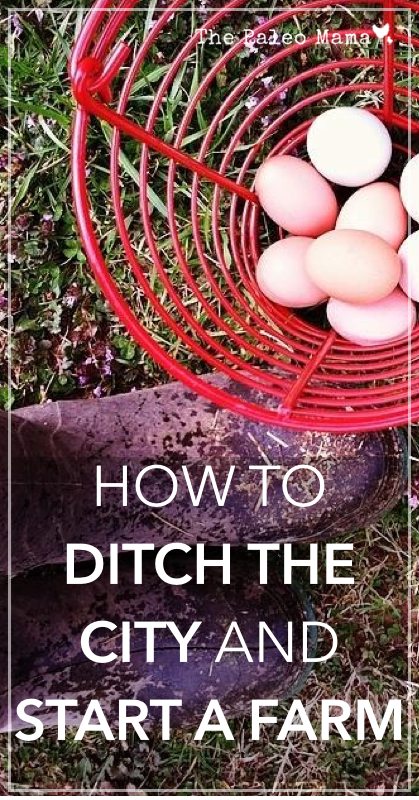
4) We Ordered Chickens!

1911727_10152300017457013_689404168_n

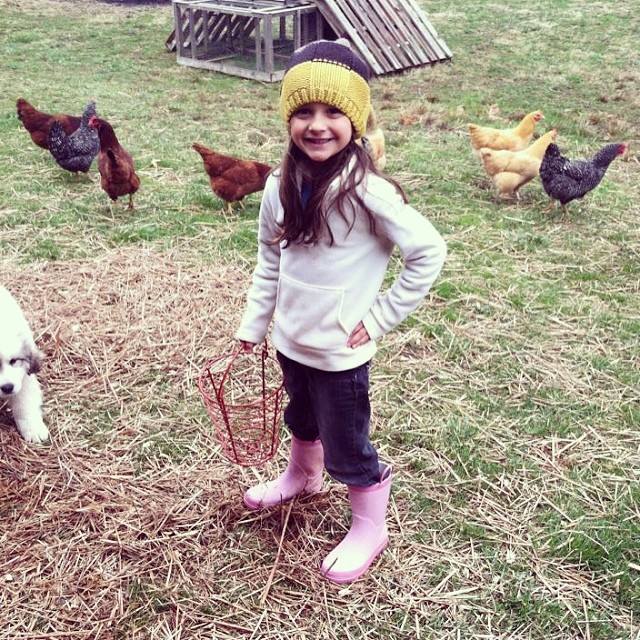
Seriously, I had the chicks ordered and planned for delivery before we were even in the state! I was so excited to start homesteading and couldn’t wait for my own pastured eggs! Chickens are the best way to start homesteading. They are the easiest animals to care for. It takes about 5 minutes in the morning and 5 minutes at night to care for my chickens. As chicks, you need a few things, like a brooder area (we use stacks of straw for this), a heating lamp, and food and water bowls. Start-up costs is under $100 and that is including ordering the chicks online and paying shipping. You usually can find chicks local at a feed store for pretty cheap too!

5) I Found My Goats

soph

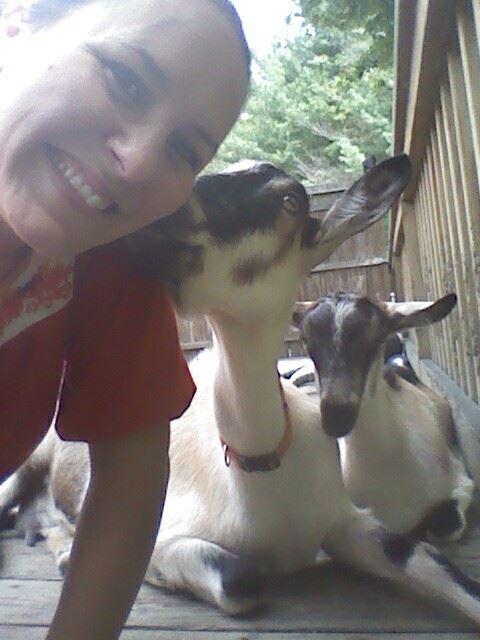
I had my goats planned, as well, before we even were in North Carolina. I knew I wanted fresh, raw, goat milk. Goats are MUCH easier to keep than cows and I am more keen on goat’s milk than cow milk. I found a lady on Craigslist who was selling a goat-in-milk and her doeling. I arranged for us to pick them up about a week after we moved. It actually is a hilarious story if you would like to go read about it! I watched You Tube videos on how to milk a goat for hours but it did NO good. You have to just learn it hands-on and it does take a little practice! However, it’s so worth it. My goat has been giving us nearly a half gallon a day for the past 8 months that we have had her. Sadly, I’m drying her off right now because she is pregnant (and so is her baby!) and needs a little break before her babies come in the early summer.

6) We Started Composting

1149041_10152304668567013_1965001985_n

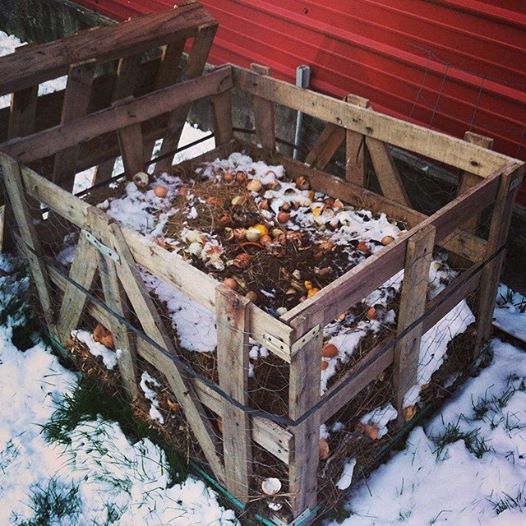
There is a local furniture store near us that gives away pallets and these large pallet containers. We grabbed them and started using it to hold our compost in. We definitely planned on a spring/summer vegetable garden so we started composting right away. We throw most our vegetable and fruit scraps to the chickens but we compost everything else! Composting is so easy.

7) We Started Raising Meat Rabbits

1503406_10152144268402013_545477526_n

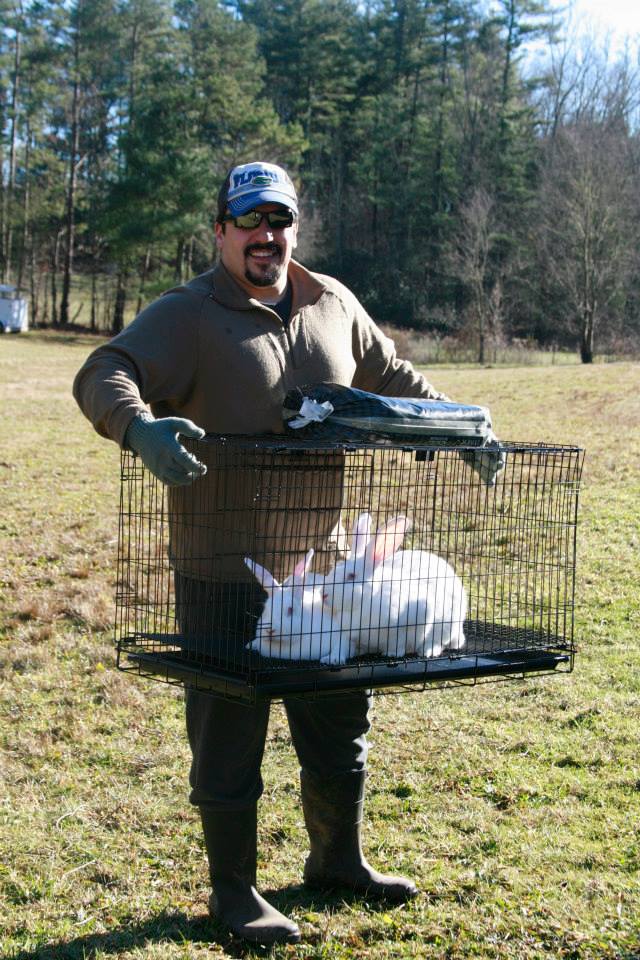
I don’t even know how we started doing this but it has become my husband’s favorite thing so far. We have 3 does (the moms) and 2 bucks (the boys) and we breed them every other month or so. Actually they are due any minute now for this round! The benefit of meat rabbits is that they reproduce a ton and have short pregnancies. Their meat is like chicken too! One set of meat rabbits (one buck and one girl) can give you 400lbs of meat a year! We pasture the offspring before they are ready to be butchered, that way they are living as natural as possible and eating lots of fresh grass.

8) We Slowed Down & Relish Our Life

1014008_10152303278872013_2013805231_n

This has been THE HARDEST thing for me to do since we have moved away from our city life. You never would have thought that slowing down would be so difficult, but it really is…especially if you are used to hurry, hurry, hurry everywhere you go. The drivers here drive me crazy…they are so pokey! It’s all a mindset and just truly realizing that being rushed is pointless. It doesn’t’ get you anywhere any faster. It just stresses you out and causes anxiety.

Conclusion

How to Ditch the City and Start a Farm | www.thepaleomama.com .001

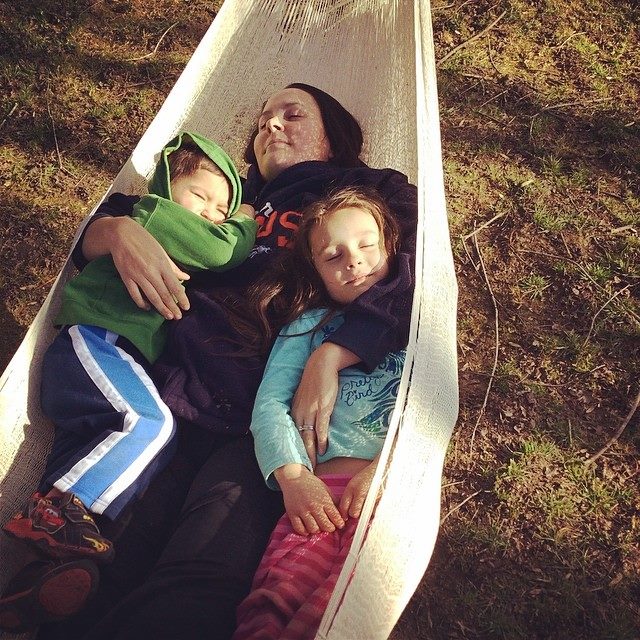
We couldn’t be happier with our decision to ditch the city and start a farm. Our kids absolutely adore their new life here. They miss their family, of course, but we are our own family now and it’s important to us to do what is best for them. The city was scaring me more-and-more and the thought of raising my kids there just kept me up at night.

Now they are able to cherish simple things like the joy of collection eggs, and planting seeds and watching them grow, and watching animals give birth! It is amazing to see how they thrive in this environment.

Books I Recommend: Raising Dairy Goats | Raising Chickens for Dummies | The Self Sufficient Life and How to Live It | Back to Basics | Let it Rot | Storey’s Guide to Raising Meat Rabbits

Websites I Recommend: The Prairie Homestead | Weed em’ & Reap | The Elliott Homestead | Blue Yurt Farms


Have you ever thought about ditching your city life and starting a homestead or a farm? Leave a comment and tell me about it! I’d love to connect with you!

Filed Under: Budget, Homesteading, Living Sustainably, Natural Living, Paleo Baby, Paleo Toddler, Shopping Local Tagged With: backyard chickens, eggs, farming, goats, homesteading, paleo, raw milk

10 Healing Herbs to Grow in Your Survival Garden

March 21, 2014 by Jackie Ritz 19 Comments

For many, the time has come to plan our summer gardens.   My interest is a bit self-serving in that I am in the process of rethinking my own garden and while I grow an abundance of rosemary, lavender and peppermint, this year will be an ideal time to replace some tired shrubs with plants that will work for me.  Healing herbs will fit the bill quote nicely.

Herbs have been used for centuries to sooth and to heal.  According to Wikipedia:

 Herbs have long been used as the basis of traditional Chinese herbal medicine, with usage dating as far back as the first century CE and before. Medicinal use of herbs in Western cultures has its roots in the Hippocratic (Greek) elemental healing system, based on a quaternary elemental healing metaphor.

With such a long history of use it makes perfect sense that you would want to include a selection of herbs in the survival garden.

Healing Herbs for the Healing Garden 

Basil:  People don’t usually think of basil as a healing herb and yet traditionally, it is called the “king of herbs”.  It is used medicinally as a natural anti-inflammatory and is thought to have mild antiseptic functions. Some healing uses are for flatulence, lack off appetite, nausea and cuts and scrapes.
It is also superb on spaghetti and in pesto but then you already knew that.  Basil is an annual plant so you will have to start anew each year.

German Chamomile:  Chamomile is one of the most popular herbs in the Western world.  Its flower heads are commonly used for infusions, teas and salves.  These in turn can be used to treat indigestion, anxiety and skin inflammations.  As a tea, it serves as a mild sedative to help with sleep.

Feverfew:  This perennial is a member of the sunflower family and has been used for centuries in European folk medicine as a remedy for headaches, arthritis, and fevers. The name feverfew comes from a Latin word meaning “fever reducer.”

Its  many uses include easing headache pains – especially migraines.  This is done by chewing on the leaves.  A tea made from the leaves and flowers is said to relieve the symptoms of arthritis.

Lemon Balm:  Lemon balm is a member of the mint family.  Considered a calming herb, it has been used as far back as the Middle Ages to reduce stress and anxiety, promote sleep, improve appetite, and ease pain and discomfort from indigestion.  Even before the Middle Ages, lemon balm was steeped in wine to lift the spirits, help heal wounds, and treat venomous insect bites and stings.

As with many other herbs in your healing garden, lemon balm promotes relaxation and a sense of calm.

Parsley:  While not one of my favorites, there is nothing like a sprig of parsley to take away bad breath.  It is no wonder that this biennial (meaning it lives for two years) is used to decorate and garnish plates in the fanciest of restaurants.

10 Healing Herbs to Grow in Your Survival Garden | www.thepaleomama.com .001

When brewed as a tea, parsley can help supplement iron in a person’s diet, particularly for those who are anemic. Drinking parsley tea also boosts energy and overall circulation of the body, and helps battle fatigue from lack of iron.  Other uses?  Parsley tea  fights gas and flatulence in the belly, kidney infections, and bladder infections.  It can also be an effective diuretic.

Sage:  Did you know that the genus name for sage is “salvia” which means “to heal”? In the first century C.E. Greek physician Dioscorides reported that sage stopped bleeding of wounds and cleaned ulcers and sores. He also recommended sage juice in warm water for hoarseness and cough. In modern times, a sage tea is used to sooth mouth, throat and gum inflammations.  This is because sage has excellent antibacterial and astringent properties.

Thyme:  Back during medieval times, thyme was given to knights before going in to battle.  The purpose was to infuse this manly man with vigor and courage.

These days, thyme used to relieve coughs, congestion, indigestion and gas.  This perennial is rich in thymol, a strong antiseptic, making thyme highly desirable in the treatment of wounds and even fungus infections.  Thyme is a perennial that does well, even in cooler, Pacific Northwest climates.

Rosemary:  Long ago, rosemary was known as ‘the herb of remembrance.’ Even today, in places like Australia and New Zealand, it is used as a symbol of remembrance since it is known to help sharpen mental clarity and stimulate brain function. You might recall that many statues of the ancient Greeks and Romans show men wearing sprigs of rosemary on their heads – signifying mental acuity.

The needles of the delightfully fragrant rosemary plant can be used in a tea to treat digestive problems.  The same tea can also be used as an expectorant and as a relaxing beverage that is helpful for headaches.  Other healing uses include improving memory, relieving muscle pain and spasms, stimulating hair growth, and supporting the circulatory and nervous systems.

Peppermint: Peppermint has a long tradition of medicinal use. Archaeological evidence places its use far back as ten thousand years ago. It is commonly used to soothe or treat symptoms such as nausea, vomiting, abdominal pain, indigestion, irritable bowel, and bloating and more.
The leaves and stems contain menthol which in addition to use medicinally, is used as a flavoring in food, and a fragrance in cosmetics.  The plant is prolific, growing well in moist, shaded areas as well as in sunnier locations.  The roots emit runners that can quickly overtake the garden so most gardeners prefer to plant peppermint in pots.

The easiest way to acquire a peppermint plant?  Find a friend or neighbor that is growing peppermint to break off a stem.  Place it is a glass of water and in a very short period of times, roots will form an you will have your own peppermint start.

Lavender:  I saved my personal favorite for last. Of course it helps that I have an abundant amount of fragrant lavender in my yard.

A tea made from lavender has many uses with one of the foremost being it’s ability to have a calming effect on a person’s mind and body. To that end, lavender can promote a sense of well-being and alleviate stress. It is also useful for dealing with various gastrointestinal issues such as upset stomachs and flatulence.

Because it is a strong antiseptic, lavender tea, when applied topically, can help heal cuts, wounds and sores. It can also be used to mitigate bad breath.

How Do I Get Started?

With so many to herbs to choose from, where do you start?  A lot will depend on the amount of space you have, the climate, and the availability of seeds, starts, or cuttings.  My recommendation is that you start with three or four herbs that appeal to you from a healing perspective.  Many can be grown in pots on a porch or deck so if space is a problem, you can start modestly.

How to Make an Herbal Tea

The process of making a pot of herbal tea is in itself healing.  Perhaps that has something to do with the proactive effort involved in doing something positive for one’s own self and well-being.  And luckily, brewing an herbal tea is easy.

The Healing Garden: 10 Herbs To Grow in the Survival Garden Backdoor Survival
To make an herbal tea, first bring some cool water to a boil.  While waiting for the water to boil, fetch a non-mental container that will be used to brew the tea.  A quart mason jar works nicely for this purpose.  You do not want to use a metal container since the metal may interfere with the purity and taste of the tea.

Add 2 tablespoons of fresh (or 1 tablespoon of dried herb or crushed seed) to the empty pot or jar for each cup of water.  Then, and this is the important part, add an extra 2 tablespoons of fresh (or 1 tablespoon of dried) herbs “for the pot.”  So, for example, if you are making 2 cups of hot tea, you would use 6 tablespoons of fresh herbs or 3 tablespoons of dried herbs.

Pour the boiling water over the herbs and let them steep, covered, for about 5 minutes give or take.  There is no  exact time since everyone’s strength preference is difference.  When ready, strain the herbs and pour the tea into a cup.  At this point you may want to garnish your heavenly – and healing – cup of tea with honey, citrus fruits or addition herb sprigs.

For iced tea, increase the quantity of herbs in the basic recipe by 1 1/2 to allow for dilution from the melting ice.

The Final Word

In reading about these herbs, you may have noticed that many are reputed to have the same or similar healing qualities.  Do they work?  I can personally vouch for Rosemary and Lavender which I have used as both a tea and as an essential oil.

One thing that is true is that with a little time and for a nominal cost, you can grow the makings for healing teas, infusions and balms in your own garden. Add a dose of sun and some rich potting soil and you will be set to go.  Just keep in mind that while perennial plants will flourish over the winter and will be there for you the following spring, annual plants must be reseeded or restarted every year.

If you would like to learn more about the healing properties of various herbs, the University of Maryland Medical Center has an excellent web site with a lot of useful information about herbs and other alternative medicine topics.  Click on “herbs” then scroll down to the particular herb you would like to learn about.


Original Source: Natural Blaze

Filed Under: Budget, Homesteading, Living Sustainably, Natural Living, Nutrition Tagged With: gardening, healing, herbs, homesteading, natural living

Bone Broth—One of Your Most Healing Diet Staples

March 19, 2014 by Jackie Ritz 22 Comments

Bone Broth - One of Your Most Healing Diet Staples.001

According to an old South American proverb, “good broth will resurrect the dead.” While that’s undoubtedly an exaggeration, it speaks to the value placed on this wholesome food, going back through the annals of time.

The featured article by Dr. Amy Myers1 lists 10 health benefits of bone broth. Sally Fallon with the Weston A. Price Foundation2 has previously published information about this healing food as well.

First and foremost, homemade bone broth is excellent for speeding healing and recuperation from illness. You’ve undoubtedly heard the old adage that chicken soup will help cure a cold, and there’s scientific support for such a statement.

For starters, chicken contains a natural amino acid called cysteine, which can thin the mucus in your lungs and make it less sticky so you can expel it more easily. Processed, canned soups will not work as well as the homemade version made from slow-cooked bone broth.

For best results, you really need to make up a fresh batch yourself (or ask a friend or family member to do so). If combating a cold, make the soup hot and spicy with plenty of pepper. The spices will trigger a sudden release of watery fluids in your mouth, throat, and lungs, which will help thin down the respiratory mucus so it’s easier to expel.

But the benefits of broth don’t end there. As explained by Sally Fallon:3

“Stock contains minerals in a form the body can absorb easily—not just calcium but also magnesium, phosphorus, silicon, sulfur and trace minerals. It contains the broken down material from cartilage and tendons–stuff like chondroitin sulphates and glucosamine, now sold as expensive supplements for arthritis and joint pain.”

The Healing Influence of Broth on Your Gut

In later years, medical scientists have discovered that your health is in large part dependent on the health of your intestinal tract. Many of our modern diseases appear to be rooted in an unbalanced mix of microorganisms in your digestive system, courtesy of an inappropriate and unbalanced diet that is too high in sugars and too low in healthful fats and beneficial bacteria.

Bone broth is excellent for “healing and sealing” your gut, to use Dr. Natasha Campbell-McBride term. Dr. Campbell’s GAPS Nutritional Protocol, described in her book, Gut and Psychology Syndrome (GAPS), centers around the concept of “healing and sealing” your gut through your diet.

Broth or “stock” plays an important role as it’s easily digestible, helps heal the lining of your gut, and contains valuable nutrients. Abnormalities in your immune system are a common outcome of GAPS, and such immune abnormalities can then allow for the development of virtually any degenerative disease…

The Healing Benefits of Bone Broth

As the featured article states, there are many reasons for incorporating good-old-fashioned bone broth into your diet. The following health benefits attest to its status as “good medicine.”

Helps heal and seal your gut, and promotes healthy digestion: The gelatin found in bone broth is a hydrophilic colloid. It attracts and holds liquids, including digestive juices, thereby supporting proper digestion. Inhibits infection caused by cold and flu viruses, etc.: A study4published over a decade ago found that chicken soup indeed has medicinal qualities, significantly mitigating infection
Reduces joint pain and inflammation, courtesy of chondroitin sulphates, glucosamine, and other compounds extracted from the boiled down cartilage Fights inflammation: Amino acids such as glycine, proline, and arginine all have anti-inflammatory effects. Arginine, for example, has been found to be particularly beneficial for the treatment of sepsis5 (whole-body inflammation).

Glycine also has calming effects, which may help you sleep better

Promotes strong, healthy bones: As mentioned above, bone broth contains high amounts of calcium, magnesium, and other nutrients that play an important role in healthy bone formation Promotes healthy hair and nail growth, thanks to the gelatin in the broth


Making your own bone broth is extremely cost effective, as you can make use of left over carcass bones that would otherwise be thrown away. And while the thought of making your own broth may seem intimidating at first, it’s actually quite easy. It can also save you money by reducing your need for dietary supplements. As mentioned above, bone broth provides you with a variety of important nutrients—such as calcium, magnesium, chondroitin, glucosamine, and arginine—that you may otherwise be spending a good deal of money on in the form of supplements.

Easy Chicken Broth Recipe

Both featured articles include a sample recipe for homemade chicken broth. The following recipe was provided by Sally Fallon, writing for the Weston A. Price Foundation.6 Her article also contains a recipe for beef and fish broth. (You could also use turkey, duck, or lamb, following the same basic directions.) For Dr. Myers’ chicken broth recipe, please see the original article.7

Perhaps the most important caveat when making broth, whether you’re using chicken or beef, is to make sure they’re from organically-raised, pastured or grass-fed animals. As noted by Fallon, chickens raised in confined animal feeding operations (CAFOs) tend to produce stock that doesn’t gel, and this gelatin has long been valued for its therapeutic properties.8 As explained by Fallon:

“Gelatin was universally acclaimed as a most nutritious foodstuff particularly by the French, who were seeking ways to feed their armies and vast numbers of homeless in Paris and other cities. Although gelatin is not a complete protein, containing only the amino acids arginine and glycine in large amounts, it acts as a protein sparer, helping the poor stretch a few morsels of meat into a complete meal.”

Besides that, CAFO animals are fed an unnatural diet that is not beneficial for their intestinal makeup, and they’re also given a variety of veterinary drugs and growth promoters. You don’t want any of these potentially harmful additives in your broth, so make sure to start off with an organically-raised product.

Ingredients for homemade chicken broth 9

Bone Broth - One of Your Most Healing Diet Staples | www.thepaleomama.com .001

  • 1 whole free-range chicken or 2 to 3 pounds of bony chicken parts, such as necks, backs, breastbones, and wings
  • Gizzards from one chicken (optional)
  • 2-4 chicken feet (optional)
  • 4 quarts cold filtered water
  • 2 tablespoons vinegar
  • 1 large onion, coarsely chopped
  • 2 carrots, peeled and coarsely chopped
  • 3 celery stalks, coarsely chopped
  • 1 bunch parsley

Please note the addition of vinegar. Not only are fats are ideally combined with acids like vinegar, but when it comes to making broth, the vinegar helps leech all those valuable minerals from the bones into the stockpot water, which is ultimately what you’ll be eating. The goal is to extract as many minerals as possible out of the bones into the broth water. Bragg’s raw apple cider vinegar is a good choice as it’s unfiltered and unpasteurized.

Cooking Directions

There are lots of different ways to make bone broth, and there really isn’t a wrong way. You can find different variations online. Here, I’ll offer some basic directions. If you’re starting out with a whole chicken, you’ll of course have plenty of meat as well, which can be added back into the broth later with extra herbs and spices to make a chicken soup. I also use it on my salad.

  1. Fill up a large stockpot (or large crockpot) with pure, filtered water. (A crockpot is recommended for safety reasons if you have to leave home while it’s cooking.)
  2. Add vinegar and all vegetables except parsley to the water.
  3. Place the whole chicken or chicken carcass into the pot.
  4. Bring to a boil, and remove any scum that rises to the top.
  5. Reduce the heat to the lowest setting and let simmer.
  6. If cooking a whole chicken, the meat should start separating from the bone after about 2 hours. Simply remove the chicken from the pot and separate the meat from the bones. Place the carcass back into the pot and continue simmering the bones for another 12-24 hours and follow with step 8 and 9.
  7. If cooking bones only, simply let them simmer for about 24 hours.
  8. Fallon suggests adding the fresh parsley about 10 minutes before finishing the stock, as this will add healthy mineral ions to your broth.
  9. Remove remaining bones from the broth with a slotted spoon and strain the rest through a strainer to remove any bone fragments.

Bone Broth—A Medicinal ‘Soul Food’

Simmering bones over low heat for an entire day will create one of the most nutritious and healing foods there is. You can use this broth for soups, stews, or drink it straight. The broth can also be frozen for future use. Keep in mind that the “skin” that forms on the top is the best part. It contains valuable nutrients, such as sulfur, along with healthful fats, so just stir it back into the broth.

Bone broth used to be a dietary staple, as were fermented foods, and the elimination of these foods from our modern diet is largely to blame for our increasingly poor health, and the need for dietary supplements.

Both broth and fermented foods, such as fermented veggies, are simple and inexpensive to make at home, and both also allow you to make use of a wide variety of leftovers. When you add all the benefits together, it’s hard to imagine a food that will give you more bang for your buck.

Filed Under: Budget, Budget Shopping, Living Sustainably, My Recipes, Natural Living, Nutrition, Paleo Education, Shopping Local

30 Cheap Main Dish Paleo Meals

October 4, 2013 by Jackie Ritz 42 Comments

Paleo is too expensive.

My grocery bill is TOO much since eating this way.

I can’t afford to do this anymore so I’m done.

Sound familiar? I know. I’ve been there. Paleo CAN be expensive, but so can the SAD (standard American diet). ANY diet or lifestyle can be expensive.

The USDA uses national food intake data and grocery price information to calculate different costs for a healthy diet at home. The latest numbers for a four-member family: a thrifty food plan, $146 a week; a low-cost food plan, $191 a week; a moderate-cost plan, $239; a liberal plan, $289 a week. Some food waste is built into these costs (source).

So, let’s be realistic. Look at those numbers. ALL food has gone up…not just Paleo. What category does your family fall into? Are you wanting to eat in the thrifty plan, low-cost, moderate-cost, or liberal plan? Which one can you afford?

Most Americans may only be able to afford the low-cost budget. I know that’s where I fall. My budget for my Paleo family is $200 per week, so I am always looking for low-cost Paleo family meals to make the most out of our budget.

So…here are some of my favorite budget-friendly Paleo meals for a family!

30 Cheap Main Dish Paleo Meals

Beef

beef

Spaghetti Squash Goulash – this recipe makes 8 servings! So cut it in half if you don’t want that many. We freeze it though!

Grain Free Nacho Pot Pie – Mexican twist to a Chicken Pot Pie!!!

Ground Beef Stroganoff – very frugal meal and is, absolutely, delicious.

Bacon and BBQ Burger Salad from – leave the bacon out for an even cheaper meal

Slow Cooker Paleo Pot Roast – throw it in the crockpot and go! So simple!

Healthy Butternut Squash Shepherds Pie – Shepherds Pie has always been one of the most nourishing, yet frugal meals to make!

Deconstructed Hamburgers (Hamburger Salad) – what an awesome idea to do for  family night with the kids!

Crockpot Swiss Steak – I love me some Swiss steak! Use arrowroot if you are avoiding potatoes!

Mexican Breakfast – whip this baby up in minutes, especially if you already have ground beef already in the fridge!

Poultry

chicken

Tomato Basil Chicken – 20 Minute Meal!

Buffalo Chicken Muffins – 2 chicken breasts and 5 eggs make 12 HEARTY muffins!

Loaded Mexican Nachos – you won’t even miss the corn chips!

Spicy Chicken Lettuce Wraps – a healthy version of PF Changs Lettuce Wraps!

Duck Pate – an overseen power food that is EXTREMELY frugal and deeply nutritious!

Grain Free Chicken Parmesan – this looks delicious and you can fry it in my favorite coconut oil if you don’t have an animal fat.

Pork

pork

Italian Sausage with Winter Squash – One Pot Meal!

Slow Cooker Pork Shanks – you can usually find pork shanks for $2-$2.50 per lb!

Grain Free Breakfast Shepherd’s Pie – A grain free, primal , low carb, egg and bacon mini pie with a coconut flour and veggie crust.

Easy Sweet Curry Pork with Acorn Squash – very frugal meal using leftover (or not) pork chops with a delicious coconut milk curry!

Seafood

fish

Tomato Basil Mussels – Mussels are VERY cheap. You can get a entire lb for $4!

Salmon and Broccoli Omelette – eggs are EXTREMELY frugal which allows you to splurge on the salmon (I like this Salmon).

Paleo Fish Tacos – white fish is very budget-friendly, so don’t skip the fish because you think it’s not in your budget!

Fishy Bites – use canned salmon (or tuna for cheaper cost) to make this kid-friendly meal that even adults will love!

Thai Shrimp Salad – Shrimp is the ground beef of the seafood world! It’s very cheap and easy to cook!

Salmon Patties – these are a staple in my house! When you can’t afford fresh salmon get a good canned salmon!

Soups

soup

Creamy Fire Roasted Tomato Soup – one of my favorite soups in the whole world! Sub full fat coconut milk for dairy free!

Easy Taco Soup – this soup is AMAZING! I eat like 3 bowls when we have it!

 Creamy Chicken Tomato Crockpot Soup – another delicious and SIMPLE crockpot recipe!

Roasted Butternut Squash Soup – chicken stock adds a great protein to this dish (here’s how I make my chicken stock). Pair it with this Almond Bread!

Spicy Sausage and Squash Soup – tis the season for all things squash. Use a butternut squash if you can’t find buttercup!


Please come back and tell me you enjoyed some of these delicious, yet very frugal recipes!!


Filed Under: Budget, Round Up Tagged With: budget friendly, cheap paleo meals, dairy free, gluten-free, grain-free, inexpensive paleo meals, main dish budget paleo meals, primal meals for cheap

30 Healthy Living E-Books for $39 – This Week Only!

September 5, 2013 by Jackie Ritz Leave a Comment

9667272100_e18df78042_zI LOVE saving money and this special E-book bundle is a HUGE savings! For one week, Sept. 4-10, 2013, you can save 90% (that’s less than $1.90 per ebook) on this amazing E-book bundle!

Get 30 E-books for Only $39

That’s 90% OFF – A $650 Value!

The best thing about this bundle deal is that it’s loaded with TONS of information on healthy living, real food recipes, non-toxic solutions, holistic remedies for illness/sickness, and SO MUCH MORE.

9664287161_54d9f454b4

What’s an E-book? 

For one low price ($39) you receive 30 E-books in this bundle for 90% off their usual list price of $650.

When you buy the Ebook Bundle all 30 ebooks will be downloaded to your computer, and then you can read them on your laptop, iPad, Kindle, or even on your smart phone (great for checking things when you are out-and-about!)!

The only catch?  This sale only lasts 1 week – so you need to act fast and get this bundle now.

Here are a few of my favorites that are included: 

9665986157_4ff4b448cd

1) DIY Non Toxic Cleaning Recipes – This book is invaluable to any home that is pursuing greater health by eliminating toxic chemicals found in commerical cleaning supplies! It’s loaded with recipes to use around the house, saving you the chemicals and loads of money!


9665986233_89165c3b78


2) Feed Your Fertility – whether you are just starting to plan a family or having challenges trying to conceive, learn to use the principles of Chinese medicine, real food, and healthy living to optimize your fertility and have a healthy baby.


9665986153_7e3380137a


3) Grain Free Desserts – learn to prepare over 90 delicious grain and dairy free breads, cakes, cupcakes, cookies, brownies, and ice creams!


9669218310_be00f2c8ce


4) Culture Your Life – if you are looking to get started into making Kombucha or Kefir, then this is the book for you! It’s loaded with over 45 recipes that are designed to give you confidence and motivation to get started!


And here’s the complete list of books included: 

  • 1 DIY Non-Toxic Cleaning Recipes by Heather Dessinger of Mommypotamus (NEW)
  • 2 Simply Salads by Season by Kristen Michaelis of Food Renegade (NEW)
  • 3 Feed Your Fertility by Emily Bartlett and Laura Erlich (NEW)
  • 4 The Sleep Solution: End Your Insomnia Naturally by Emily Benfit of Butter Believer (NEW)
  • 5 Processed Free by Robin Konie of Thank Your Body (NEW)
  • 6 Pain Free by Robin Konie of Thank Your Body
  • 7 Get Your Fats Straight by Sarah Pope of The Healthy Home Economist (REVISED)
  • 8 Love Your Body by Elizabeth Walling of The Nourished Life (NEW)
  • 9 Quit PMS by Lauren Geertsen of Empowered Sustenance (NEW)
  • 10 Real Food Survival Guide for Busy Moms by Lindsey Gremont of Homemade Mommy (NEW)
  • 11 Grain-free Desserts Jennifer McGruther of Nourished Kitchen
  • 12 Sustainability Starts at Home by Dawn Gifford of Small Footprint Family (NEW)
  • 13 Natural Cocktails by Kendahl Millecam of Our Nourishing Roots
  • 14 Have Your Cake & Lose Weight, Too! by DaNelle Wolford (NEW)
  • 15 Real Fit At Every Age by Julie de Lagarde of Real Fit Mama (NEW)
  • 16 Your Custom Homestead Jill Winger
  • 17 Beyond Broth by Jill Tieman of Real Food Forager (NEW)
  • 18 Gluten-free Vegetarian by Hannah Healy of Healy Real Food Vegetarian (NEW)
  • 19 Kick the Weight with Keto by Kim Knoch of The Eat Fat Lose Fat Blog (NEW)
  • 20 The 30-Day Heartburn Solution by Craig Fear (NEW)
  • 21 From Scratch by Shaye Elliott of The Elliott Homestead (NEW)
  • 22 The Granny Plan by Kathy Block of Granny’s Vital Vittles (NEW)
  • 23 Healer by Joseph Dispenza (NEW)
  • 24 Three Weeks to Vitality: The Ultimate Cleanse by Mary Vance (NEW)
  • 25 Grain Free Meal Plans for Fall by Cara Comini of Health, Home & Happiness
  • 26 Real Food Ingredient Guide by Kelly the Kitchen Kop
  • 27 30 Days of Simple Suppers by Rachel Jones of Nourishing Minimalism
  • 28 Culture Your Life by Louise Kane Buckley of Loula Natural (NEW)
  • 29 Nourishing Our Children Sandrine Love
  • 30 Eating Additive Free by Christy Pooschke of Completely Nourished

Remember — this special end of summer e-book bundle only last 7 days and ends of September 10, 2013 at midnight Pacific. Click here to order now — get all 30 e-books and save over 90%!

9667501892_cff101ff21_z


Filed Under: Budget, Natural Living Tagged With: budget books, healthy living books, healthy living ebook bundle, paleo books

How We Paid Off More Than $27,000 of Debt in 6 Months…and Still Ate Paleo!

August 19, 2013 by Jackie Ritz 234 Comments

When my husband and I sat down to discuss our finances 6 months ago, we were so close to getting ourselves wrapped up in a new mortgage and even more in debt. We had a pile of debt, disguised in the form of what Americans would say is normal. My husband and I had both accumulated student loan debt and we had recently just purchased a new car. I know what you are thinking, student loan debt and car payments aren’t really, truly, debt to be concerned about. Yea, that’s what we thought too.

How It All Started…

Someone in a Facebook group of mine was talking about Dave Ramsey. I had heard about him hundreds of time before but this time, something struck home.

My husband and I wrote out each of our current bills and total due to each, including car debt and our student loan debt. Thankfully, we never had credit card debt. The number was astounding. Here we were, getting ready to purchase a house and we had over $50,000 worth of debt to our name. And when I say about to purchase a house, I mean we had signed the offer and sent it in over to the seller’s agent. The sellers made a counter-offer and we had it in our hands about to sign and something told us to wait. We let the offer expire and the whole deal fell through…thank the Lord! Turns out we don’t even want to live in that state we were about to buy a house in.

This jarring realization of how deep in debt we were prompted us to take a look at what this whole “Dave Ramsey” thing is really about. I kept hearing these Ramsey terms like, “snowball“, “baby steps” and “emergency fund“. I spent the next few days researching about the whole method and devising a plan of attack. I hope this post gives you hope for getting out of debt, no matter if you make a ton of money or not.

Over 6 months ago, we were $50,000 in debt. What was the catalyst for us to turn things around?

I think it was when we actually sat down and wrote out each balance we had for each debt. We never thought of student loans as debt that should be paid off quickly…same for car loans. However, we realized that debt is debt and we wanted to get rid of it as soon as we could.

What strategies did we use to recover our finances?

The first thing we did was look at where we were spending our money. Most bank websites have a nifty tracking devise and you can categorize your spending. We noticed we were spending way too much on groceries (my fault) and eating out. Also, all the random things added up…most of them I couldn’t even figure out what they were.

What adjustments did we make on the spending side?

  • We took that tracking statement from our previous month and devised a plan to make each category significantly smaller.
  • We cancelled our cell phone payments and got rid of our iPhones (for more reasons than one). We signed up for prepaid phones through MetroPCS which brought our $160 cell phone payment down to $60 per month.
  • We cut our cable and starting using Netflix and Hulu to stream shows on our Roku. We bought a cable antenna to use if we want to watch broadcast (newer TV’s have this antenna built in).
  • I enrolled in doTERRA and started selling essential oils to get as much money as I could on the side to help pay down debt.
  • I stopped buying over-the-counter medication and cleaning products and started using essential oils instead.
  • We called various customer services (i.e.XM radio, car maintenance)on various plans and told them we couldn’t afford it anymore. They offered to reduce the payments by more than 75%!
  • We made sure to cut our electricity down by turning off lights and not running the air conditioning too high.
  • I make a lot of homemade cleaners (using this book) to cut down on spending too much on store-bought products.
  • We buy most everything USED at Goodwill, Craigslist, and local thrift stores.
  • We sold A LOT of stuff. We sold a car, bringing us down to a one-car family. We sold furniture. We sold dishes, clothes, toys, etc.
  • We started using the “envelope” system and took out cash for certain things like: my personal money, my husband’s personal money, groceries, entertainment and dining out. We use the cash for the week and when it runs out…it’s out.
  • We don’t use our debit card at all anymore…only for gas.
  • I strategically meal planned our meals by using THIS .

envelope

Did we focus on cutting our spending, boosting our income, or both?

A little of both. My husband’s pay stayed the same. I am a stay at home mom who dabbles into blogging, so I made an effort to try to make a little money from blogging. All the money I earned from blogging went into paying off debt.

All it took was “Baby Steps”…

  1. First, we dropped our savings to $1000. This is baby step #1 in the Dave Ramsey method. Some people have to save up to the $1,000 but we had this in our savings account already. We actually had a lot more. We are money hoarders. We were hoarding our money all the while we had a mountain of debt. Dumb, eh? This, for us, was the hardest thing in this whole process. Dropping our savings to $1,000 was a BIG risk…especially when we no longer had the security of the military. We were civilians now. No career safety net.
  2. The next baby step is paying off every single debt using the “snowball” technique. We took our list of debts and put them in order from smallest to largest. We started paying off the smallest debt first. To do this, our budget had to be PERFECT. We took every bit of extra money left over, after making payments and taking out grocery/personal/entertainment money, and put as much as we could towards this smallest debt. We made the minimum payments on all the rest of our bills. Once that debt was paid off, we took all that money we were paying into that first debt and put it towards the next debt. It was like climbing up a ladder…or rolling a snowball down a hill.
  3. Baby steps 3-5 have to do with investing (college, saving 3-6 months emergency fund 401-K, stocks) and, to be honest, I’m not sure what order they go in…because I don’t care about them right now! We are still in baby step #2 but we have paid off more than $27,000 in 6 short months.

We were able to pay off over $27,000….

  • by budgeting very wisely
  • selling lots of stuff to put towards paying off debt.
  • using some of our savings to pay off debt
  • and continuing to tithe in the process

What is our plan now?

  1. We are getting ready to start paying off OUR LAST DEBT!!! Our Honda that we bought last year (brand new) should be paid off before this year is over (if my calculations are right)!
  2. Then we move onto Baby Step #3, which is saving 3-6 months emergency fund. This will cover 3-6 months of expenses in case anything happens.
  3. After we save up our emergency fund, we will start saving up for a down payment on a house!

I hope this post encourages you to start paying off debt. Make a plan. Get mad at it! And then attack it with everything you have.

If you are interested in learning more about the Dave Ramsey method, I suggest you purchase his book, “The Total Money Makeover“, and, also, look into taking one of his local classes called “Financial Peace University“.


Filed Under: Budget Tagged With: baby steps, dave ramsey, debt, financial freedom, how to budget, snowball

« Previous Page
Next Page »

Primary Sidebar

  • Facebook
  • Instagram
  • Pinterest
  • RSS
  • YouTube

Hi, I'm Jackie Ritz and welcome to The Paleo Mama! I'm a published author, certified herbalist, and voracious researcher of natural medicine and nutrition. I'm glad you're here and I hope you stick around for awhile!

Recent Posts

  • When God Says Pause: Why I Took a 5-Year Break from My Online Business
  • How to Quit Facebook but Keep Your Business Profile
  • Leaving the City for the Country
  • Natural Way to Heart Health

MEAL PLANS

Biblically clean meal plans that are for those love to cook real food

Read More

Footer

Our Blog

The Paleo Mama blog provides simple answers for healthier families through research, tutorials, recipes, and simple remedies for daily needs!

  • Health
  • Essential Oils
  • Recipes
  • Remedies
  • Natural Living
  • Meal Plans

Stick around!

You’ll get instant access to a library of natural remedies and real, paleo food, including our ebooks and free guides we send out.

  • Home
  • Disclosure/Disclaimer
  • Privacy Policy
  • Advertise
  • Contact Me

Copyright © 2025 · Wellness Pro on Genesis Framework · WordPress · Log in