• Skip to primary navigation
  • Skip to content
  • Skip to primary sidebar
  • Skip to footer

The Paleo Mama

Homegrown and Handmade

  • About
  • Blog
    • Podcast
  • Meal Plans
  • Essential Oils
  • Our Farm
    • Great Pyrenees Puppies
    • Goats
      • Goats for Sale
      • Goat Sales Policy
      • Nigerian Dwarf Bucks
        • Ranchocabra Lunar Eclipse

Jackie Ritz

Recycled Coffee Table Milk Stand

April 6, 2015 by Jackie Ritz 9 Comments

We had the fantastic pleasure of moving over 4 times in one year! Yippee! I think I would rather poke my eyes out than move another time with 2 small kids. However, out of all the broken furniture, dings, scratches, missing pieces, came a beautiful creation that my husband made for me — my very own Recycled Coffee Table Milk Stand! 

My amazing and creative husband is going to share how we made this simple, recycled creation! Welcome hunny! 

Thank you for the introduction, Jackie! I’m so excited to be sharing my first, official blog post ever!

What can we do with a bed that is missing one of the components to put it back together, a desk that is completely busted, or a coffee table that has a gash on it so big that no table cover can mask it…making you too embarrassed to use it ever again?

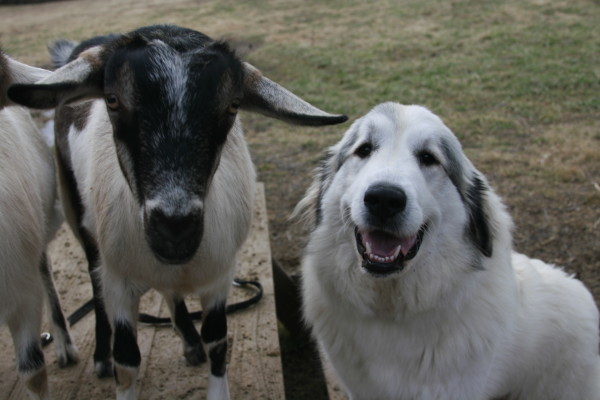
Well put that together with a move to the mountains of western North Carolina, and have a wife that desires raising goats for the wonderful, nutritious milk they make…what do you have?

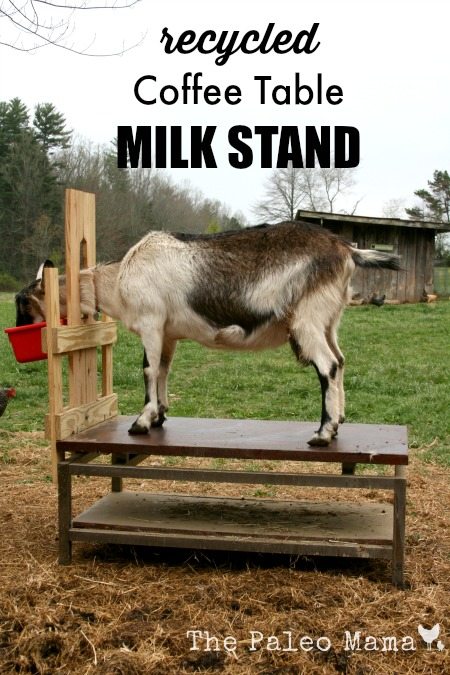
A recycled coffee table milk stand!

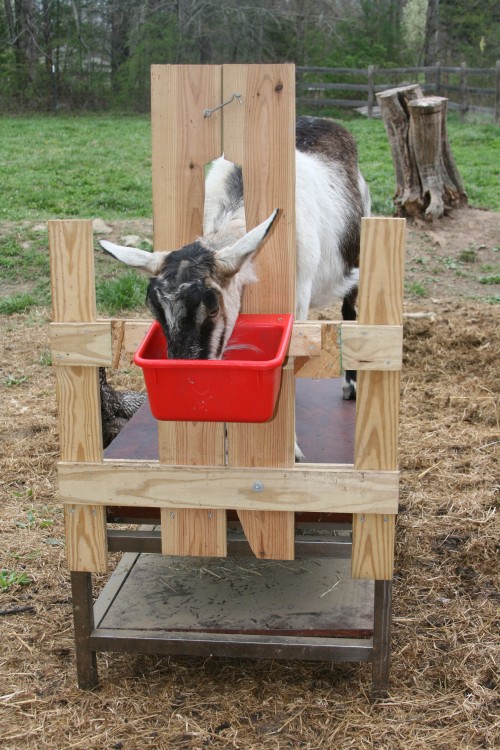
This recycled coffee table milk stand has proven to be exceptional, best part is, I did not have to create it from the floor up – just designed a stanchion that attaches to the side of the existing table, and voila – a milking stand!

What is a stanchion?  Well, for non-milking folks, it is the portion of the milk stand that holds the goat’s head steady (without pinching!) and a food trough, allowing the milker to keep the goat occupied while they efficiently resource that wonderful milk!

So like any budding homesteader coming from the city, where did I go first?  Of course, Google and YouTube!  A quick search of “milk stand stanchion” brought up hundreds of ideas that others have done, allowing me to get the gist and inspiration to make one that works for me.

Starting with the coffee table mentioned above, the other supplies you will need will depend on your final design.  But, to get those creative juices flowing, here is the example of what worked for us:

Materials (yours WILL vary based on your design and coffee table/piece of furniture!):

  • 2 – 1”x4” board cut to 2 pieces measuring 42” each (figured this out by measuring the distance needed to brace my stanchion against the coffee table, comfortably stabilizing the stanchion)
  • 1 – 1”x4” board cut to 4 pieces measuring 38” each (figured this for the cross-pieces needed to stabilize and secure the stanchion to the rest of the stanchion) (see pictures)
  • 1 – 1”x6” board cut to 2 pieces measuring 38″ each (figured this by measuring from the surface top of the table to where the goat’s neck could comfortably fit through to get to the food)
  • 1 – carriage bolt with washers and nut (ours was 3 1/2 inches long. Make it long enough to fit through cross-pieces and 1×6 board to serve as a pivot for the board to latch it in place during use) (see pictures)
  • 2 – “L” brackets with screws for supporting the stanchion onto the surface of the table
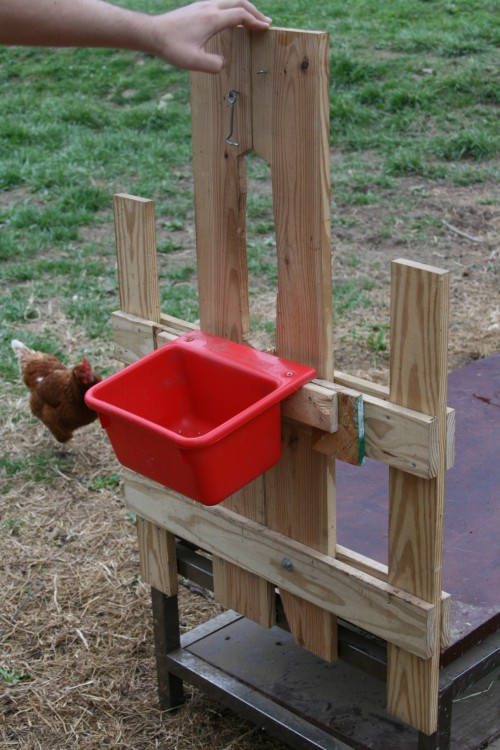
  • Find a hanging bucket (at a local feed store) or online (we have this one). 
  • You will need 1-2 inch wood screws for screwing the boards together and also we used (4) 3 and 1/2 inch screws to fully secure the stanchion to the existing table wood surface, for further strength.

Step-By-Step: 

Step 1: Secure the 1″x 4″ (42 inch) boards to the table, using (4) 3 1/2 inch wood screws.

Step 2: Screw the “cross” pieces (1″x 4″ by 38″) to the pieces you just screwed into the coffee table.  Make sure that one of the pieces rests onto the coffee table top as to provide a surface to further use the “L” brackets to stabilize the stanchion later to it.

IMG_0631

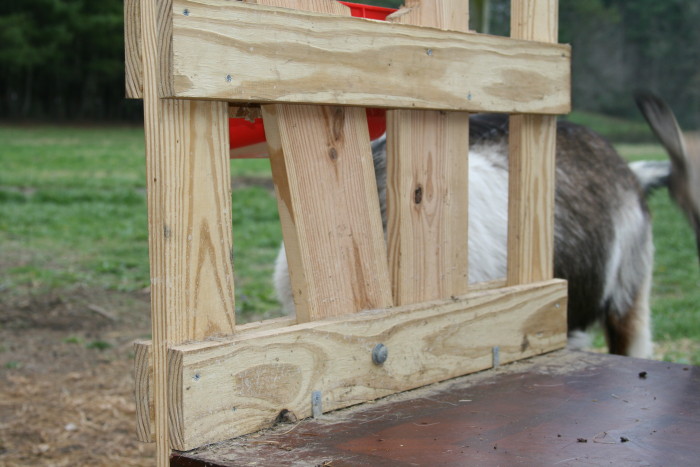
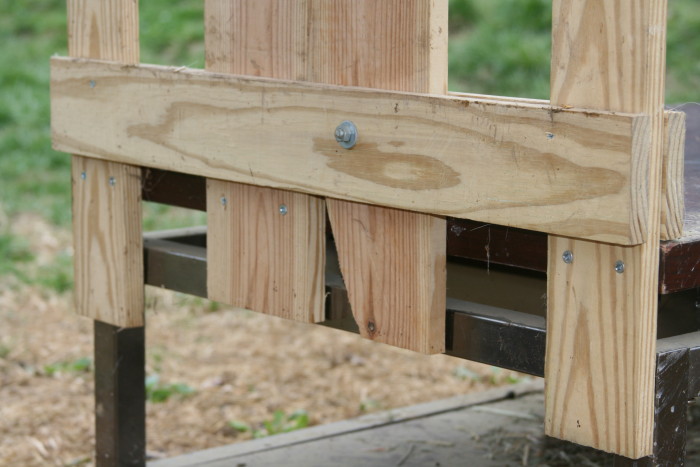
Step 3: Using a jigsaw, cut into the 1″ x 6″ pieces, making sure to “mirror” the cuts to make a hole for the goat neck.  We cut about 2″ into the plank, then down about 8-9 inches, making this hole.  ENSURE to notch one of the planks by cutting a section off of the inside corner (where the two planks touch when the hole is made).  This will allow the plank to pivot on the carriage bolt, allowing it to open the planks, giving you more room to maneuver the goat’s head into position when the planks are pushed together to secure the goat’s head and neck!)

IMG_0610

Step 4: Slide the 1″ x 6″ planks down toward the surface of the coffee table.  Drill a hole big enough to slide the carriage bolt through to create your pivot for the plank.  Screw the other plank into the coffee table surface.  Only screw the plank without the bolt to the cross pieces for additional support.

Step 5: Drill and screw the “L” brackets onto the bottom cross piece and to the surface of the coffee table.

Step 6: Attach the hanging feed bucket to the stanchion with a couple of scrap pieces of wood, to create a gap to hang it from.  Further secure the bucket by screwing it into the stanchion.

IMG_0625

A couple of quick caveats for making your recycled coffee table milk stand: of the two boards used for holding the goat’s neck, you will need to cut out a section into each of the board (either by hand or by jig saw) to create a “hole” for holding the goat’s neck with a wide enough berth to comfortably allow the goat to move their head around!  In addition, if you look at the pictures, I point out where I additionally cut a diagonal section to allow one of the boards to pivot, opening more room for the goat to be held by the stanchion.

IMG_0626

Overall cost was about $30 – in addition, if you do not happen to have a table saw to cut the longer boards, most home improvement stores will cut them for you for free!  Bonus!

I hope this gives you that final inspiration needed to get started repurposing that old, tired, scratched coffee table or piece of furniture into a hard-working functioning recycled coffee table milk stand of your very own!

Recycled Coffee Table Milk Stand Pin

Filed Under: goats, Homesteading, Living Sustainably

Homestead Goals

March 7, 2015 by Jackie Ritz 7 Comments

It’s already March, and as the winter is slowly coming to a close and the sight of daffodils greening up and getting ready to proud fully bloom in all their luster, I am getting our small homestead ready for the season ahead. 

Since we homestead on a rental property of only 3 acres, we are, somewhat, limited in what we can do. However, we are still able to do MUCH more than before. 

Laura_Coppelman_141213-3

PERSONAL & FAMILY GOALS:

  1. Paleo Daddy is home full-time! Yes, he quit his job and came home to work with my blogging/essential oil business and we are so happy! So, our goals have evolved over the past 3 months, which makes it a perfect time to set some new ones. 
  2. Continue homeschool with our 6 year old. We have already decided to move onto First Grade with her! We love this time spent with her being home…and she loves it too! You should see this girl’s social calendar: Mad Scientist Lab at a local museum, Art Class, Enrichment classes with a local homeschool co-op, and private Piano lessons. 
  3. More travel as a family. Can I get an, “amen“, that the kids are finally old enough to just pick up and go more places! 
  4. Purchase or grow all organic food. Since we became financially free (hallelujah!), we have more room in our budget and have decided to make this a priority. We do a weekly Farm Box that is in the Asheville area (tell them Jackie Ritz sent you!), purchase a half grass-fed cow at a time from a friend, get raw cow milk and cream from a local farm, raise our own chickens, and have our own dairy goats. Our goats are not in milk right now, which is why we are supplementing with local raw cow milk. 
  5. Continue to save for the purchase of our future homestead! Since going through Financial Peace University and becoming debt-free, we have decided to be very patient in purchasing our home here in North Carolina. We are hoping to save enough for a 20-50% down payment and are considering purchasing land and then building our home. 

17

FARM GOALS: 

RABBITS: All of our meat rabbits have made their way to our freezer, urging me to hurry up and order a rabbit cookbook. I can roast a rabbit. The Paleo Daddy can smoke a rabbit on our Big Green Egg like nobody’s business…but that’s about it. So, I have nearly 30 rabbits that need to be eaten…and the first thing on my list is to make Rabbit Sausage! 

LAYING HENS:

  • Since we have a handsome rooster who is doing a great job at flirting with the ladies, we purchased a used incubator and are going to be incubating some of our eggs. We have 23 chickens, so we don’t *need* anymore chicks, but we want to show the kids how they grow from egg to chick. 
  • Muck out the chicken coop. We use the deep-litter method in the chicken coop and barn during the winter. 

18

MEAT CHICKENS: We will be purchasing 40 meat chickens to raise for meat. We will keep them in the barn until they are big enough to go out and pasture during the day.

SHEEP: Because our land is only 3 acres, there is no way we could have a steer for meat. Thankfully, we have a friend who raises them and we purchase it in bulk from him. However, sheep meat is delicious, easy raise, 100% grass-fed (so no extra money on feed), and will fit right in with our 5 goats. We are looking to purchase 2 Katahdin sheep this spring and raise them till they are large enough to butcher. 

BEES: We were hoping to purchase bees this year, but since we won’t be purchasing a home till the fall of 2015, we are probably going to have to wait on that one. We don’t want to have to relocate the bees and avoid problems with them getting lost.

_MG_9657

LIVESTOCK GUARDIAN DOG: Our Great Pyrenees is *almost* ready to be let loose with the chickens and goats full-time! We have raised her the slow and hard way, training her the proper way, so she can give us a protected flock. She is 15 months now and is, nearly, finished with the annoying puppy stage. She still antagonizes the rooster, so we cannot leave her alone with the chickens just yet. She does great with our goats, which is the reason we purchased her. However, our goats and chickens are together, so we need to wait a few more months and continue our training with her before she can be trusted with the chickens full-time. 

DAIRY GOATS: 

  • We are purchasing a Nubian doe-in-milk this month (March) or next! We have 4 other Alpine does, none of them are in milk anymore, and we are excited to add a new breed. Nubians are known for their floppy ears and their milk that is high in butterfat! 
  • Sell our castrated Alpine buck so someone can use him for pasture maintenance or meat. We do NOT like the taste of goat so we don’t plan on eating him…plus I just couldn’t. Just can’t. 
  • Purchase a registered Alpine buck for breeding in the fall and to breed our 4 Alpine does with. 
  • Breed our Nubian in the fall with a local Nubian buck. We will have to pay for stud service. 
  • Shave our goats in the spring. We buzz them at the end of the cold season to help prevent lice. 

GARDEN

  • Build 2 raised beds. Since we are on a rental and our soil is predominately clay, we will be growing our veggies in raised beds. 
  • Collect any needed heirloom seeds. 
  • Make more lacto-fermented foods with our produce. 
  • Preserve or can.

CHEESE-MAKING: Continue to make goat cheese, mozzarella, yogurt, kefir, creme fraiche, and other cheeses with our local raw cow milk and goat milk. 

SOAP-MAKING: I enjoy making goat’s milk soap and am learning more about the art of soap-making. I am no expert, but making soap is cathartic to me and I plan on purchasing THIS BOOK as a resource to making different varieties of soap. 

_MG_9693

Well, now I’m exhausted thinking about all the work to be done! I’m praying for a beautiful harvest this year and the effort I put into our homestead is 100% worth it. My children are learning the most valuable lessons on our little farm and I wouldn’t trade that for more time. 

May you have a blessed year!

Eucharisteo! 


Filed Under: Grassfed Beef, Homesteading, Living Sustainably, Natural Living, Shopping Local

Spicy Paleo Lasagna

March 4, 2015 by Jackie Ritz 7 Comments

SpicyPaleoLasagna_H FB

Today I’m welcoming Angie from Simplicity in Bloom to the blog to share with you all her delicious, mouth-watering, Paleo Lasagna recipe! Thank you, Angie, for sharing this dairy-free and gluten-free lasagna with my readers! 

I love comfort foods and lasagna is one of the best!  It’s always filling, satisfying and is actually very easy to make.  One of my favorite things about lasagna is how many different ways it can be prepared.  Various types of meat, different levels of spice, even adding vegetables can change a tried-and-true comfort food into to a dish that is sure to please any family.

I usually prefer spicy food so I’m always looking for ways to add a little zing!  Recently I created a Paleo version of lasagna with lots of spice that I wanted to share.  No worries if spicy food isn’t for you – I’ve added notes in the recipe to tone it down for those with a milder palate.

This recipe uses zucchini in place of traditional lasagna noodles and does not use cheese.  My kids were a little skeptical when I told them about this particular version of lasagna but after the first bite, they were asking when we could have it again.  BIG WIN!!  Give this recipe a try.  You will be pleasantly surprised!

Spicy Paleo Lasagna Recipe

INGREDIENTS: 

  • 2 lbs ground Italian sausage
  • 1 medium yellow onion, diced
  • 3 cloves garlic, minced
  • (2) 14.5oz cans diced organic tomatoes (I used Fire Roasted for more zing)
  • 6oz can tomato paste
  • 24oz pasta sauce (I used a spicy variety)
  • ¼ tsp cayenne pepper – optional
  • ½ tsp Italian seasoning
  • ½ tsp sea salt
  • ½ tsp ground black pepper
  • 2 Tbsp chopped fresh parsley
  • 2 Tbsp chopped fresh basil
  • 3 medium zucchini, sliced slightly thicker than a lasagna noodle

DIRECTIONS:  

SimmeringSauce

STEP ONE: Brown the meat in a large skillet.  Add the diced onions and garlic.  Once the meat is fully cooked, stir in the diced tomatoes, tomato paste, and seasonings.  Simmer uncovered for 1 ½ hours, stirring occasionally until the sauce has thickened.  

ZucchiniSlices

STEP TWO: While the sauce is simmering, peel the zucchini and slice it length-wise.  Make each slice a little thicker than a lasagna noodle.  A mandoline slicer would work well for this.  I don’t have one so my slices were less than perfect.  As it turns out, it didn’t matter.  Still tasted great! 

STEP THREE: Preheat the oven to 375 degrees F.  Grease your favorite lasagna baking dish (I used a 9”x13” glass pan).  

AssemblingLasagna

STEP FOUR: To assemble, spread a thin layer of meat sauce in the bottom of the baking dish.  Add a layer of zucchini slices.  Spread 1/3 of the remaining sauce over the zucchini.  Repeat layers ending with meat sauce on top.  Mine had three layers of zucchini slices and four layers of sauce including the sauce in the bottom of the baking dish.

ReadyToBake

STEP FIVE: Bake in preheated oven for 30 minutes.

Just to prepare you – without noodles and a cheese mixture, this lasagna doesn’t maintain a neat stacked form.  It spreads out a bit on the plate.  That did not cause a bit of concern – we had 100% clean plates!  I hope your family enjoys this recipe as much as mine did.  Simply yours!  

ABOUT THE AUTHOR

AngieImageAngie is a wife, mother of three teenagers, proud owner of two spunky black labs, graphic designer, and blogger at Simplicity in Bloom.  She and her family enjoy an active lifestyle including sports, long walks with the dogs, and summer evenings in the backyard.

Because Angie feels that life has gotten too busy to appreciate “the here and now,” she is on a journey to find the simpler things.  She enjoys sharing the new ideas and experiences she encounters on her journey.  In her blog, Angie explores simplicity in many common areas: recipes, quick financial tips, thoughtful homemade gifts, home improvements, cleaning options, and using essential oils.  Look for simplicity on Angie’s blog, Facebook page, Pinterest page, Twitter, and Instagram.

SpicyPaleoLasagna_V PIN

Filed Under: Grassfed Beef, My Recipes, Natural Living, Starting Paleo

How to Make Your Own Moby Wrap

March 2, 2015 by Jackie Ritz 5 Comments


Today I’m welcoming Darla from Dear Darla on the blog! You are going to love this post from Darla and see how easy it is to make your own “Fauxby” Moby Wrap (don’t you just love saying that?!). Mama’s, she is giving you your hands back and your little ones are going to love being safe and snug next to your heartbeat again! 

“Help! My Baby refuses to be put down!” Oh Mama, I have been in your skin. You have this new baby that you have waited so long for and you are beaming with love for your little one, but you’re also starving and you have to do a load of laundry or your daughter is going to have to wear her Elsa dress to church (again).  This is when we choose between making a salad with one hand,  or put the baby down and risk waking him and hearing him cry in protest. Well, there is another option. You can wear your baby.

It is growing in popularity to wear our babies. Not just because of the cute wraps and carriers available but also because of our baby’s needs and how they develop after birth. The concept of the “Fourth Trimester” is a helpful way of looking at it. My son, for example, spent 40 weeks happy and comfortable in the womb. He got to hear my heartbeat, breathing, speaking and singing. He was able to feel the ebb and flow of my body as it naturally moved throughout my day. It’s the only comfort he has ever known up to this point. Then, he was born. There were bright lights and the noises were much louder. All of a sudden, his world went from the close and quiet quarters of the womb, to the infinite and terrifying open air. It’s no wonder his instincts drove him right to mother’s skin. It is no wonder he “refuses to be put down” sometimes.  It’s no wonder he screams in protest and fear when he can’t find me.

DearDarlaFauxby5
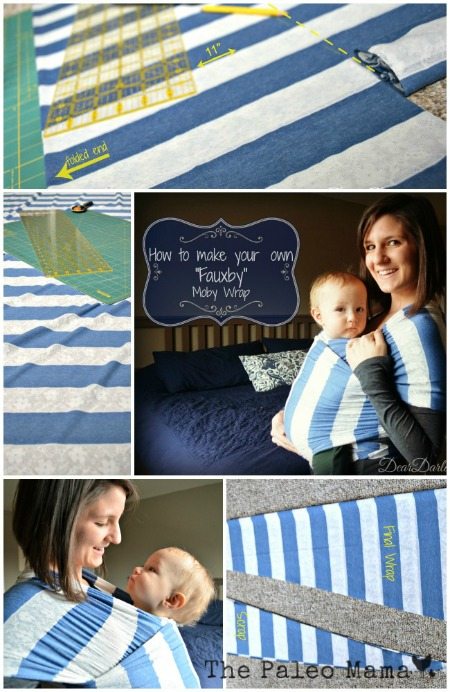
The transition from ‘Womb to World” takes a long time. Our patience and  sympathy will help our babies along the way.  You cannot spoil a newborn. They don’t have the cognition to muster manipulation, they just need your comfort and to know they can trust you. Wearing our babies kissably close helps them feel secure while helping us eat more than granola bars for the first few months. 


My favorite carrier is the Faux Moby Wrap I made at home. The “Fauxby”, if you will. It’s lightweight and easily transitions to fit as your and your baby’s bodies change. It’s easy to make, cheaper and you get to customize it for yourself.  If I had to put it in terms we can all understand, it’s about as easy to make as putting a king size duvet cover on. It takes a little math and calculated fineness, but it can be done and you’ll feel really proud of yourself afterwards.

I didn’t need much. I have this rotary cutting set. These are essential for crafting because I can’t cut a straight line to save my life. I would highly suggest using one for this project because we aren’t sewing so our edges will remain raw and visible.

DearDarlafauxby

 You’ll need 5-6 yards of a fabric of your choice. I made this wrap for a summer baby so I was looking for something lightweight and breathable. You want something stretchy, like a t-shirt or a jersey skirt. This is the hardest part of making your wrap! I know. Don’t be discouraged, there are so many options and it’s pretty intuitive and easy to figure it out once you get to the store. A few key words to look for in the fabric descriptions are: knit, rayon, polyester blends. Basically, anything stretchy in that section will work.  The original Moby is 6 yards long, I’ve found that to be too long for my small frame, so I trimmed mine to about 5 yards. Anywhere between 5 and 6 should be fine.  The fabric comes wide enough to get three wraps out of the deal too! So, you can be a really great friend and give a couple away as humble brag baby shower gifts. You’re awesome.

One more note on buying fabric, check coupons! There is always a sale going on!

Ok, enough chatting…let me show you how to make your own moby wrap! 

How to Make Your Own Moby Wrap:

ITEMS NEEDED: 

  • 5-6 yards of fabric 
  • Rotary Cutting Set

Step #1:

Measure the width of your fabric and then fold your fabric in half “hot dog style” so your salvage ends are together. Divide the width by three. (Mine was 66 inches wide so I had enough for three 22-inch-wide wraps.)  Take the folded end, and measure and mark in half of that number from the edge towards the lose ends. For me, that was 11 inches. Cut the whole length of the fabric 11 inches from the fold so when it opens up, you have three 22 inch wide strips of 5-6 yards.

DearDarlaFauxby1

 Step #2: 

Now you taper the ends so that they are more manageable to tie up.  Leave your first cut folded “hot dog style” and then fold it “hamburger style” so now the ends of your wrap are together and you have 4 pieces of fabric you’re cutting through.

DearDarlaFauxby2

 Step #3: 

At this point, my wrap had to taper from 11” to 2”. I did this over the course of 4’. I marked the ends at 2“, then 2’ in made a mark at 6” and then 2’ in again I marked the top at 11”. I drew a line to connect each mark and cut.

DearDarlaFauxby3

That is it! All you have to do now is check out the video below to learn how to put it on and carry your baby safely and you’re all set! It only took two cuts and now you have your own Fauxby wrap! You can cuddle and bond with your baby and eat a meal with both hands, you may even fold some laundry if you’re feeling bold.  I’m excited for you.

ABOUT THE AUTHOR: 

My name is Darla. I’m a lover and pursuer of many things. In the stage of life I’m in, there is so much to try and so much life to experience. The time is flying. The days are long but the months seem so short. I want to remember it all. I want to share what has worked for me. I want to process and protest some things that I used to just accept. Mostly, I long to grow. To become a stronger wife, a wiser, more intuitive mother and a daring and brave woman after Gods gracious heart.

Follow Darla: 

  • DearDarla.com
  • Facebook.com/Deardarlajean
  • Instagram @DearDarlaJean
  • www.pinterest.com/DearDarlaJean/

How to Make Your Own Moby Wrap

Filed Under: breastfeeding, Living Sustainably, Natural Living, Paleo Baby

Get a Month’s Worth of Paleo Meal Plans for FREE!

February 25, 2015 by Jackie Ritz 14 Comments

Fresh raw food ingredients for Paleo diet

Are you thinking about trying Paleo but you aren’t sure how to make it work for your family? 

Are you on a budget and think that eating Paleo is too expensive? 

Or maybe you have been eating Paleo for awhile and would like some more guidance and simplicity on meal planning. 

You are in the right place! 

I’ve created a WHOLE MONTH of budget-friendly meal plans for you! The best part? These are EASY to make. You will not be in the kitchen forever…maybe 30 minutes max to prep a healthy and whole meal for your family! 

To get 4 weeks of meals plans PLUS a printable grocery list, sign up below by leaving your name and email. 

You will get your first week of meal plans TODAY and then, one email a week, for four weeks! If you don’t see the form below, click here. 

SUBSCRIBE TO OUR FREE MEAL PLANS!

* indicates required


Fresh raw food ingredients for Paleo diet

Filed Under: Budget, Budget Shopping, Living Sustainably, My Recipes, Natural Living, Starting Paleo

Essential Oils and Hormone Support

February 24, 2015 by Jackie Ritz 1 Comment

 Today I’m welcoming Lora from The 21st Century Mama to my blog! She is going to share a wealth of information on essential oils and hormone support!  Let’s give it up to my expat friend Lora! 

When we talk about hormones in every day life, we are usually talking about our menstrual cycles and periods and PMS. However, there is much more to it than just the so called “women’s problems”. 

While hormones do control the reproductive system and therefore your periods and your PMS, they also controls the internal balance of the body’s systems; our body’s response to stress and injury and even our body’s energy levels. 

There are no less than ten glands or organs that control our hormone production, and balance each hormone relative to the other hormones in our body so that our bodies can function properly.

Below I have looked at the five most problematic organs that can be supported by essential oils.  

So the support you give your endocrine system in terms of a healthy diet; adequate exercise and adequate sleep is really important because it directly affects how you feel, and how your body functions on a day-to-day basis. When any one of these glands or organs becomes sluggish or over excited, they can change the level of one or several hormones, which can throw off the delicate balance of the entire body. 

In addition to the support you give your body via your lifestyle choices, there are some essential oils that can also provide some support to the various glands or organs of the endocrine system. I’ve listed some of these essential oils below.

The Thyroid – Frankincense and Lemongrass: 

The thyroid gland controls your body’s metabolic rate and digestive system as well as the function of the heart and brain development. It does this by producing two hormones: thyroxine and triiodothyronine. 

The Pancreas – Cinnamon, Rosemary and Basil:

The Pancreas is a gland that controls the production of digestive enzymes, which break down and digest food after you eat. It also produces hormones that control the glucose levels in the blood, such as insulin and glucagon. 

Maintaining steady glucose levels in the blood is important as it ensures that the body has a steady supply of energy. This energy is used for the body’s metabolism, when we exercise and to fuel the parts of the brain that use glucose.

Cinnamon supplements, when taken for a period of three months, has been found to significantly improve blood glucose control in Chinese patients with type 2 Diabetes taking Gliclazide (a prescribed diabetic medication) Source. 

Basil leaf extract was shown to help maintain an already healthy blood glucose in diabetes patients, suggesting that Basil could be used as dietary therapy to help strengthen the immune system (source).

Pituitary Gland – Frankincense, Sandalwood and Vetiver: 

The pituitary gland is the “master gland” of the hormone system. It senses the body’s needs and sends signals to other glands and organs throughout the body to regulate their function. For example it secretes hormones that regulates the function of the thyroid, the adrenals and the ovaries or testes. 

The pituitary gland controls metabolism, reproduction, growth and blood pressure, along with many other functions. 

Giving your pituitary gland the right support is extremely important as it controls the function of so many other glands and organs in the body. 

Adrenal Glands – Basil and Rosemary:

The adrenal glands control the level of salt and water levels in the blood, which in turn controls blood pressure along with producing male sex hormones such as testosterone. They also produce cortisol and adrenaline which deal with stress responses in the body and helps control the body’s metabolism. 

Ovaries – Rosemary and Geranium: 

The ovaries are part of a woman’s reproductive system and they produce eggs for fertilization alongside the reproductive hormones oestrogen and progesterone. 

Both oestrogen and progesterone levels need to be balanced for optimal reproductive health. An imbalance of these hormones can lead to a decrease in fertility and alterations to a woman’s menstrual cycle. 

How to Apply & Diluting for Topical Use: 

I would dilute the essential oils according to the recommend guidelines in the chart below and apply them over the organ or gland you want to support and on the reflex points in the feet. With the “hotter” oils, like cinnamon, rosemary, basil, and lemongrass, you will want to use a higher dilution. 

You dilute essential oils with a carrier oil such as: fractionated coconut oil, almond oil, or jojoba oil. 

Dilution Chart

Where to Buy High Quality Essential Oils at a Discount: 

I recommend that when using essential oils to support your hormones, that you use the highest and most therapeutic quality you can find. CLICK HERE to see my brand of choice and how you can purchase them at a discount. 

Hopefully this blog post gives you some ideas on ways to support the endocrine system, but if you have any symptoms of an endocrine disorder, please consult a doctor. These recommendations are, simply, to support your overall wellness. 

ABOUT THE AUTHOR: 

Lora is an expat, currently living in Dubai in the Middle East, although the UK is where she was born and raised. She arrived in Dubai newly married and within three years has had two under two. A chequered career history of actress and lawyer (and a general need to talk too much), along with the new career of being a Stay At Home Mum led her to the world of blogging. She spends her time chasing the two year old, cleaning the one year old and liberally applying Balance to the kids and herself to get through the day unscathed! You can find her on her blog, Facebook page or Instagram. 
 
field of grass and perfect sky

Filed Under: essential oils, Guest Posts, Living Sustainably, Natural Living

« Previous Page
Next Page »

Primary Sidebar

  • Facebook
  • Instagram
  • Pinterest
  • RSS
  • YouTube

Hi, I'm Jackie Ritz and welcome to The Paleo Mama! I'm a published author, certified herbalist, and voracious researcher of natural medicine and nutrition. I'm glad you're here and I hope you stick around for awhile!

Recent Posts

  • When God Says Pause: Why I Took a 5-Year Break from My Online Business
  • How to Quit Facebook but Keep Your Business Profile
  • Leaving the City for the Country
  • Natural Way to Heart Health

MEAL PLANS

Biblically clean meal plans that are for those love to cook real food

Read More

Footer

Our Blog

The Paleo Mama blog provides simple answers for healthier families through research, tutorials, recipes, and simple remedies for daily needs!

  • Health
  • Essential Oils
  • Recipes
  • Remedies
  • Natural Living
  • Meal Plans

Stick around!

You’ll get instant access to a library of natural remedies and real, paleo food, including our ebooks and free guides we send out.

  • Home
  • Disclosure/Disclaimer
  • Privacy Policy
  • Advertise
  • Contact Me

Copyright © 2025 · Wellness Pro on Genesis Framework · WordPress · Log in