• Skip to primary navigation
  • Skip to content
  • Skip to primary sidebar
  • Skip to footer

The Paleo Mama

Homegrown and Handmade

  • About
  • Blog
    • Podcast
  • Meal Plans
  • Essential Oils
  • Our Farm
    • Great Pyrenees Puppies
    • Goats
      • Goats for Sale
      • Goat Sales Policy
      • Nigerian Dwarf Bucks
        • Ranchocabra Lunar Eclipse

gluten-free

5 Ways to Start Homesteading (No Matter Where You Live)

October 2, 2013 by Jackie Ritz 3 Comments

Today I’m excited to share this guest post from Colleen of Five Little Homesteaders!  I love her blog for it’s encouragement of self-reliance, DIY posts, and great homesteading ideas! Please head over to check out her amazing blog and don’t forget to follow Five LIttle Homesteaders on Facebook!  Please welcome, Colleen! -Jackie @ The Paleo Mama! 

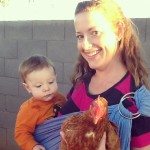
Greetings! I’m so excited to be guest posting over on The Paleo Mama today. My family and I are currently living the homesteading lifestyle in Phoenix, Arizona. I blog about our trials and successes on my blog Five Little Homesteaders. I love reading about Jackie’s homesteading adventures and I especially loved her recent post on goat-milking.

We don’t have goats on our little homestead but we do have chickens – six of them. And you might be surprised to hear that when I say little homestead, I mean LITTLE. We currently live on a .15 acre lot near downtown Phoenix.

You see, we’re urban homesteaders and we make the most of the little bit of land that we have – gardening and raising our small flock of chickens. I’m here today to assure you that you CAN homestead. You may think your lot is too small and that you don’t have enough time, but after reading this post, I hope you’ll feel like there is something you can do to get yourself a little closer to the land, no matter how small that piece of land is.

5 Ways to Start Homesteading (No Matter Where You Live):

1.  Build a raised bed.

paleomama5

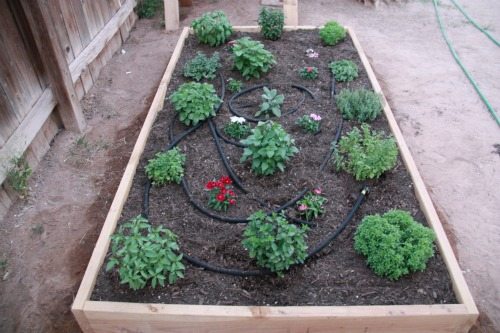
Building a raised bed garden in your back (or front) yard doesn’t have to be expensive or time consuming.  My husband has built us all manor of raised beds but one of my favorites is incredibly easy and cheap, costing just $30!  Raised beds are great for the beginning gardener because they allow you to control the soil quality more easily and don’t require any tilling or special knowledge.

2.  Get a good scratch-cooking cookbook.

Cooking from scratch is a habit that many homesteaders embrace.  Start with getting a good cookbook and quality ingredients. (I realize many/most of you who read this blog follow the Paleo diet and probably already cook most of your own food from scratch, so there you go!  You’re on your way to being a homesteader!)

3.  Start a compost pile.

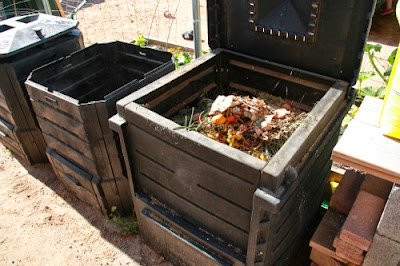
Rather than throwing out your food waste or grass clippings, toss them into a pile in your backyard (preferably in a compost bin) and start a compost pile.  It is pretty simple to do and you can use the compost to enrich your garden each season.

4.  Learn to preserve your surplus. 

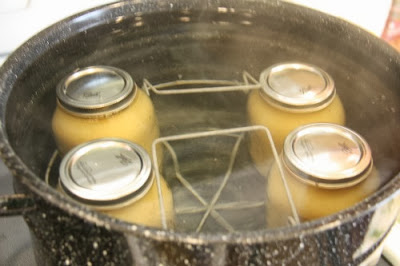
Once you start your garden, you’ll find that you quickly begin getting more of certain crops than you know what to do with.  This is the perfect time to learn to preserve.  It can be as simple as freezing produce properly or as complicated as learning to pressure can.  Start simple and ask for help.  I learned to water bath can by having my mom over one morning and she walked me through it.  Now I’ve got it down and actually really enjoy doing it!

5.  Get chickens!

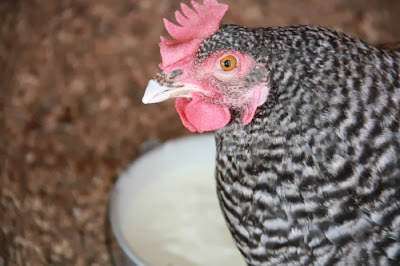
Not every city allows them but more and more cities are opening up to the idea. Check local ordinances and if you are allowed, get a couple of chickens. Eggs that you raise in your backyard cannot be beat.  In Phoenix we are allowed to have up to 20(!) chickens.  We currently have 6, but I’m hoping to raise that to 10 this spring.  Start small and don’t be intimidated.  At the end of the day, my chickens are easier to care for than our family dog.

In the past several years my family and I have become increasingly more self-sufficient – living off our land more and more.  It has been incredibly rewarding for us and educational for our children.  I think you’ll agree, if you give it a try!

You can continue to follow homesteading endeavors on my Facebook page and my blog! 

Headshot - CAnderson


Colleen is a special education teacher turned stay-at-home mom to three little ones – ages 4, 2, and 1. Her days are filled with laughing and tears, joys and frustrations, toddlers and babies.  The basics of gardening were gifted to her by her mother and father starting at a very young age.  Through their homesteading adventures, she hopes to lead her family down the path of leading a more sustainable, intentional, and full life.


Shared on The Prairie Homestead

Filed Under: Living Sustainably, Natural Living Tagged With: canning, chickens, compost, gluten-free, homesteading, paleo, primal, urban homesteading

Buffalo Chicken Muffins

September 28, 2013 by Jackie Ritz 31 Comments

buffalo chicken muffins

I was going to post these next week but I think today is good but wanted to get them to you in time for the Saturday football games! These muffins are delicious. I am a HUGE fan of buffalo chicken wings…HUGE. But they are just so terrible for you. We make them ourselves sometimes to cut down on the loaded transfats from frying them in canola or peanut oil, or whatever they use. But, I wanted to create something that I could grab in a hurry and that was actually good for me. Great thing about these Buffalo Chicken Muffins is that they are loaded with protein and, also, perfect for you if you are doing “Kick the Weight with Keto” with me!

The Buffalo Chicken Muffins do the trick! In fact you might not even want to eat chicken wings after these! I’m not joking…these are amazing! You can make a a batch for the week and then just reheat them accordingly. Another great thing about these muffins is that they are CHEAP to make, especially if you use chicken breast and not expensive ground chicken.

I hope you enjoy!

Buffalo Chicken Muffins

buffalochicky

Ingredients:

  • 2 chicken breasts (raw) or 1lb of ground chicken (cheaper to grind yourself in a food processor)
  • 5 eggs
  • 1/2 cup of bleu cheese (you can omit this if you really, truly need to)
  • 2 green onions, chopped
  • 1/4 cup of Frank’s RedHot Buffalo sauce
  • 1/2 teaspoon salt
  • 1/2 teaspoon pepper
  • 1/2 teaspoon baking soda

Directions: 

1) Heat the oven to 350 degrees.

2) Chop up the raw chicken breast into large chunks. Then throw them in the food processor. Process for about 30 seconds until it is completely ground. Let it rest for a second.

3) In another bowl add the eggs, green onions, bleu cheese, baking soda, salt and pepper. Mix till blended.

4) Add the chicken, bleu cheese, and hot sauce to the bowl and mix until everything is incorporation.

5) Scoop into a silicone muffin pan (I love this one) or a heavily greased muffin pan.

6) Bake for 25 minutes till muffins are firm.

7) Serve with extra hot sauce, ranch, celery and carrots! Makes 12 muffins!

buffalochicken2

buffchicken

Filed Under: My Recipes Tagged With: buffalo chicken muffins, buffalo chicken wings, chicken muffins, gluten-free, grain-free, paleo chicken wings

Pumpkin Pie in 2 Minutes Flat!

September 27, 2013 by Jackie Ritz 96 Comments

As a mother of 2 kids at home, 2 goats (one in milk), 17 chickens, and a full-time cleaner and personal laundromat, I am STRAPPED for time. I don’t have time to make pie, cookies, or delicious treats for my kids everyday. I make 3 Paleo meals a day and THAT’S it! My kitchen is a disaster most days!

But it’s pumpkin season and I LOVE me some pumpkin. But I don’t want to make a whole pie. I might eat it all! So, I’ve been trying to find a fix for my pumpkin craving. My Pumpkin Pie in a Cup is delicious, but sometimes I want to chew my pumpkin and not drink it.

I don’t mind microwaves either. I know some people refuse to use them and if you’re reading this and now realize that this recipe requires a microwave…I’m sorry. How’d you think you were gonna get Pumpkin Pie in 2 minutes without a microwave?! I’m sure you can use your oven if you really want to. I’m an honest person. I’m not going to tell you microwaves are bad and then just secretly use one. I have a microwave and I use it often.

So, I put the genius idea of my Mug Brownie together with my Pumpkin smoothie and this is what I’ve come up with. This is very much the texture of Pumpkin Pie because there is no “cake-y” ingredients in it like coconut flour or almond flour. I really suggest you make the crust because it gives it that crunch that blends well with the smooth texture of the Pumpkin!

Pumpkin Pie in 2 Minutes Flat!


Ingredients:

  • 1/2 cup of pureed pumpkin
  • 1 egg
  • 1/4 teaspoon of stevia or 2 TB of raw honey/or maple syrup
  • 1 teaspoon of Pumpkin Pie spice

Crust (Optional) – you can totally make this without the crust…although you would be missing out!

  • 1 TB butter or Ghee
  • 1 TB shredded coconut
  • 1 TB almond flour
  • (optional) sprinkle of coconut sugar

Directions:

1. Put the butter/ghee in a large ramekin and toss in microwave for 3o seconds to melt.

2. Add the shredded coconut and the almond flour to the butter and mix it around with a spoon.  Pat it down to form the crust. Sprinkle with coconut sugar if you like.

pumpkin pie

3. In a separate bowl, mix the pumpkin, egg, pumpkin pie spice, and sweetener of choice together till smooth.

4. Pour the pumpkin mixture into the large ramekin over the crust.

5. Use fingers to form into a pretty little pie!

6. Toss in microwave for 2 minutes. After 2 minutes is up, check it. If the center is still a little wet, then pop it back in for another 20-30 seconds!

_MG_7207

pumpkin pie 2

7. Careful… pumpkin gets really hot! Add your favorite toppings: coconut butter, drizzle of honey or maple syrup, pecans, whipped cream, cinnamon, or butter/ghee and eat!!! My favorite toppings are coconut butter, extra pumpkin pie spice, and pecans!

8. Enjoy and try to share 😉

pumpkin pie 2

This recipe is shared on Holistic Squid, Kelly the Kitchen Kop, and Real Food Forager.

Filed Under: My Recipes Tagged With: dairy free, gluten-free, grain-free, microwave pumpkin pie, paleo pumpkin pie, primal pumpkin pie, pumpkin pie, quick pumpkin pie

Paleo Meal Plans- 50% Off This Week Only!!! (Sale extended to 10/7!)

September 26, 2013 by Jackie Ritz 2 Comments

brainfood

Hey everyone! I wanted to send out a quick email to tell you about a really great sale that is happening this week only. It’s a Back to School Sale to make your life easier! Holistic Squid offers two different plans, depending on what your diet preferences are: Real Food Meal Plans and Paleo Meal Plans.

These plans will make your life easier!

That’s right, your dinners will be all planned out,  and Holistic Squid will even hook you up with a complete shopping list so all you have to do it grab the ingredients and get cooking quick and delicious meals your whole family will love.

The Real Food Meal Plans and Paleo Meal Plans are 50% OFF if you subscribe this week using coupon code BRAINFOOD.

1 year subscription: $72 now only $36/year

Quarterly Subscription: $33 now only $16.50/quarter

Monthly Subscription: $14 now only $7/month.

Excited yet? Subscribe now or keep reading.

Screen Shot 2013-08-28 at 3.06.20 PM

Healthy eating doesn’t have to be a chore. But, lots of times it just doesn’t come easy to a busy family with kids back to school. You are running around to practices, pick-up lines, and then, on top of that, haven’t even thought about cooking a healthy meal for the night. As a busy mom, myself, I feel your pain. I have 2 goats, 17 chickens, 2 dogs, 2 kids at home with me, I work from home, and try to manage to keep my house clean on top of all that. It just doesn’t happen sometimes.

These meal plans are my lifesaver. All I have to do is pick up the groceries for the week and follow the recipes in the evening. But, don’t just listen to me. Look at the feedback from others who are using these meal plans:

“This working mom’s life has gotten a whole lot easier thanks to you – most appreciative of your hard work – thank you!!” – M.

“I get your meal plans and they are truly WONDERFUL! Thank you for taking the time to do them, we haven’t had cereal for dinner in weeks.” – Selene

“I’m a busy business owner and first time mom to a 19 month old who wants to feed my family nutritious meals and stop eating out all the time.  I love how the meals are flavorful, toddler friendly, and packed full of nutrition!” – Jenny

“You really make it easy to come home and have a healthy meal on the table in no time.” –  Mare

“As a single dad of 4 kids, I have been a subscriber to your Real Food Meal Plan since February.  It has saved me immeasurable time and we have enjoyed your recipes.” – Jean

Don’t wait any longer! This special offer is only available to September 30 at midnight. Use the code BRAINFOOD when you checkout to receive a 50% discount for the entire time you are subscribed!!!

Click here to order Real Food Meal Plans at 50% OFF today!

Click here to order Paleo Meal Plans at 50% OFF today!

Filed Under: Budget Shopping, Paleo Education Tagged With: cheap meal plans, dairy free, gluten-free, grain-free, paleo, paleo meal planning, primal, real food meal plans, weekly meal plan subscription

Homemade Herbal Shaving Cream & Citrus Spiced Aftershave

September 25, 2013 by Jackie Ritz 10 Comments

cream+aftershaveforpaleomama.jpg

I’m so thankful for all these wonderful bloggers who are willing to share some great stuff with my readers on my page! I just think that is so generous! With my big move to North Carolina, setting up our farm, and settling in with the kids, these guest posts have, not only, been a lifesaver, but I am learning so much from them! Aren’t you? Today’s post is brought to you by Becca at The Dabblist! I am just amazed at how great this recipe works and I do plan on whipping up a batch of the homemade shaving cream for myself! Please welcome Becca!  

My poor husband had basically given up on shaving, and had resorted to sporting stubble for several months when enough was enough. His sensitive skin would break out in a rash every time he shaved, and no conventional (or expensive natural brand) skincare products could make it right.  So he thought his only option was to not shave anymore, which I wasn’t exactly a fan of. Every kiss would be highlighted with the scrape of needle-like facial stubble. Sometimes I would break out in hives when we would…ahem…have one of our more passionate moments.

So, as you can see, we were in a bit of a pickle. And I wasn’t going to let it go on any longer. So I started researching homemade, herbal remedies for sensitive male skin that would also work for shaving. We needed something to moisturize his skin while shaving, and soothe it afterwards. As I keep finding out in my journey through life, nature has the best recipes – for our skin, for our health, for a happy and healthy life.

Today, I’m sharing with you my recipes for shaving cream and soothing aftershave tonic.

Homemade Herbal Shaving Cream

shavingcreamforpaleomama.jpg

Ingredients: 

  • 1/4c. almond oil (you can also use olive or coconut oil)
  • 2 tbsp. shea butter
  • 2 tbsp. cocoa butter
  • 1/3c. aloe vera gel
  • 1 tbsp. Bentonite or Aztec Indian clay powder
  • 2 tbsp. baking soda
  • 1/4c. liquid castile soap
  • 2 tsp. Vitamin E oil

 Instructions: 

In a double boiler (or a glass bowl placed over a pan of water), melt the oil and butters together. Once melted, immediately remove from heat, transfer to another bowl, and add in the other ingredients. Blend with a hand blender until frothy and cream-like (should take 60-90 seconds). Place cream into glass jar containers and allow to cool. Store in a cool, dark cupboard (no need to refrigerate). Shelf life is 1 month.

To use, take a small amount of cream in your hand of work up to a lather on your face before shaving. Be sure to splash face with warm water after shaving, and before using the aftershave tonic.

 Citrus Spice Aftershave Tonic

cream+aftershaveforpaleomama.jpg

Ingredients: 

  • 1c. vodka
  • 1c. witch hazel
  • 1 sprig rosemary
  • 1 sprig fresh mint
  • 1 cinnamon stick
  • 10 while cloves
  • 1 tsp. vegetable glycerin
  • 10 drops sweet orange oil
  • 10 drops lemon oil
  • 1 pinch fresh orange peel zest
  • 1 pinch fresh lemon peel zest

 Instructions: 

Combine all ingredients in a large jar and seal tightly. Store in a cool, dark cupboard for 2 weeks and allow mixture to steep. Give it a shake every couple of days to agitate the ingredients.

Once mixture is steeped, strain the liquid into a lovely looking container. Your aftershave tonic is ready to use! Store in a cupboard (or refrigerate, if you want it cool) and use within 6 months.

To use, pour a bit of the mixture onto a cotton pad and swipe over skin just after shaving. Another option is to pour the mixture into a spray bottle and spritz the face.

19bc4a93063dc53ad76900340c908f0bBecca is the face behind The Dabblist – her manifesto to declare freedom from the taboo from being known as a “dabbler.” She has found that, through sharing our stories and creations with each other and not being afraid to get our hands dirty, we can remember what our great great great grandmothers once knew – that we can be the creators of our own joy. 

 You can follow The Dabblist on Facebook, Pinterest, & Instagram.

Filed Under: DIY, Natural Living Tagged With: dairy free, DIY aftershave, DIY shaving cream, gluten-free, grain-free, homemade aftershave, homemade shaving cream, men's shaving cream, natural remedies, paleo, primal, razor burn

Chocolate Pecan Pie Energy Bars

September 23, 2013 by Jackie Ritz 8 Comments

Chocolate Pecan Lara 2-1

Today I’m excited to share this guest post from Jennifer of Sweet Plantains. Please head over to Sweet Plantains and check out Jennifer’s amazing recipes and don’t forget to follow Sweet Plantains on Facebook! -Jackie 

We have a little grocery shopping tradition in our family. A light at the end of the tunnel, if you will. And believe me, you need a light when you attempt any sort of shopping with four kids. After we’ve gone through the whole store (and back again, since I inevitably forgot one thing all the way at the beginning), we head to the “bar aisle” for a Larabar.

We love Larabars. They’re chewy, fruity, and filling; and while so many bars in the health food store are masquerading as healthy, it’s like a breath of fresh air to find something a picky mommy like me can be happy to give her kids.

There are so many different flavors that I can grandly motion to a whole row, and say, “Pick one. Any one. Whichever one you want, you can have.” It feels good. Especially since chances are I just spent the last half hour explaining why we can’t get soy-ladened-this, or food-colored-that. And even though I have to stand there for a full five minutes while each child agonizes and debates the merits of each flavor before picking the exact same one as the sibling before them, I get to feel the thrill of allowing my children to get a store-bought goodie wrapped in a shiny, colorful, crinkly package. A rare treat, indeed!

I’d love to pack up a whole basket of those great little bars to take home. Unfortunately, they’re a little tough on the budget department. They’re such a great portable snack that I just had to decode the formula and start making my own larabars at home. Which, as it turns out, is even better than buying them – and not just for the money saved. Making homemade Larabars is so incredibly simple and easy, and when I make them at home, I get to create any flavor my little heart desires.

Like Chocolate Pecan Pie. Yes, I did say Chocolate Pecan Pie. Sweet and decadent, it tastes like the perfect combination of fudge and pecan pie – all rolled into one healthy, energy-packing little bar. And while I do love making these with my kids, I will forewarn you – it’s hard to share!

Chocolate Pecan Pie Energy Bars

Ingredients:

  • 1 cup toasted pecans
  • 1 cup dried apricots
  • 1/2 cup dried blueberries
  • 1/2 cup raisins
  • 1/4 cup cocoa powder

Directions:

1. Put the pecans in the bowl of a food processor and process until they are the consistency of cornmeal. Set aside.

2.  Put the fruit in the food processor and puree until smooth.

3. Add in the cocoa and the pecans and process until well combined.

4. Line an 8″ square baking dish (or equivalent) with parchment or wax
paper, leaving a few inches of paper hanging over either side.

5. Spoon the fruit mixture into the parchment-lined pan and flatten – either with slightly
damp hands, or by pressing down with the overhanging paper.

6. Cover the dish with plastic wrap, and place in the refrigerator for a few hours until hardened.

7. Place the hardened mixture on a cutting board, peel off the paper, and cut into bars of desired size.

8. Wrap each bar individually in parchment, or layer them in an airtight container with parchment between each layer.

Enjoy!

Jennifer is a stay-at-home, homeschooling mom of four. She is an avid cook, health enthusiast, and lover of all things homemade! At Sweet Plantains she shares original recipes, homeschooling tips, parenting thoughts, and anything else that strikes her fancy. In her spare time she enjoys experimenting in the kitchen, reading nutrition books, and being barefoot outdoors with her little ones!

  • Follow Sweet Plantains Blog!
  • Follow Sweet Plantains on Facebook !
  • Follow Sweet Plantains on Twitter!
  • Follow Sweet Plantains on Pinterest! 


shared at: Mostly Homemade Mondays  and Holistic Squid

Filed Under: My Recipes Tagged With: chocolate pecan pie larabar, gluten-free, grain free snacks, homemade chocolate bar, homemade larabar, paleo, primal

« Previous Page
Next Page »

Primary Sidebar

  • Facebook
  • Instagram
  • Pinterest
  • RSS
  • YouTube

Hi, I'm Jackie Ritz and welcome to The Paleo Mama! I'm a published author, certified herbalist, and voracious researcher of natural medicine and nutrition. I'm glad you're here and I hope you stick around for awhile!

Recent Posts

  • When God Says Pause: Why I Took a 5-Year Break from My Online Business
  • How to Quit Facebook but Keep Your Business Profile
  • Leaving the City for the Country
  • Natural Way to Heart Health

MEAL PLANS

Biblically clean meal plans that are for those love to cook real food

Read More

Footer

Our Blog

The Paleo Mama blog provides simple answers for healthier families through research, tutorials, recipes, and simple remedies for daily needs!

  • Health
  • Essential Oils
  • Recipes
  • Remedies
  • Natural Living
  • Meal Plans

Stick around!

You’ll get instant access to a library of natural remedies and real, paleo food, including our ebooks and free guides we send out.

  • Home
  • Disclosure/Disclaimer
  • Privacy Policy
  • Advertise
  • Contact Me

Copyright © 2025 · Wellness Pro on Genesis Framework · WordPress · Log in