• Skip to primary navigation
  • Skip to content
  • Skip to primary sidebar
  • Skip to footer

The Paleo Mama

Homegrown and Handmade

  • About
  • Blog
    • Podcast
  • Meal Plans
  • Essential Oils
  • Our Farm
    • Great Pyrenees Puppies
    • Goats
      • Goats for Sale
      • Goat Sales Policy
      • Nigerian Dwarf Bucks
        • Ranchocabra Lunar Eclipse

Natural Living

Top 6 Companion Plants to Defend Your Precious Veggies From Harmful Insects

April 30, 2015 by Jackie Ritz 4 Comments

Gardening

Today I welcome Sally from Garden Valley Homestead to the blog! I’m so excited to share this wonderful post she wrote on the top 6 companion plants to defend your precious veggies from harmful insects. 

Everyone needs a friend, someone to look out for us, keep us safe. We’re stronger together, right? Plants need best-buddies, too, a pal to protect them from harmful insects. Some plants make great companions, but some are mighty Super Heroes that not only protect their friends, but also make them stronger and better (more flavorful). Plants are designed to live and work together. When you know which plants live and work well together–who looks after whom–your gardening work is so much easier, and your plants will thrive–while you sit back, then reap the harvest! 

Top 6 Companion Plants to Defend Your Precious Veggies From Harmful Insects: 

There are many excellent companion plants growing on this green earth, but this post zeroes-in on a handful of great ones–Super Heros– that can live happily in just about any garden. The plants that made the Top 6 List were selected because they are:

  • Easy to find
  • Easy to grow
  • Easy to eat
  • Repel insects from a range of commonly grown vegetables, including tomatoes, cabbage, beans, potatoes
  • Worthy of being called Super Heros

Plant List: 

#6 BORAGE

borage, pinnable, garden, plant, post, sally olson, canva (1)

Borage is a friend to MANY plants, especially tomatoes and squash. But, Borage and strawberries are absolute Besties! Savvy strawberry farmers always set a few plants in their beds to enhance the fruits flavor and yield. Borage’s Super Powers are its knack for repelling tomato hornworms and cabbage worms, attracting bees and wasps, as well as adding trace minerals to the soil. Borage leaves contain vitamin C and are rich in calcium, potassium and mineral salts. It also makes a nice mulch for most plants. Borage is self-sowing, so after planting this annual once, it will reseed itself. Borage flowers are beautifully vibrant and edible. The plant itself is furry and gangly, and not edible. This is why is ranks 5th among five super defenders.

Borage grows in zones 5-10

#5 CHIVES

2

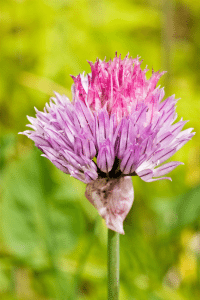
Chives buddy-up well with carrots, tomatoes, broccoli, cabbage, eggplant, kohlrabi, peppers, potatoes, rhubarb, strawberries, mustard–and apples! Chives’ super power is defending tomatoes from aphids and repelling Japanese beetles and carrot rust flies from your garden. Planting chives consistently for three years amongst apple trees prevents scab disease. That’s a big deal! Apple scab can ruin a season’s crop. Pair Chives with carrots and tomatoes to enhance their flavor. It holds fourth place because it doesn’t get along well with asparagus, beans, peas, and spinach.

Chives grow in ALL hardiness zones.

Word of warning: It’s not recommended to plant Chive with asparagus, beans, peas and spinach.

#4 RADISH

6

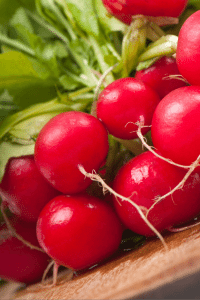
Radishes are trustworthy companions to many plants–and they’re easy to grow. Plant radishes along side beets, bush beans, pole beans, carrots, chervil, cucumber, lettuce, melons, nasturtium, parsnip, peas, spinach to protect them from cucumber beetles and rust flies. Radishes draw strength and flavor from Chervil and nasturtium, so think about planting a little of each to give your radishes a boost.

To defend your corn crop against borers (ugh!), plant radish with your corn, but let it go to seed for its protective power to work. 

If you don’t mind planting a few sacrificial radish, plant a few with your spinach to lure leafminers from your spinach plants. The leafminers will damage the radish leaves, but not the edible root. 

Radish’s super power lies in its uncanny ability to tell you something about your soil, like if the calcium levels are off. If your radish grows to produce a stringy root, your soil needs calcium.

Word of warning: Keep radishes away from hyssop plants, cabbage, cauliflower, Brussels sprouts and turnips.   

Radish grow in ALL hardiness zones.

#3 ONION

3

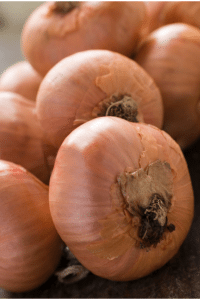
If you’re looking forward to growing any of these vegetables this season–Broccoli, Brussels Sprouts, Cauliflower,Cabbage, Collards, Chard, dill, Kale, Kohlrabi, Mustard, Radishes, Rutabaga, tomato, Turnip–send in the onions! The onion’s super power is its strong smell which confuses carrot and onion flies and repels maggots away from carrots, lettuce, chamomile, beets, cabbage, and parsnips.

Grows in all zones, depending upon the variety.

Word of warning: Keep onions away from peas and asparagus.


#2 MARIGOLD (CALENDULA)

5

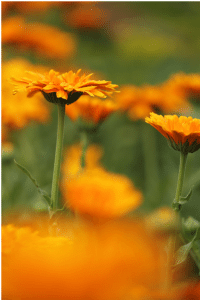
Even though this number 2 Guardian Plant, marigold (Pot Marigold) isn’t a vegetable, it is edible…and beautiful…and easy to grow. Botanically known as Calendula , ( ca·len·du·la \kə-ˈlen-jə-lə, -dyu̇-lə\), it is a might adversary of any insect that dares to enter the garden. French marigolds repel whiteflies and kill bad nematodes. Mexican marigolds are said to “bug” many destructive insects. Scented varieties of marigold flowers are the best pest deterrents. One of Calendula’s super powers is its ability to be self-reliant. But, give it a little care and it will perpetually bloom in your garden.

Grows in ALL hardiness zones.

Word of warning: While calendula drives away many foes, it also attracts spider mites (there’s a plant for that!) and snails.

#1 GARLIC: 

1

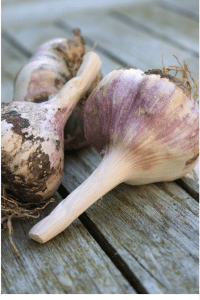
Yes, garlic! It ranks Number #1 Super Hero Defender of Good (plants) on this list of Super Hero insect-fighting plants because its powerful ability to defend fruit trees! 

Garlic is the perfect, yet stealthy, partner for apple, peach and pear orchards, or wherever borers are a problem. Garlic’s super power is its ability to accumulate sulfur, which acts as a naturally occurring fungicide. Garlic’s companion plants take-up take up the sulfur through their roots (how to make a soil drench) and pores. Garlic’s status as Super Guardian Defender stem from its ability to ward-off codling moths, Japanese beetles, root maggots, snails, and carrot root fly. Go ahead and plant garlic under peach trees to help repel borers. 

Garlic is one plant you should plant throughout your garden beds. Plant garlic along side your tomatoes to prevent red spider mites (link to calendula) from moving in. Diamond back moths won’t bother your cabbage when garlic is standing guard.

Bonus: Aphids won’t give your roses a second thought once they realize garlic is on duty.

Word of warning: Garlic is fickle around peas.

Gardening is so much simpler–and rewarding, when you let the plants do the work for you. Now you know which plants which protect your crops from invaders is half the battle. It’s time to dig in and starting growing a strong, healthy crop of produce for your family.

RESOURCES: 

  1. Companion Planting https://www.ghorganics.com/page2.html
  2. Gardening with Borage: https://gardening.about.com/od/herbsspecificplants1/p/Borage.htm
  3. Wikipedia: https://en.wikipedia.org/wiki/List_of_pest-repelling_plants
  4. Harvest to Table: https://www.harvesttotable.com/2009/04/insect-deterrent_plants/
  5. Pallen Smith: https://www.pallensmith.com/articles/pest-control-plants
  6. Do It Yourself: https://www.doityourself.com/stry/using-garlic-as-a-natural-pesticide#b
  7. The Flower Expert: https://www.theflowerexpert.com/content/growingflowers/growingflowers/growing-marigolds

ABOUT THE AUTHOR: 

Sally Olson is a wife, mother, writer/blogger, and redeemed fake Ficus tree owner. She blogs at Garden Valley Homestead where she helps reluctant gardeners trade in brown thumbs for fresh greens. Sally, her husband of 26 years, two sons, horses, Labrador Retrievers, and hens are blessed to call the Sierra-Nevada Foothills home. For more nourishing garden time-saver tips, follow Sally at https://www.gardenvalleyhomestead.com and on Pinterest,  pinterest.com/GVHomestead/

Gardening

Filed Under: DIY Home Recipes, Homesteading, Living Sustainably, Natural Living

5 Ways to Use Comfrey

April 29, 2015 by Jackie Ritz 1 Comment


If you’re following me on Instagram you might have seen a few posts on our new 10-acre “forever farm” that we will be moving into shortly. I am truly blessed with all the healthy garden plants and trees already planted there. One of my greatest thrills is the Comfrey patch just waiting for me to use. Of course, I have been researching all the ways to use this extremely beneficial plant, and I’m excited to share with you here the 5 ways to use comfrey that I’ve discovered and will implement on our new homestead. 

5 Ways to Use Comfrey:

1. Comfrey for preparing the soil of my garden 

It will become my secret weapon to improve my veggie garden soil, to mulch around my plants, and to prevent disease from keeping me from a bountiful harvest of veggies later in the fall. I’ll be using fresh comfrey leaves as fertilizer in my planting holes. I’ll also learn to make comfrey “tea” to add to the water that waters my garden. (Add fresh comfrey leaves to a half barrel of water, cover, and steep for 3-6 weeks.) And by adding a few drops of liquid soap to my “tea,” I’ll be able to spray and coat the tops and bottoms of my plants to keep away the garden pests.

2. Comfrey will be a major part of our compost station.

Comfrey has a higher NPK (nitrogen, phosphorus and potassium) ratio than either kelp or the average homemade compost pile. It is rich in calcium and many other valuable plant nutrients. It is known to be a compost activator to “heat things up quickly.” Comfrey makes a wonderful mulch, naturally high in nitrogen so it doesn’t pull nitrogen from the soil. It’s high potassium content makes it so beneficial for flowers, vegetables, berries and fruit trees. I’ll be adding 2-3 inches of leaves around my plants. These leaves will slowly break down and release the wonderful nutrients. Comfrey should not be used for root crops or leafy greens because they may cause these plants to go to seed prematurely.

3. Comfrey as a liquid fertilizer

This may be the best use I’ll find. I’ve been told that now that I have comfrey I can throw away the Miracle Grow and other fertilizers. Chopped leaves and stems can be crammed tight into a large container (like 5 gallon buckets) with a brick or rock pressing down on the mass of comfrey. After a few weeks I’ll have a greenish-brownish “soup” mixture ready for use. After straining it through a fine screen, I can add a spigot to the bottom of the container and just keep adding more comfrey to the top to break down also.

4. Comfrey for our livestock

Comfrey has been traditionally used as livestock food. Dry comfrey contains protein and an assortment of healthy minerals. Because it is lower in fiber, it is a good feed for pigs and chickens who have trouble digesting fiber. It has also proven to be an excellent feed for horses, cows, donkeys, sheep, and goats. However, I’ll have to cut the comfrey leaves and wilt them for a day or so to get our chickens to eat them…they would not like the prickly hairs on the leaves. Research indicates I will be able to replace up to 10 percent of the chicken feed without lowering egg production.

5. Comfrey as a healing salve

Comfrey has been in use as a medicinal herb for more than 200 years. The allantoin content of comfrey aids in healing wounds, sores, burns, swollen tissue, and broken bones. It can be applied externally to bruises, sprains, arthritic bones of any inflamed tissue, and acts as an anti-inflammatory and pain reliever. I will be able to make a poultice by boiling the leaves, or by putting the roots in a blender or food processor, covering with oil, and grinding as fine as possible. It should be stored in a large glass jar and allowed to soak for several weeks before straining. However, comfrey should never be taken internally. I will follow up with an entire blog on how to make comfrey salve in a coming blog, but in the meantime, you can check out my Healing Salve recipe and replace the calendula with comfrey. 

The comfrey in my new garden is planted with a blueberry patch. You can see from the photo to the right that my kids have already determined they will spend time eating the healthy, large blueberries that have grown up under the protection of the secret power of Comfrey.

Comfrey is a fast growing, hardy plant, and I should get 4-5 pounds of leaves from each plant a year. I’ll remove the flowers from most of the plants because they take a lot of the plant’s energy to create the seeds. However, since I plan to have 5 or more beehives, I’ll leave a few plants with flowers for the bees that love them. Besides, the flowers are beautiful!

Getting Started in Comfrey: 

  1. Find a local gardener (Craigslist is a great place to look) who is selling comfrey plants. 
  2. Plant your own seeds (I like these non-gmo ones) 
  3. Order dried comfrey (I like this one) 

Resources

  1. https://www.rodalesorganiclife.com/garden/comfrey-power
  2. https://www.waldeneffect.org/blog/Feeding_comfrey_to_livestock/
  3. https://riseandshinerabbitry.com/2013/08/11/comfrey-the-homesteaders-gold-mine/
  4. https://www.nantahala-farm.com/comfrey-growing-s.shtml

Filed Under: DIY Beauty Recipes, DIY Home Recipes, Homesteading, Living Sustainably, Natural Living

DIY Herbal Mouthwash

April 21, 2015 by Jackie Ritz 3 Comments

So, many of you might know if you follow me on Instagram, but a few months ago I started the Invisalign braces. I LOVE the changes I am seeing in my teeth and would recommend them to anyone in a heartbeat, but having the braces on my teeth 22 hours a day can make my mouth stale and dry. I am a minimalist and before braces I would just drop a little bit of peppermint essential oil on my tongue and swish around! However, with the new Invisalign braces, I needed something that would swish really good and freshen my breath…which is why I created this DIY Herbal Mouthwash. 

I had some dried peppermint laying around so I infused the water with it and added in some cinnamon and vitamin C powder to act as a preservative. I’m now, sort of, addicted to this mouthwash and I know you will be too!

Note: You can leave the dried peppermint out and just add an extra 5 drops of peppermint essential oil. Also, be sure to use THERAPEUTIC grade essential oil since you will be swishing it around in your mouth. Here’s where I get mine. 

DIY Herbal Mouthwash

  • 2 cups of filtered water
  • 2 TB of dried peppermint leaves
  • 10 drops of peppermint essential oil
  • 5-10 drop of Cinnamon essential oil (you decide how much)
  • 1/2 teaspoon of Vitamin C powder (to act as a preservative). If you leave this ingredient out, then I suggest you store the bottle in the fridge. 

Click here to see where I buy therapeutic grade essential oils at a discount! 

How to Make: 

  1. Place the water in a small pot and bring to a simmer. 
  2. Add the peppermint leaves, reduce heat, cover and simmer for 15 minutes. 
  3. Use a cheesecloth and strain out the herbs. Cool. 
  4. Add the essential oils and vitamin C powder to the mixture. 
  5. Store in a glass jar and shake before each use. 

DIY Herbal Mouthwash  The Paleo Mama

Filed Under: DIY Beauty Recipes, DIY Home Recipes, essential oils, Living Sustainably, Natural Living

Essential Oils for Labor

April 20, 2015 by Jackie Ritz 2 Comments

Today I welcome Rachel from Healing in Our Homes to the blog! Rachel is a homeschooling mother of 5 wonderful children and a doula and birth photographer to many women. She is a wealth of information when it comes to supporting pregnant and I’m so blessed to have her share more about essential oils and labor. 

Labor, like pregnancy, can involve a lot of changing needs and feelings – first your hot then your cold, youʼre excited then youʼre crying, one minute you want someone to rub your shoulders, the next you want to hurt anyone that touches you. This is normal and essential oils are a wonderful tool to have to manage our changing moods and comfort levels during labor.

As a doula Iʼve been privileged to be a support to many women as theyʼve given birth. I love when my clients use oils already or are open to me using oils to support them. It doesnt matter if you are giving birth at home, at a birth center, or in a hospital there are still many ways for essential oils to bring comfort, both, emotionally and physically.

Where to buy high quality essential oils at a discount

Here are some of my favorite essential oils for labor:

1. Peppermint

This refreshing oils is so fabulous for when you are hot or tired. You can smell directly from the cap for some quick energy or dilute with a carrier oil and apply to the back of the neck for a cooling effect.

2. Wild Orange & Citrus Bliss Blend

Both of these oils make a wonderful compliment to peppermint for energy and stamina. They are also a great mood lifter if you feel discouraged. You can make a spray (see recipe below), diffuse them together in a diffuser or simply put them into your hands to inhale. Citrus oils can also help a laboring mama stay focused and help to calm nausea.

3. Clary Sage or Clary Calm Blend

Clary Sage is a powerful support for labor, especially when labor is stalled. Typically Clary Sage is avoided in pregnancy because of the possibility of this effect on the body. But once you are full term and your body is ready for delivery, it is a great support.

4. Balance Blend

The tree oils that make up this blend are wonderful for stabilizing mood. If you are feeling frustrated, defeated, out of balance or super emotional have someone rub a few drops into your foot and apply some to the back of your neck as well.

5. Lavender, Serenity blend, & Ylang Ylang

These are my top choices for calming during labor. I like to have my client smell the oils and make a choice by what is most attractive to her in that moment. I would offer one of these oils if mama was agitated or stressed. For mood issues, always go with whatever smells the best to you. Your body knows what it needs.

6. Marjoram

This oil is often underappreciated in the oil world. Marjoram is a great oil for soothing the discomforts of contractions. Dilute and apply to the lower abdomen. Its also great after birth for the cramps that can come while nursing so keep it around!

7. Deep Blue Blend & Black Pepper

I can verify, from my own multiple personal experiences, that back labor is the WORST. First, if you can, get on all fours to encourage that little stinker to turn the right way and relieve you of your misery. But if they insist on coming out looking up at the sky then these two oils are your friend. Get someone to rub them in thoroughly for you. Following with a heating pad or pack can help drive the oils in and give further relief.

Additional tips & recipes:

  1. Put 20 washcloths in a crockpot , fill with water, add 20 drops of lavender and set to “warm”. Apply a washcloth to lower abdomen or back at the beginning of each contraction.
  2. Cooling spray: Mix 25 drops of Wild Orange or “Invigorating” blend, 25 drops of Peppermint and water in a 4oz spray bottle. Spray on during transition or when feeling tired or discouraged.
  3. Perineum support: Mix 10 drops Helichrysm or Geranium in 1 tablespoon Fractionated Coconut Oil and massage into perineum at crowning. These oils support the skin tissue to help minimize puffiness and help the tissue stretch to avoid tearing.
  4. Use Lavender and Geranium over the uterus after birth for soothing all of those tired muscles.
  5. Peri Spray: (This is RAVED about amongst our team for soothing after a vaginal birth) Mix 5 drops of Lavender, Geranium and Helichrysm in 1oz of filtered water or fractionated coconut oil. Spray on after each time you use the bathroom or rinse. Donʼt leave this one out, you will be so glad you have it!
  6. Keep your Clary Sage and “Women’s Monthly” blend around because Clary Sage can help aid in milk production as well as support a balanced hormonal system postpartum. Dilute and apply to the lower abdomen daily.

So make sure to add your oils to your hospital bag or birth kit. Enjoy your oils during labor and delivery! To see how to use essential oils on newborns and babies, click here! 

How to purchase therapeutic-grade essential oils at a discount!

ABOUT THE AUTHOR: 

Rachel is a wife and homeschooling mom to 5 spunky kids. She serves as a doula and birth photographer, is an avid researcher and love to share what she learns on her blog, Healing in our Homes. Her passion is to support other women as they journey through childbirth, the challenges motherhood and creating healthy homes. DoTERRA has been the perfect way for her to practically empower women to care for themselves and their families naturally.

Blog: www.healinginourhomes.com 
Facebook: https://www.facebook.com/HealingInOurHomes
Pinterest: https://www.pinterest.com/healinghomes/
Instagram: https://www.instagram.com/healinginourhomes
Twitter: https://twitter.com/healngnourhomes

Where to Buy High Quality Essential Oils at a Discount: 

I recommend that when using essential oils to support your labor, that you use the highest and most therapeutic quality you can find. CLICK HERE to see my brand of choice and how you can purchase them at a discount. 

Essential Oils for Labor Support 

Filed Under: DIY, DIY Beauty Recipes, essential oils, Natural Living

Lemongrass Essential Oil

April 10, 2015 by Jackie Ritz Leave a Comment

Lemongrass

Lemongrass (Cymbopogon flexuosus) grows in dense clumps that can grow 6 feet in height and 4 feet in width. It is native to warm and tropical regions, such as India, Southeast Asia, and Oceania. It is used as a medicinal herb in India and it is common in Asian cuisine. In African and South American countries, it is popularly used for making tea. Lemongrass essential oil is extracted from the leaves by steam distillation.

Its main chemical components are Geranial, Neral, Myrcene, Citronellai, and Citral.

What are the benefits of Lemongrass Essential Oil?

Its primary benefits are:

  • It supports healthy digestion
  • It soothes aching muscles
  • It purifies and tones skin
  • It relieves head and neck tension and promotes healthy body temperatures. 
  • Lemongrass Oil is far better than many of the synthetic deodorants that are a big expense, a heavy impact on the environment, and have limited lasting power. 

What are Lemongrass’s cautions?

If you have sensitive skin, it may create a rash. It is not recommended for children or nursing mothers. Because lemongrass can stimulate blood flow, pregnant women should use extreme caution.

Click here to get my Essential Oil Safety Guide

Top Ten Uses for Lemongrass Essential Oil

  1. Lemongrass has wonderful skin regeneration properties. It can be added to shampoos, conditioners, deodorants and lotions.
  2. To help soothe sore joints or muscles. Combine equal parts Fractionated Coconut oil (or another carrier oil) and Lemongrass and rub topically on the area of concern.
  3. It is a natural bug repellant for insects like mosquitoes and ants. It can be sprayed, diluted in a carrier oil, directly on the skin. It can even be used to control fleas; add about 5 drops to water and create your own spray to protect your pet’s coat.
  4. It supports healthy thyroid function. Mix 1-2 drops with a carrier oil and apply topically over your neck area.
  5. It can be used in your household products. Try putting a few drops on a dust cloth and then wipe down the wood in your house.
  6. It is a natural insect repellant and pest control. Rub or spritz some lemongrass on your skin before going outside.
  7. It can be used to detoxify your body. Make your own detoxifying lemongrass tea by adding 2-3 drops to your favorite tea.
  8. You can make a refreshing foot bath by adding 2 drops of Lemongrass Oil and 2 tablespoons of Epsom salts to warm water, and soak your feet for 10 minutes.
  9. Lemongrass oil is a valuable oil to use in aromatherapy. Its clean and calming aroma can reduce sad and anxious feelings, relieve restlessness and occasional sleeplessness, and helps you to relax.  Try adding 3-4 drops to your diffuser and diffuse for one hour before bedtime.

Where to  purchase Lemongrass essential oil

Home-made Lemongrass Essential Oil Recipe

Lemongrass oil can be used to relieve occasional muscle and joint discomfort in your body. I have found it to be so convenient to have a homemade soothing rub using essential oils, including lemongrass with coconut oil and beeswax.

Lemongrass and Emotions

Lemongrass oil is the oil of cleansing. It is a powerful cleanser of energy, and dispels feelings of despondency, despair and lethargy. It teaches individual to move forward without hesitation. As individuals let go of past issues they have an increased ability to see situations with greater clarity. (source) 

Companion Oils: Melaleuca, Thyme, Clary Sage

Lemongrass Essential Oil

Sources

  1. https://draxe.com/lemongrass-essential-oil/
  2. https://beautetude.com/2015/03/30/lemongrass-essential-oil-benefits-uses/
  3. https://www.sustainablebabysteps.com/lemongrass-essential-oil.html
  4. https://www.organicfacts.net/health-benefits/essential-oils/health-benefits-of-lemongrass-essential-oil.html
  5. https://www.stockpilingmoms.com/2013/05/uses-and-benefits-of-lemongrass-essential-oil/
  6. https://articles.mercola.com/herbal-oils/lemongrass-oil.aspx

 So tell me?! How do you like to use Lemongrass essential oil?

Filed Under: DIY Beauty Recipes, DIY Home Recipes, essential oils, Natural Living

Homestead Goals

March 7, 2015 by Jackie Ritz 7 Comments

It’s already March, and as the winter is slowly coming to a close and the sight of daffodils greening up and getting ready to proud fully bloom in all their luster, I am getting our small homestead ready for the season ahead. 

Since we homestead on a rental property of only 3 acres, we are, somewhat, limited in what we can do. However, we are still able to do MUCH more than before. 

Laura_Coppelman_141213-3

PERSONAL & FAMILY GOALS:

  1. Paleo Daddy is home full-time! Yes, he quit his job and came home to work with my blogging/essential oil business and we are so happy! So, our goals have evolved over the past 3 months, which makes it a perfect time to set some new ones. 
  2. Continue homeschool with our 6 year old. We have already decided to move onto First Grade with her! We love this time spent with her being home…and she loves it too! You should see this girl’s social calendar: Mad Scientist Lab at a local museum, Art Class, Enrichment classes with a local homeschool co-op, and private Piano lessons. 
  3. More travel as a family. Can I get an, “amen“, that the kids are finally old enough to just pick up and go more places! 
  4. Purchase or grow all organic food. Since we became financially free (hallelujah!), we have more room in our budget and have decided to make this a priority. We do a weekly Farm Box that is in the Asheville area (tell them Jackie Ritz sent you!), purchase a half grass-fed cow at a time from a friend, get raw cow milk and cream from a local farm, raise our own chickens, and have our own dairy goats. Our goats are not in milk right now, which is why we are supplementing with local raw cow milk. 
  5. Continue to save for the purchase of our future homestead! Since going through Financial Peace University and becoming debt-free, we have decided to be very patient in purchasing our home here in North Carolina. We are hoping to save enough for a 20-50% down payment and are considering purchasing land and then building our home. 

17

FARM GOALS: 

RABBITS: All of our meat rabbits have made their way to our freezer, urging me to hurry up and order a rabbit cookbook. I can roast a rabbit. The Paleo Daddy can smoke a rabbit on our Big Green Egg like nobody’s business…but that’s about it. So, I have nearly 30 rabbits that need to be eaten…and the first thing on my list is to make Rabbit Sausage! 

LAYING HENS:

  • Since we have a handsome rooster who is doing a great job at flirting with the ladies, we purchased a used incubator and are going to be incubating some of our eggs. We have 23 chickens, so we don’t *need* anymore chicks, but we want to show the kids how they grow from egg to chick. 
  • Muck out the chicken coop. We use the deep-litter method in the chicken coop and barn during the winter. 

18

MEAT CHICKENS: We will be purchasing 40 meat chickens to raise for meat. We will keep them in the barn until they are big enough to go out and pasture during the day.

SHEEP: Because our land is only 3 acres, there is no way we could have a steer for meat. Thankfully, we have a friend who raises them and we purchase it in bulk from him. However, sheep meat is delicious, easy raise, 100% grass-fed (so no extra money on feed), and will fit right in with our 5 goats. We are looking to purchase 2 Katahdin sheep this spring and raise them till they are large enough to butcher. 

BEES: We were hoping to purchase bees this year, but since we won’t be purchasing a home till the fall of 2015, we are probably going to have to wait on that one. We don’t want to have to relocate the bees and avoid problems with them getting lost.

_MG_9657

LIVESTOCK GUARDIAN DOG: Our Great Pyrenees is *almost* ready to be let loose with the chickens and goats full-time! We have raised her the slow and hard way, training her the proper way, so she can give us a protected flock. She is 15 months now and is, nearly, finished with the annoying puppy stage. She still antagonizes the rooster, so we cannot leave her alone with the chickens just yet. She does great with our goats, which is the reason we purchased her. However, our goats and chickens are together, so we need to wait a few more months and continue our training with her before she can be trusted with the chickens full-time. 

DAIRY GOATS: 

  • We are purchasing a Nubian doe-in-milk this month (March) or next! We have 4 other Alpine does, none of them are in milk anymore, and we are excited to add a new breed. Nubians are known for their floppy ears and their milk that is high in butterfat! 
  • Sell our castrated Alpine buck so someone can use him for pasture maintenance or meat. We do NOT like the taste of goat so we don’t plan on eating him…plus I just couldn’t. Just can’t. 
  • Purchase a registered Alpine buck for breeding in the fall and to breed our 4 Alpine does with. 
  • Breed our Nubian in the fall with a local Nubian buck. We will have to pay for stud service. 
  • Shave our goats in the spring. We buzz them at the end of the cold season to help prevent lice. 

GARDEN

  • Build 2 raised beds. Since we are on a rental and our soil is predominately clay, we will be growing our veggies in raised beds. 
  • Collect any needed heirloom seeds. 
  • Make more lacto-fermented foods with our produce. 
  • Preserve or can.

CHEESE-MAKING: Continue to make goat cheese, mozzarella, yogurt, kefir, creme fraiche, and other cheeses with our local raw cow milk and goat milk. 

SOAP-MAKING: I enjoy making goat’s milk soap and am learning more about the art of soap-making. I am no expert, but making soap is cathartic to me and I plan on purchasing THIS BOOK as a resource to making different varieties of soap. 

_MG_9693

Well, now I’m exhausted thinking about all the work to be done! I’m praying for a beautiful harvest this year and the effort I put into our homestead is 100% worth it. My children are learning the most valuable lessons on our little farm and I wouldn’t trade that for more time. 

May you have a blessed year!

Eucharisteo! 


Filed Under: Grassfed Beef, Homesteading, Living Sustainably, Natural Living, Shopping Local

« Previous Page
Next Page »

Primary Sidebar

  • Facebook
  • Instagram
  • Pinterest
  • RSS
  • YouTube

Hi, I'm Jackie Ritz and welcome to The Paleo Mama! I'm a published author, certified herbalist, and voracious researcher of natural medicine and nutrition. I'm glad you're here and I hope you stick around for awhile!

Recent Posts

  • When God Says Pause: Why I Took a 5-Year Break from My Online Business
  • How to Quit Facebook but Keep Your Business Profile
  • Leaving the City for the Country
  • Natural Way to Heart Health

MEAL PLANS

Biblically clean meal plans that are for those love to cook real food

Read More

Footer

Our Blog

The Paleo Mama blog provides simple answers for healthier families through research, tutorials, recipes, and simple remedies for daily needs!

  • Health
  • Essential Oils
  • Recipes
  • Remedies
  • Natural Living
  • Meal Plans

Stick around!

You’ll get instant access to a library of natural remedies and real, paleo food, including our ebooks and free guides we send out.

  • Home
  • Disclosure/Disclaimer
  • Privacy Policy
  • Advertise
  • Contact Me

Copyright © 2025 · Wellness Pro on Genesis Framework · WordPress · Log in