• Skip to primary navigation
  • Skip to content
  • Skip to primary sidebar
  • Skip to footer

The Paleo Mama

Homegrown and Handmade

  • About
  • Blog
    • Podcast
  • Meal Plans
  • Essential Oils
  • Our Farm
    • Great Pyrenees Puppies
    • Goats
      • Goats for Sale
      • Goat Sales Policy
      • Nigerian Dwarf Bucks
        • Ranchocabra Lunar Eclipse

DIY

DIY Facial Serum

December 4, 2014 by Jackie Ritz 41 Comments

I’ve traded in my expensive over-the-counter facial products for simple and natural ingredients! Not only are they 100% natural, but they are, also, safer and MORE effective than anything you could purchase from the store.

I’ve been using the oil cleansing method on my face for years. I love it and will never go back to cleansers and moisturizers. CLICK HERE to see what the oil cleansing method is and learn more about this safe and effective way to cleanse your face.

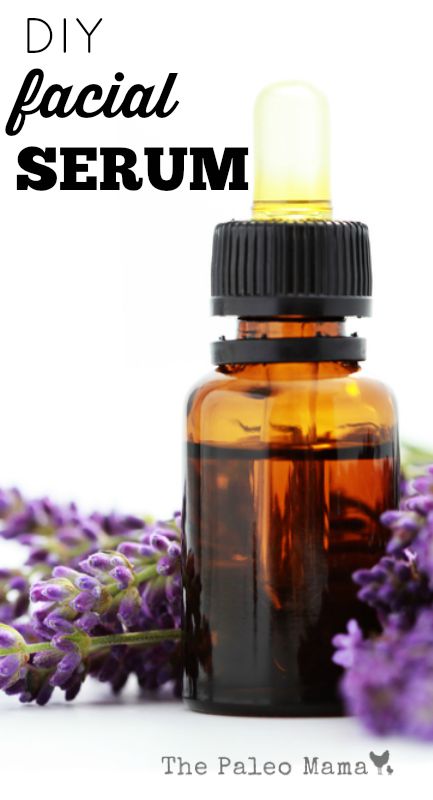
Lately, as I’m getting a tad bit older, I’ve been using specific anti-aging essential oils to help promote healthy skin. I created a “facial serum” that uses my favorite essential oils and are known for their anti-aging benefits! Take a look at the oils below…

1) Lavender – Lavender is great for all skin types, but very powerful for mature skin. It is widely known for its calming and relaxing properties but also is great for soothing mild skin irritations. 

2) Frankincense – Frankincense is one of the most prized and valued essential oils.  It’s used in many beauty products to slow the signs of aging and to promote a youthful, radiant skin.

3) Geranium – Uses of Geranium essential oil date back to ancient Egypt when Egyptians used Geranium oil to beautify skin.  As an essential oil, Geranium has been used to promote clear, healthy skin—making it ideal for skin care products (source).

4) Myrrh – Ancient records show that Myrrh was deemed so valuable that at times it was valued at its weight in gold. It is also soothing to the skin—promoting a smooth, youthful looking complexion.

I buy only therapeutic-grade essential oils. You can click here to purchase your very own wholesale starter kit at wholesale prices!!!

DIY Facial Serum Recipe

INGREDIENTS:

  • 50ml glass dropper bottle (where to buy online) – we save old stevia bottles and use them for things like this!
  • 4 Tablespoons of Almond oil (where to buy) or Jojoba oil (where to buy)
  • 7 drops each of Lavender, Frankincense, Geranium, and Myrrh Essential Oils (where to buy)
  • Empty 2 capsules of Vitamin E (OPTIONAL)

DIRECTIONS: 

  1. Add everything to your glass dropper bottle. Shake.
  2. Apply at night before bed!

DIY Facial Serum


Filed Under: DIY, DIY Beauty Recipes, essential oils, My Recipes, Natural Living

Oil Pulling With Essential Oils

August 6, 2014 by Jackie Ritz 14 Comments


Oil Pulling is an ancient detoxification practice that involves swishing oil around in your mouth for 15-20 minutes. The benefit of doing this is to reduce the amount of harmful bacteria, reduce dental plaque, remineralize your teeth, help with gum issues, and strengthen your gums. You can give your teeth an extra boost by oil pulling with essential oils.

When you swish oil around in your mouth, plaque get stuck to the oil and dissolve in the liquid oil. So you are removing a lot of bacteria, which is found in plague and leads to all kinds of oral health problems, every time you oil pull.

I added oil pulling to my life when I found out I had 6 cavities! I was able to heal these cavities naturally by eating a traditional diet with the proper nutrients and supplements added. You can click here to read more about how I healed my tooth decay. 

What Oil to Use:

Traditionally, sesame seed or sunflower oil was used among the early oil-pullers, however, my personal favorite is coconut oil because it has so many health benefits. You can use any oil that you like, just stay away from canola or vegetable oil.

Adding Essential Oils to Your Oil Pulling Regime:

Adding in therapeutic-grade, 100% pure, essential oils into your oil pulling regime is a great way to give your health a supercharge!  I buy my essential oils at wholesale price and I encourage you to do the same! You can CLICK HERE and learn how to get your essential oils from me at wholesale cost!

Here’s a few suggestions to help with oral issues:

  1. Peppermint essential oil.
  2. Clove essential oil.
  3. Basil essential oil.
  4. Melaleuca essential oil.
  5. Myrrh essential oil.
  6. OnGuard essential oil (my favorite choice).

How to Oil Pull:

  1. First thing in the morning, put 1 teaspoon-1 tablespoon of coconut/or sesame oil in your mouth. Use 1 teaspoon if you are just starting out or if you have a gag reflex. Swish it around till it melts.
  2. Open your mouth and add 2 drops of your favorite essential oil.
  3. Swish the oil around in your mouth (like you would with mouthwash) for 15-20 minutes. I like to push it through my teeth and around the sides of my mouth. Don’t swish hard or your cheeks will start to hurt! I do this while I’m doing my morning chores and milking the goat! But you can also do it while your getting ready in the morning!
  4. Spit the oil out in your trash can! Do not swallow it…it is now loaded with bacteria and toxins.
  5. Brush your teeth with a safe toothpaste! I use my homemade toothpaste, but THIS ONE is great if you can’t make your own!
  6. Happy Oil-Pulling!

 CLICK here to Start Using Essential Oils! 

Oil Pulling


Filed Under: DIY, DIY Beauty Recipes, essential oils, Living Sustainably, Natural Living, Nutrition

Spiced Chai Lip Balm Recipe

August 4, 2014 by Jackie Ritz 26 Comments

I love chai tea and the way the spices in a chai tea smell. I have been making my own lip balm for years now, usually I just put my All Purpose Salve on my lips, but I wanted something a little “fancier” so I created a delicious Spiced Chai Lip Balm recipe that I know you will enjoy.

I wanted to stay away from citrus essential oils because they are photo toxic and it is the summer! You can easily double or triple this recipe to make extras to give away to your friends!

A NOTE OF ESSENTIAL OILS: I only recommend therapeutic-grade essential oils. You can purchase therapeutic-grade essential oils at wholesale cost (CLICK HERE to learn more!).

DIY Spiced Chai Lip Balm

makes 10 3ml jars

INGREDIENTS: 

  • 1 Tablespoon of Coconut Oil 
  • 1 Tablespoon of Cacao Butter or Raw Shea Butter (can leave this ingredient out in the winter but it helps hold the balm together during the hot summer months)
  • 1 Tablespoon of Beeswax Pastilles
  • 1/4 Teaspoon of Castor Oil for shine
  • 1/4 Teaspoon of Vanilla
  • Essential Oils: 4 drops of Cinnamon Bark or Cassia, 4 drops of Ginger, and 4 drops of Clove. You can also substitute Black Pepper essential oil and/or Coriander Essential oil if you want! (where to buy)
  • Small Containers or reused lip balm tubes

DIRECTIONS: 

  1. Add the coconut oil to a small pan and simmer till melted.
  2. Add the beeswax pellets and cacao/or shea butter and simmer for about 5-10 minutes till melted.
  3. Add the castor oil. Stir and remove from stove.
  4. Let sit till the mixture is warm to the touch, but not thick. It’s easier to pour into containers when it is still liquid.
  5. Add in the vanilla and essential oils. Stir.
  6. Pour into your containers and enjoy!

Spiced Chai Lip Balm www.thepaleomama.com

Filed Under: DIY, DIY Beauty Recipes, essential oils, Living Sustainably, Natural Living

Cultured Dairy: How to Make 1 Stick of Butter, 1 Pint of Sour Cream, and 1 Pint of Buttermilk with JUST ONE Quart of Cream!

May 1, 2014 by Jackie Ritz 50 Comments

Cultured Dairy .001

Before you go jumping down my throat about posting this because it’s dairy, I want to make sure I mention that my family consumes raw dairy. I have always been open about that and I feel it is something that my family thrives on.

So, am I still Paleo? I don’t really like labeling myself as anything. We eat by a Paleo template and include raw dairy in our diet. You can click here to see why my family consumes raw milk. 

My goats are due to have babies in June, so the 2 months prior to birth, we are giving them a break from milking. It’s sad not to have fresh, raw goats milk everyday, but I am lucky to have lots of farms nearby that have raw milk. This past week I went with raw cow milk from Jersey’s….mostly cause raw goats milk is $12 a gallon! Yikes! I’ll just wait for my goats to kid in June!

Raw dairy is extremely nutritions, but cultured (fermented) dairy takes it to a whole new level. Culturing helps to break down casein, or milk proteins, one of the most difficult proteins to digest. It, also, restores enzymes that may have been destroyed during pasteurization including lactase, which helps to digest lactose (milk sugar) and numerous enzymes, which help the body absorb calcium and other minerals.

In addition, cultured dairy provides beneficial bacterial and lactic acid to help your digestive tract stay healthy. Click here to read all the benefits of raw cultured dairy. 

Fun with Cultured Dairy:

How to Make 1 Stick of Butter, 1 Pint of Sour Cream, and 1 Pint of Buttermilk with JUST ONE Quart of Cream! 

Tools Needed: 

  • Wooden Spoon
  • Food Processor 
  • One Quart of Cream (preferably raw, but not necessary)
  • 2 Pint sized mason jars
  • One Cheesecloth (not necessary, you can use your hands)

Directions: 

Step One: Culture Your Cream. Take your quart of cream and set it out on the counter for 8 hours to sour with the lid on.

IMG_9054

Step Two: Make the Cultured Butter. Take one pint (2 cups) of the cream and pour it into your food processor. Set the other 2 cups aside. Turn your food processor on high and allow the blades to “churn” the cream into cultured butter. This takes roughly 10 minutes. When you start to see clumps forming in your cream, turn off your food processor and use your wooden spoon to push the butter to one side.

IMG_9056

Scoop out the cultured butter and place it in a cheesecloth. Gently squeeze out all the cultured buttermilk back into the food processor bowl with the rest of the buttermilk.

IMG_9060

Place the butter in a bowl with ice water and use your spoon to really push out any more buttermilk. Make sure to get as much excess liquid out. The ice water helps to firm up your butter. Remove the butter and use your hands to squeeze out any more water and form into whatever shape you would like. You have cultured butter!

Step Three: Make Your Buttermilk. Pour all your buttermilk leftover from making the butter into a pint-sized mason jar. You have cultured buttermilk!

Step Four: Make Your Sour Cream, aka Cream Fraiche’: Now take the other 2 cups of cultured cream that you set aside, and pour it into a pint-sized mason jar. Take one tablespoon of the cultured buttermilk that you made and put it inside the jar with the cream. Put the lid on and shake the jar to incorporate the cultured buttermilk with the cream.

Leave your jar on your counter or in a warm spot for 12 hours to culture even more and thicken. Chill well! You have European Style Sour Cream!

You will love this European Style Sour Cream that is also known as Creme Fraiche’. It is just like sour cream but much tastier. Put it on your potatoes, in your soup, on your eggs, and anywhere else you like to put sour cream. To make more Creme Fraiche’, follow Step Four above but use one tablespoon of leftover Creme Fraiche’, instead of cultured buttermilk, to culture another pint of cream! You can do this 6-8 times before you need to start over with cultured buttermilk!

I hope you have fun doing this! Let your kids help you and make it a fun kitchen experiment! 

Cultured Dairy- How to Make butter, buttermilk, and sour cream from 1 quart of cream! .001


Filed Under: DIY, Homesteading, Living Sustainably, My Recipes, Natural Living

Go ‘Crackers’ Over this Wheat-Free Snack Alternative!

March 25, 2014 by Jackie Ritz 8 Comments

Jicama Crackers.001

One of the things that was tough for my husband to give up when he first started cutting out wheat and grains from his diet was crackers.  He just loved having crackers with cheese or with his soup.

So, I had to try to come up with an alternative for him, and I came up with a great one, if I do say so myself.  Of course!  Slices of fresh jicama.

If you’ve never seen or tried a jicama before, you’ll likely find it in the exotic section of your local grocery store, or more commonly, at a farmer’s market or Asian market.

What a tasty, veggie, and a fantastic replacement for crackers.

INGREDIENTS:

  • 1 jicama, sliced to about ¼ in rounds
  • 1 lime
  • Himalayan Salt

PREPARATION: 

  • Sprinkle Himalayan salt over jicama slices.
  • Squeeze lime juice over jicama.

You can keep it this simple, or top the jicama with any cracker topping you like, such as cheese or olive oil.

So quick simple and satisfying.  I know you’ll just go crackers over this one!  (You may all stop groaning now, thank you)

Jicama Crackers-A Wheat Free Snack Alternative | www.thepaleomama.com.001

Filed Under: DIY, Living Sustainably, My Recipes, Natural Living, Nutrition

Cleaning Your Floors with Essential Oils

March 18, 2014 by Jackie Ritz 32 Comments

Cleaning Your Floors With Essential Oils .001

Recently I published an article listing the cleaning products and ingredients that you MUST avoid when you are cleaning your house. Many of the common household cleaners that we use are not only extremely toxic and carcinogenic to us, but they are taking a toll on the environment as well. Is all these cleaning products really necessary anyway?

We have become so scared of germs and bacteria that we are leered in to using products labeled “kills 99.9% of bacteria” and “kills germs on target.” When I see products like this it always causes me to think about how this world must have been before commercial cleaning products and if germs was such a big deal back-in-the-day.

When it comes to cleaning your floors, you don’t need expensive products to do the job. Essential oils are great at cleaning up the dirt while leaving a refreshing, clean aroma in the air. Cleaning your floors with essential oils is completely safe, non-toxic, frugal, and easy!

Best Essential Oils to Clean Your Floors With:

1911684_10152286759639725_1234070701_n

  • Lavender + Lemon
  • Citrus Blend: Lemon, Lemongrass, Wild Orange, and Lime
  • Spicy Blend: Orange, Clove or Cinnamon
  • Protective blend
  • Cleansing Blend: Melaleuca + Eucalyptus
  • Minty Refresher: Peppermint + Wild Orange

Where to buy essential oils? (click here)

What Oils Are The Best for Your Needs:

  • Have ants and mice? Use Peppermint
  • Feeling poopy? Use Melaleuca
  • Want to disinfect? Use Lemon

How to Use Essential Oils on Your Floors:

1.  Multi-Purpose Floor Cleaner Recipe

The beauty of using essential oils on your floors, is that you don’t have to worry about using a specific oil on a specific service. Each essential oil will work on your floors. This recipe works if you have tile, hardwood, linoleum, ceramic, laminate, and vinyl. You can mix any of the oils I recommend above to make this recipe or use one single oil.

INGREDIENTS: 

  • 1 cup of white vinegar
  • 1 TB of castile soap
  • 15 drops of essential oils
  • One bucket of water

DIRECTIONS:

  • Put all the ingredients in a bucket and use to mop the floors.

2. Heavy Duty Floor Cleaner

This is a great recipe to whip up if you have a really messy, sticky spill. Most likely, you will want to use this in your kitchen under where your kids eat!

INGREDIENTS: 

  • Make the recipe above for my Multi-Purpose Floor Cleaner 
  • Mix in 1/4 cup of baking soda

DIRECTIONS: 

  • Mop the floor with the mixture above. Then go over with hot water to rinse any residue.


Click here to Pin this article!

Cleaning Your Floors with Essential Oils | www.thepaleomama.com .001


Filed Under: DIY, DIY Home Recipes, essential oils, Living Sustainably, Natural Living

« Previous Page
Next Page »

Primary Sidebar

  • Facebook
  • Instagram
  • Pinterest
  • RSS
  • YouTube

Hi, I'm Jackie Ritz and welcome to The Paleo Mama! I'm a published author, certified herbalist, and voracious researcher of natural medicine and nutrition. I'm glad you're here and I hope you stick around for awhile!

Recent Posts

  • When God Says Pause: Why I Took a 5-Year Break from My Online Business
  • How to Quit Facebook but Keep Your Business Profile
  • Leaving the City for the Country
  • Natural Way to Heart Health

MEAL PLANS

Biblically clean meal plans that are for those love to cook real food

Read More

Footer

Our Blog

The Paleo Mama blog provides simple answers for healthier families through research, tutorials, recipes, and simple remedies for daily needs!

  • Health
  • Essential Oils
  • Recipes
  • Remedies
  • Natural Living
  • Meal Plans

Stick around!

You’ll get instant access to a library of natural remedies and real, paleo food, including our ebooks and free guides we send out.

  • Home
  • Disclosure/Disclaimer
  • Privacy Policy
  • Advertise
  • Contact Me

Copyright © 2025 · Wellness Pro on Genesis Framework · WordPress · Log in