• Skip to primary navigation
  • Skip to content
  • Skip to primary sidebar
  • Skip to footer

The Paleo Mama

Homegrown and Handmade

  • About
  • Blog
    • Podcast
  • Meal Plans
  • Essential Oils
  • Our Farm
    • Great Pyrenees Puppies
    • Goats
      • Goats for Sale
      • Goat Sales Policy
      • Nigerian Dwarf Bucks
        • Ranchocabra Lunar Eclipse

DIY Home Recipes

DIY Herbal Mouthwash

April 21, 2015 by Jackie Ritz 3 Comments

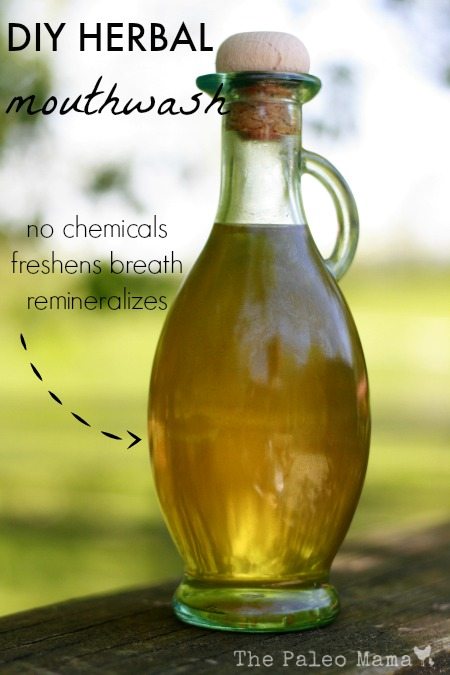
So, many of you might know if you follow me on Instagram, but a few months ago I started the Invisalign braces. I LOVE the changes I am seeing in my teeth and would recommend them to anyone in a heartbeat, but having the braces on my teeth 22 hours a day can make my mouth stale and dry. I am a minimalist and before braces I would just drop a little bit of peppermint essential oil on my tongue and swish around! However, with the new Invisalign braces, I needed something that would swish really good and freshen my breath…which is why I created this DIY Herbal Mouthwash. 

I had some dried peppermint laying around so I infused the water with it and added in some cinnamon and vitamin C powder to act as a preservative. I’m now, sort of, addicted to this mouthwash and I know you will be too!

Note: You can leave the dried peppermint out and just add an extra 5 drops of peppermint essential oil. Also, be sure to use THERAPEUTIC grade essential oil since you will be swishing it around in your mouth. Here’s where I get mine. 

DIY Herbal Mouthwash

  • 2 cups of filtered water
  • 2 TB of dried peppermint leaves
  • 10 drops of peppermint essential oil
  • 5-10 drop of Cinnamon essential oil (you decide how much)
  • 1/2 teaspoon of Vitamin C powder (to act as a preservative). If you leave this ingredient out, then I suggest you store the bottle in the fridge. 

Click here to see where I buy therapeutic grade essential oils at a discount! 

How to Make: 

  1. Place the water in a small pot and bring to a simmer. 
  2. Add the peppermint leaves, reduce heat, cover and simmer for 15 minutes. 
  3. Use a cheesecloth and strain out the herbs. Cool. 
  4. Add the essential oils and vitamin C powder to the mixture. 
  5. Store in a glass jar and shake before each use. 

DIY Herbal Mouthwash  The Paleo Mama

Filed Under: DIY Beauty Recipes, DIY Home Recipes, essential oils, Living Sustainably, Natural Living

Lemongrass Essential Oil

April 10, 2015 by Jackie Ritz Leave a Comment

Lemongrass

Lemongrass (Cymbopogon flexuosus) grows in dense clumps that can grow 6 feet in height and 4 feet in width. It is native to warm and tropical regions, such as India, Southeast Asia, and Oceania. It is used as a medicinal herb in India and it is common in Asian cuisine. In African and South American countries, it is popularly used for making tea. Lemongrass essential oil is extracted from the leaves by steam distillation.

Its main chemical components are Geranial, Neral, Myrcene, Citronellai, and Citral.

What are the benefits of Lemongrass Essential Oil?

Its primary benefits are:

  • It supports healthy digestion
  • It soothes aching muscles
  • It purifies and tones skin
  • It relieves head and neck tension and promotes healthy body temperatures. 
  • Lemongrass Oil is far better than many of the synthetic deodorants that are a big expense, a heavy impact on the environment, and have limited lasting power. 

What are Lemongrass’s cautions?

If you have sensitive skin, it may create a rash. It is not recommended for children or nursing mothers. Because lemongrass can stimulate blood flow, pregnant women should use extreme caution.

Click here to get my Essential Oil Safety Guide

Top Ten Uses for Lemongrass Essential Oil

  1. Lemongrass has wonderful skin regeneration properties. It can be added to shampoos, conditioners, deodorants and lotions.
  2. To help soothe sore joints or muscles. Combine equal parts Fractionated Coconut oil (or another carrier oil) and Lemongrass and rub topically on the area of concern.
  3. It is a natural bug repellant for insects like mosquitoes and ants. It can be sprayed, diluted in a carrier oil, directly on the skin. It can even be used to control fleas; add about 5 drops to water and create your own spray to protect your pet’s coat.
  4. It supports healthy thyroid function. Mix 1-2 drops with a carrier oil and apply topically over your neck area.
  5. It can be used in your household products. Try putting a few drops on a dust cloth and then wipe down the wood in your house.
  6. It is a natural insect repellant and pest control. Rub or spritz some lemongrass on your skin before going outside.
  7. It can be used to detoxify your body. Make your own detoxifying lemongrass tea by adding 2-3 drops to your favorite tea.
  8. You can make a refreshing foot bath by adding 2 drops of Lemongrass Oil and 2 tablespoons of Epsom salts to warm water, and soak your feet for 10 minutes.
  9. Lemongrass oil is a valuable oil to use in aromatherapy. Its clean and calming aroma can reduce sad and anxious feelings, relieve restlessness and occasional sleeplessness, and helps you to relax.  Try adding 3-4 drops to your diffuser and diffuse for one hour before bedtime.

Where to  purchase Lemongrass essential oil

Home-made Lemongrass Essential Oil Recipe

Lemongrass oil can be used to relieve occasional muscle and joint discomfort in your body. I have found it to be so convenient to have a homemade soothing rub using essential oils, including lemongrass with coconut oil and beeswax.

Lemongrass and Emotions

Lemongrass oil is the oil of cleansing. It is a powerful cleanser of energy, and dispels feelings of despondency, despair and lethargy. It teaches individual to move forward without hesitation. As individuals let go of past issues they have an increased ability to see situations with greater clarity. (source) 

Companion Oils: Melaleuca, Thyme, Clary Sage

Lemongrass Essential Oil

Sources

  1. https://draxe.com/lemongrass-essential-oil/
  2. https://beautetude.com/2015/03/30/lemongrass-essential-oil-benefits-uses/
  3. https://www.sustainablebabysteps.com/lemongrass-essential-oil.html
  4. https://www.organicfacts.net/health-benefits/essential-oils/health-benefits-of-lemongrass-essential-oil.html
  5. https://www.stockpilingmoms.com/2013/05/uses-and-benefits-of-lemongrass-essential-oil/
  6. https://articles.mercola.com/herbal-oils/lemongrass-oil.aspx

 So tell me?! How do you like to use Lemongrass essential oil?

Filed Under: DIY Beauty Recipes, DIY Home Recipes, essential oils, Natural Living

Wool Dryer Balls with Essential Oils

January 8, 2015 by Jackie Ritz 31 Comments

Wool Dryer Balls

Since I have made the switch to using wool dryer balls, instead of dryer sheets, my pocket-book is much happier, and so is my energy bill! I love my wool dryer balls with essential oils and I know you will making the switch too!

What Are Dryer Balls?

They are a 100% natural replacement for dryer sheets made from wool. You can purchase them already felted and ready to go, or you can make them yourself.

Why Use Wool Dryer Balls?

  • They can cut your drying time in half
  • They help reduce static
  • They save you money on your energy bill
  • They are chemical-free, unlike dryer sheets
  • They can be re-used over-and-over again
  • They increase the fluffiness of your clothes
  • They are safe to use with cloth diapers

Adding in Essential Oils

I love to lightly scent my clothes, so I add 3-4 drops of my favorite essential oils to each dryer ball. This usually lasts 2-4 loads before I have to add more! Here’s a few essential oil recommendations; it’s fun creating combinations that make your clothes smell so wonderful:

CLICK HERE to see where I get my essential oils at a discount

  • Lemongrass 
  • Lavender + Lemon
  • Wild Orange 
  • Peppermint + Wild Orange
  • Tangerine

Where to Buy Wool Dryer Balls:

I love Woolzies (click here to see them) in XL. I use all 4 in my laundry and right now they are 62% off on Amazon!!

Dryer Balls are Easy to Make:

ITEMS NEEDED: 

  • Recycled wool sweaters
  • Wool Yarn
  • Knee High Nylon

Step 1) Save the money and go buy a few wool sweaters from Goodwill. Then go to your nearby craft store and get a big roll of wool yarn.

Step 2) Cut the wool sweaters up in scrap pieces and ball them up in your hand. Then take the wool yarn and start wrapping it around the scrap wool until you have a large softball-size bundle of yarn. Some people make them the size of tennis balls but I say go BIG! I also think you need 4-8 of them to really notice a difference. So, make a bunch!

Step 3) Then when you’re done rolling them into balls, tie a knot, then throw the ball in a knee-high nylon, or in a sock. Tie off the end with a rubber band (a hair rubber band) and run them through a hot wash cycle and then a hot dry cycle. This makes the wool felt together.

Step 4) Then take them out and you’re done!

How to Use Your Dryer Balls:

  1. Add a few drops your favorite essential oils to each ball.
  2. Toss in the dryer with your wet clothes
  3. Re-use over and over and over again!!!!

Wool Dryer Balls from The Paleo Mama

Filed Under: DIY Home Recipes, essential oils, Living Sustainably, Natural Living

20 DIY Homemade Gifts

November 24, 2014 by Jackie Ritz 2 Comments

20 gifts

Lately there has been such a hype of essential oils, and rightly so! Essential oils are finally becoming recognized as great natural solutions!

This Christmas, I’m making all my own homemade gifts and many of the recipes use essential oils. I think most people love and appreciate the time and work you put into homemade gifts, so I love doing this for my friends and family.

Are you up for making homemade gifts for your friends and family this year? I’m including 20 recipes that are in my favorite essential oil starter kit. You can read more about the brand I stand behind and how to purchase a starter kit for yourself HERE. 

So, go on over HERE and grab your starter kit and you’ll be set to start making your own homemade gifts for Christmas! Not only will you have the essential oils you need, but you will, also, have a wholesale membership for your essential oil needs (so shop at wholesale price all year long), a support system for using your oils, and quality essential oils to use in your home. You will have a lot left over! Each bottle holds 250 drops!!!

What Essential Oils Do You Need? 

  1. Lavender
  2. Lemon
  3. Melaleuca
  4. Peppermint
  5. Frankincense
  6. Protective Blend
  7. Oregano
  8. Breathe
  9. Digestive Blend
  10. Soothing blend

Purchase your starter Kit HERE! 

20 DIY Homemade Gifts

  1. Lavender Oatmeal Facial Scrub – so simple and uses ground oatmeal!
  2. Peppermint Candy Cane Sugar Scrub – a wonderful holiday gift for your girlfriend!
  3. Homemade Frankincense Soap – by the soap base and you’re good to go!
  4. DIY Chest Rub – a homemade “vapor” rub alternative!
  5. Lavender Lemon Lip Balm – perfect for the winter season!
  6. Muscle Salve – feels wonderful on those aches and pains!
  7. DIY Coconut Salt Scrub – I recommend lavender or lemon!
  8. DIY Hand Gel – uses a protective blend to boost immunity!
  9. Fast Fizzing Bath Bombs – throw in the tub or shower for a spa-like experience!
  10. DIY Lotion Bars – easy to make and no junk ingredients!
  11. DIY Clay Mask – add lavender to this recipe because it’s great for the skin!
  12. All Purpose Salve – a salve that can be used for everything!
  13. Tallow Butt Balm – great for the little diaper rashes and sore bums!
  14. DIY Laundry Detergent – use Orange or Lemon to really clean those clothes!
  15. DIY Remineralizing Tooth Powder for Kids – a simple recipe that the kids will love!
  16. Detox Bath in a Jar – throw some epsom salt and essential oils in a mason jar!
  17. DIY Essential Lip Balm – another great recipe for the lips!
  18. Simple Peppermint Citrus Scrub – choose lemon and peppermint!
  19. DIY Aromatherapy Play-dough – great homemade gift for the kids!
  20. DIY Deodorant Stick – use melaleuca and lavender!

CLICK HERE to get started and purchase a wholesale starter kit and start making your own gifts for the Holidays!

20 Homemade Gifts

Filed Under: DIY Beauty Recipes, DIY Home Recipes, essential oils, My Recipes

Traditional Goat Milk Soap Recipe

October 22, 2014 by Jackie Ritz 21 Comments

Goat Milk Soap Recipe .001

Why Goat’s Milk

Goat’s milk is packed with vitamins, minerals natural fats, and protein. It carries a pH of around 6.4 which is very similar to a normal skin pH of 5.6, which makes it great for skin tolerance. You can find vitamins A, B2, B6, B12, and Niacin in goat’s milk and many who cannot tolerate dairy, find that they have no problems with goat’s milk.

Those who have very sensitive skin, find that paying over $5 for a bar of goat’s milk soap is worth it! I’ve had several people come up to me and tell me that my soap was the one of the only bars of soap that they could use without breaking out or having a skin reaction.

Anyone Can Make Soap

Soap is NOT hard to make. What is hard to make is all that fancy soap…which I don’t understand anyways. It’s just you, naked in the shower or bath, rubbing a bar of soap on your body. Why do you need swirls and fun shapes? If you enjoy doing that, then by all means, go for it! But I make soap for my family and most the time the kids end up making holes in the bar and pretending like Spiderman can surf on it.

This is a very basic, traditional recipe that I created. I use lard and I use lye. This is NOT a vegan recipe. I also use the traditional method of cold-process. This process uses a short prep time and a long cure time. It’s the easiest, in my opinion, because you are mostly waiting on the soap to cure and harden. This is the way our ancestors prepared soap and it’s the way I prefer to make my soap. Since I use raw goat’s milk, I prefer to keep the milk unheated to prevent destroying any vitamins and minerals.

Why Lard and Lye

Lard was traditionally used in making soap and has a very long history of in soap-making.  I get my lard from a local farm for a really good price, but you can order pastured lard from here. Lard is the hardening fat in this soap – it’s what makes the bar hard so that it doesn’t turn into a big pile of glob while you are taking a shower.

I, also, like lard because of the aging time. When you make a cold-process soap, you are going to need to let your soap age (or cure) for 3-6 weeks. If you do not use a hardening fat, like lard, then it’s going to take your soap much longer to cure. I find that 3-4 weeks is perfect for this recipe.

Now lye is necessary for the alkali, when combined with the goats milk, loosens and attracts dirt, allowing it to be washed away. After 24 hours, the lye is not even present and by the time the 3-4 weeks is up, there is no trace of lye in the soap.

Supplies Needed:

For anything that touches the lye, you will need separate supplies and those supplies should never be used on anything else. Also, this is going to make an UNSCENTED bar. I have tried using essential oils and it requires way TOO MUCH. Alternatively, if you would like, you can add a few drops of essential oil to your bar of soap when you are washing in the shower.

  • Immersion blender
  • Glass bowls for mixing
  • Rubber spatulas
  • Digital Kitchen Scale
  • Tall stainless-steel pot for melting oils
  • 2 Thermometers
  • Safety Equipment – rubber gloves, long sleeve shirt, and goggles
  • Knife to cut the soap
  • Soap Molds or Old Loaf Pans – I prefer the rustic cut of the soap and prefer to use loaf pans.
  • Parchment paper

Ingredients Needed:

You can change your fats and oils if you would like. This is just the recipe that I created and enjoy the most. I have made several other recipes and I really prefer mine as it is very moisturizing, lathers very well, and includes sustainable fats.

  • 2 ounces of Beeswax
  • 18 ounces of Coconut oil
  • 5 ounces of Castor Oil
  • 26 ounces of pastured Lard
  • 6 ounces of Olive oil
  • 8.40 ounces (or 238.39 grams) of 100% pure Lye
  • 18.9 ounces of Frozen Goats Milk (raw or pasteurized) – easiest way to freeze goats milk for soap-making, is to pour the measured out goats milk into a gallon ziplock bag. Then freeze the bag flat.

Step-By-Step Instructions:

  1. Collect all your supplies and block off your kitchen. I usually do this when my kids are down for a nap because of the lye.
  2. Put parchment paper in your loaf pans to get them ready.
  3. Measure out all the fats and oils (everything but the lye and milk) and put in your tall stainless-steel pot.
  4. Put your stove on LOW and slowly melt the oils and the fats. Put a thermometer in and make sure it never goes above 100 degrees. Once melted, remove from stove.
  5. Take your bag of frozen goats milk and smash it up into smaller pieces. Add it to a large glass bowl.
  6. Slowly sprinkle your lye over the frozen milk and mix with a spatula at the same time. MAKE SURE you are wearing your safety gear!
  7. Mix until the frozen milk is melted. Check the temperature of the mixture with a thermometer and do not let it go over 110 degrees. If it does, no worries, just cool it down by placing the bowl in a larger bowl filled with ice water.
  8. Now check on your oils and make sure they are melted and the temp is not over 100 degrees. If it is, then cool it down by placing it in the bowl of ice water.
  9. You want your oil mixture and your lye mixture to be within 10 degrees of each other.
  10. Now slowly pour your lye mixture into your oil mixture. As you are pouring, put your immersion blender on LOW and start to mix.
  11. When all the lye mixture is added, turn your immersion blender on HIGH and mix until you reach “trace”. Trace is when you can take a spoon or spatula and you can draw a line in your mixture. It usually takes me 2 minutes to reach trace with this recipe…sometimes less.
  12. Once you reach trace, you are going to need to move very fast. Immediately, pour your mixture into your 2 loaf pans or your soap molds. Use your rubber spatula to clean the bowl and smooth out the top of the loaf pan.
  13. Put the pans in a dark spot out of reach of kids. Leave it alone for 24 hours. After around 24 hours, the lye is inactive and you can touch the soap.
  14. After 24 hours, remove your soap from the loaf pans and cut into individual bars.
  15. Place the bars in a dark area and let them cure for 3-4 weeks! I know, it’s torture to wait, but it’s sooooo worth it!
  16. After 3-4 weeks the bars should be ready to go!

 See Picture Tutorial Below…..

Working on reaching trace. 

16081_10152632866727013_915759999358523822_n

After you reach trace, pour into your loaf pans and allow to sit for 24 hours. 

soap1

After 24 hours, cut into individual-sized soap bars and cure for 3-4 weeks. 

soap 2

Waiting 3-4 weeks for the soap to harden! It’s worth the wait! 

10703599_10152663692747013_4306114713772124454_n


I hope you enjoy this recipe as much as my family does! 

Traditional Goat Milk Soap Recipe .001

Filed Under: Budget, DIY Beauty Recipes, DIY Home Recipes, goats, Homesteading, Living Sustainably, My Recipes, Natural Living

Cleaning Your Floors with Essential Oils

March 18, 2014 by Jackie Ritz 32 Comments

Cleaning Your Floors With Essential Oils .001

Recently I published an article listing the cleaning products and ingredients that you MUST avoid when you are cleaning your house. Many of the common household cleaners that we use are not only extremely toxic and carcinogenic to us, but they are taking a toll on the environment as well. Is all these cleaning products really necessary anyway?

We have become so scared of germs and bacteria that we are leered in to using products labeled “kills 99.9% of bacteria” and “kills germs on target.” When I see products like this it always causes me to think about how this world must have been before commercial cleaning products and if germs was such a big deal back-in-the-day.

When it comes to cleaning your floors, you don’t need expensive products to do the job. Essential oils are great at cleaning up the dirt while leaving a refreshing, clean aroma in the air. Cleaning your floors with essential oils is completely safe, non-toxic, frugal, and easy!

Best Essential Oils to Clean Your Floors With:

1911684_10152286759639725_1234070701_n

  • Lavender + Lemon
  • Citrus Blend: Lemon, Lemongrass, Wild Orange, and Lime
  • Spicy Blend: Orange, Clove or Cinnamon
  • Protective blend
  • Cleansing Blend: Melaleuca + Eucalyptus
  • Minty Refresher: Peppermint + Wild Orange

Where to buy essential oils? (click here)

What Oils Are The Best for Your Needs:

  • Have ants and mice? Use Peppermint
  • Feeling poopy? Use Melaleuca
  • Want to disinfect? Use Lemon

How to Use Essential Oils on Your Floors:

1.  Multi-Purpose Floor Cleaner Recipe

The beauty of using essential oils on your floors, is that you don’t have to worry about using a specific oil on a specific service. Each essential oil will work on your floors. This recipe works if you have tile, hardwood, linoleum, ceramic, laminate, and vinyl. You can mix any of the oils I recommend above to make this recipe or use one single oil.

INGREDIENTS: 

  • 1 cup of white vinegar
  • 1 TB of castile soap
  • 15 drops of essential oils
  • One bucket of water

DIRECTIONS:

  • Put all the ingredients in a bucket and use to mop the floors.

2. Heavy Duty Floor Cleaner

This is a great recipe to whip up if you have a really messy, sticky spill. Most likely, you will want to use this in your kitchen under where your kids eat!

INGREDIENTS: 

  • Make the recipe above for my Multi-Purpose Floor Cleaner 
  • Mix in 1/4 cup of baking soda

DIRECTIONS: 

  • Mop the floor with the mixture above. Then go over with hot water to rinse any residue.


Click here to Pin this article!

Cleaning Your Floors with Essential Oils | www.thepaleomama.com .001


Filed Under: DIY, DIY Home Recipes, essential oils, Living Sustainably, Natural Living

« Previous Page
Next Page »

Primary Sidebar

  • Facebook
  • Instagram
  • Pinterest
  • RSS
  • YouTube

Hi, I'm Jackie Ritz and welcome to The Paleo Mama! I'm a published author, certified herbalist, and voracious researcher of natural medicine and nutrition. I'm glad you're here and I hope you stick around for awhile!

Recent Posts

  • When God Says Pause: Why I Took a 5-Year Break from My Online Business
  • How to Quit Facebook but Keep Your Business Profile
  • Leaving the City for the Country
  • Natural Way to Heart Health

MEAL PLANS

Biblically clean meal plans that are for those love to cook real food

Read More

Footer

Our Blog

The Paleo Mama blog provides simple answers for healthier families through research, tutorials, recipes, and simple remedies for daily needs!

  • Health
  • Essential Oils
  • Recipes
  • Remedies
  • Natural Living
  • Meal Plans

Stick around!

You’ll get instant access to a library of natural remedies and real, paleo food, including our ebooks and free guides we send out.

  • Home
  • Disclosure/Disclaimer
  • Privacy Policy
  • Advertise
  • Contact Me

Copyright © 2025 · Wellness Pro on Genesis Framework · WordPress · Log in