• Skip to primary navigation
  • Skip to content
  • Skip to footer

The Paleo Mama

Homegrown and Handmade

  • About
  • Blog
    • Podcast
  • Meal Plans
  • Essential Oils
  • Our Farm
    • Great Pyrenees Puppies
    • Goats
      • Goats for Sale
      • Goat Sales Policy
      • Nigerian Dwarf Bucks
        • Ranchocabra Lunar Eclipse

Blog

How to Kill Weeds Naturally

June 13, 2016 by Jackie Ritz Leave a Comment

There’s nothing more frustrating for the newbie vegetable gardener than to see those pesky garden weeds growing faster than the freshly planted vegetables. For the organic, natural gardener, getting rid of those weeds is not as easy as getting the spray can of chemical weed killer and waging war on those weeds. Weeds are a nuisance, ugly and invasive. They steal water and nutrients, hog the sun, and act like garden bullies. In this blog post I want to suggest some ideas for how to kill weeds naturally to get rid of those pesky garden nuisances.

There are many common household products you can use to make your own homemade garden weed killer. We’ll take a close look at some of these natural solutions and how to use them.

I also have a separate post on using essential oils in your garden. 

1. Mulch

You may not have considered mulch a weed killer, but that is just what it is. Putting down a 3-4 inch layer can deprive weeds of the light and warmth they need to survive. Organic mulches will also nourish your soil. Here’s a list of some of the best kinds of garden mulch you can use:

  • Shredded or chipped bark. It doesn’t break down as quickly, so may not be the best choice for your garden.
  • Chopped leaves. You can shred them by running over them a couple of times with y our lawnmower. They break down fairly quickly and provide plenty of nutrition to the soil.
  • Straw. Straw is a popular choice and breaks down fairly quickly. However it may contain weed seeds.
  • Pine needles. These look great in gardens, but can be a bit acidic, so avoid them near plants that don’t tolerate acid soil very well.
  • Newspapers. You can lay your newspaper right on top of the weeds. Each layer should be about 10 pages thick. Throw a little heavier mulch on top to weight the paper down. The paper will fertilize the soil, cool the roots, and add organic material to the soil.
  • Cedar Chips. Naturally repels pests and fleas in addition to keeping weeds down. 

2. Common Household Products

Household items can be used to make your own homemade garden week killer cheaply and effectively. These household items are guaranteed to help you get rid of those weeds.

  • Boiling Water. Boiling water is more effective than many of your store bought weed killers in wiping out unwanted vegetation. Easy-peasy to do. Put a kettle of tap water on the stove and heat till boiling, then pour on the weeds you wish to kill.
  • Vinegar. Vinegar is a great organic homemade weed killer. Either white or cider vinegar will work. The acetic acid in the vinegar works to kill the leaves on the plant but not the root. Vinegar will kill back (kill the leaves but not the root) any plant but works best on young plants because they do not have enough energy stored in the roots to regrow their leaves. My local feed store carries horticulture vinegar which is 20% acidic and works great on weeds!
  • Salt. Salt will kill plants and will make the ground unsuitable for future plant growth. On a small scale, you can drop a small pinch of table salt at the base of the undesirable plants.
  • Rubbing alcohol. Rubbing alcohol is used around the house because it draws water out and helps to evaporate it quickly. Guess what? If you put it on a plant, it will do the same thing. You will be basically sucking the life blood out of the weed. 
  • Corn Meal. Corn meal doesn’t really kill weeds, it just stops the weed seeds from ever developing. Corn Gluten is a pre-emergent, which is a fancy way of saying that is it is a seed birth-control. Corn meal scattered around an area will keep any seed in that area from growing into a plant.
  • Liquid Dish Soap. You can also add a few drops of liquid dish soap to the liquid homemade weed killers for added effectiveness. The soap is not harmful to the weeds but the soap acts as a sort of bonding agent and will help the weed killers to stick to the weed more effectively.

3. Homemade weed killer recipes

  1. Hot and Spicy Weed Killer. Some gardeners have developed recipes for weed killers by accident, including this recipe for Hot and Spicy Weed Killer. You can drizzle the boiling, spiced water you use to boil shrimp or crawfish on your weeds, and they will die. To a large pot of water, add a couple of tablespoons of Cajun or Red pepper, and half a bottle of hot sauce. Apply it directly to the weeds, but be careful not to get it on your vegetable plants. You can even check in the Dollar Store to see if they have the premixed boil seasoning for you to use.
  2. Salt and Vinegar solutions. This solution is all natural, works fast, and doesn’t harm the environment. Put a gallon of white vinegar in a weed sprayer and add about a half cup of salt. Be careful not to get this on your garden plants. It may not kill the roots of taproot weeds, but it is effective on broad leaf weeds.
  3. Dish Soap weed killer. Not only can you fight soap scum with this homemade recipe, but it kills those pesky weeds as well. To one gallon of white vinegar, add 1 cup of table salt, 1 tablespoon of Dish Soap, and 1 Tablespoon of Pine Sol. Mix it well and pour into a spray bottle, and apply to weeds (avoid your plants).

Jackie’s Homemade Weed Killer Recipe

Weed Killer Recipes

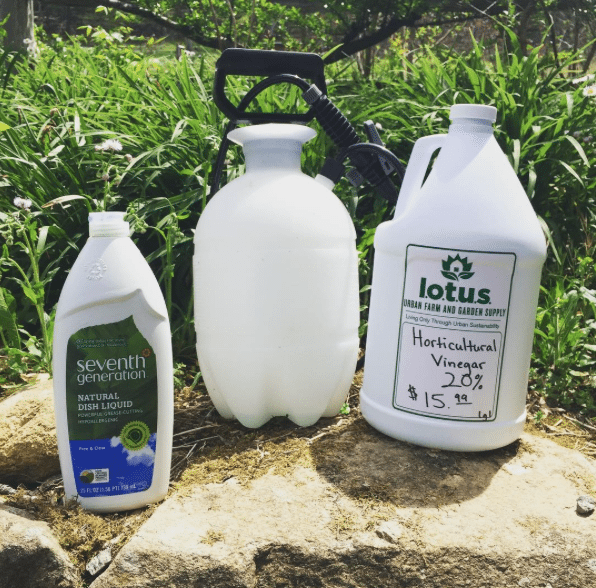
  • 2 Tablespoons of Horticulture Vinegar (click here to buy) 
  • 2 squirts of all-natural dish soap (I use this one) 
  • One gallon of water

Add all the ingredients to a gallon spray tank and spray on weeds in the morning!

*Horticulture vinegar is very strong and needs to be diluted with water. 

Alternatives to homemade weed killers

Most natural weed killers are non-selective, so you do not want to get them on your growing vegetable plants. If your efforts to come up with a home made weed killer end up falling short or just seem to be too much trouble or concern, that doesn’t mean you have to resort to the typical chemicals on the garden department shelves. There are a number of products that offer proven results for those who want to maintain a healthy home environment. You can find recommendations for these natural, organic weed controls online, including here.

Even with the best preventative solutions, you’re bound to have a few weeds in the vegetable garden. Deal with them early before they go to seed and you’ll have fewer weeds the following year. Cultivate the garden soil shallowly with a hoe to kill small weeds. Simply expose their roots to air and sunlight and they die. Hand weed larger weeds. Compost larger weeds or discard them, but don’t leave them in the garden. Some weeds, such as purslane, can regrow if left on the soil.

Nothing can replace a little hard work. I spend 5-10 minutes in my garden every morning and pull weeds before they go to seed. Morning is the best time to weed because the soil is moist, making weeds easier to pull. 

All in all, enjoy growing your own vegetables and stay on top of weeds before they make your garden a burden that you let go! 

How to Kill Weeds Naturally

Sources

  1. https://www.scotts.com/smg/goART3/Howto/how-to-control-weeds-naturally-with-mulch-weed-control-weed-killing-mulch-scotts/34300028.
  2. https://organicgardening.about.com/od/organicgardenmaintenance/a/Mulch.htm.
  3. https://www.grit.com/farm-and-garden/using-newspaper-as-mulch.aspx.
  4. https://homeguides.sfgate.com/weed-killer-vegetable-gardens-40017.html.


Filed Under: Gardening, Homesteading

What’s the Difference Between Duck Eggs & Chicken Eggs?

June 11, 2016 by Jackie Ritz 1 Comment

We have a daily supply of both chicken eggs and duck eggs from our barnyard critters. We have several Silver Appleyard Heritage Breed ducks that lay lots of large white eggs for us. We also have lots of heritage breed chicken who happily free range around our barnyard and leave us dozens of multi-colored eggs daily. We love both, and are often asked what the difference is between the two. I want to give you a few facts about duck eggs vs chicken eggs in this blog post. Let me try to answer these questions in this blog:

  • How do they compare nutritionally?
  • What are the benefits of eating each type egg?
  • How do they differ in taste?
  • How do I use duck eggs in cooking?

How do they compare nutritionally?

Here is a simple chart that compares the eggs nutritionally:

Facts Chicken Eggs (Large) Duck Eggs
Calories 71 130
Total Fat 5 g. 10 g.
Cholesterol 211 mg. 619 mg.
Sodium 70 mg. 102 mg.
Total Carbohydrates 0 g. 1 g.
Protein 6 g. 9 g.

 When it comes to comparing other nutrients like vitamins and minerals, the same rule applies to both eggs: it depends on what the bird eats. As a general rule, both chicken and duck eggs offer vitamin A, vitamin B-12, vitamins D and E, and selenium and iron. Duck eggs have more Omega 3 fatty acids, and are an alkaline-producing food. Chicken eggs are an acid food.

Ducks or chickens that are fed poultry food will not be as healthy, or provide as many nutrients, as those that are allowed to free range and forage things like algae, weeds, and grass. That is the main reason why I am totally confident in saying that barnyard duck and chicken eggs are so much healthier to eat than those you could get at your local supermarket.

What are the benefits of eating each type egg?

Duck

I want to give you some of the benefits of eating either duck or chicken eggs. Generally the benefits are similar, but there are some differences, which I’ll list. Because I am all about pastured poultry, the benefits I’m listing are related to pasture-raised poultry. For me, these benefits far outweigh any you can get from farm-raised, supermarket quality eggs. Here are some of the main benefits:

  • Both duck and chicken eggs contain healthy Omega-3 fats. These fats contribute to heart health, normalize and regulate your cholesterol triglyceride levels, aid healthy brain function, and give support against autoimmune disorders, arthritis, and cancer.
  • Pasture-raised poultry have significantly higher vitamin E content in their eggs. Vitamin E provides protection against toxins in the air, eye disorders, neurological diseases, and provide benefits for your skin and hair care.
  • Both duck and chicken eggs provide protein with high biological value (HBV). They provide a complete range of amino acids, and are considered a “complete protein.”
  • Because duck eggs generally have a thicker shell, they will stay fresher longer.   
  • People who cannot eat chicken eggs due to allergies can often eat duck eggs.

There are so many overall benefits to eating either duck or chicken eggs that I consider them an important part of my family’s daily menu plan. We love our barnyard critters for the beautiful, healthy eggs they continue to give us, and there are many times when we would choose to eat an egg over anything else.

How do duck eggs and chicken eggs differ in taste?

Laura_Coppelman_-4282

There really is not a lot of difference in the taste between a duck egg and a chicken egg. Duck eggs tend to be a bit more intense in taste than a chicken egg because of what a duck eats. They prefer to eat bugs, snails, slugs, and other high-protein critters over plant matter, and that diet impacts the flavor of their eggs.

How do I use duck eggs in cooking?

You can use duck eggs just the same as you use chicken eggs generally. But because there is a higher protein content in duck eggs, you need to be sure you are not overcooking them and turning them rubbery. Here are a few of my favorite ways to cook with duck eggs.

  • Hardboiled duck eggs—Place your duck eggs in a pot, cover with cold water, and bring to a boil. As soon as the water boils, remove the pot from the heat and let it stand for 12 minutes. Drain the eggs and shake the pan vigorously to crack the shell, this lets them cool faster and prevent overcooking. Cover with cold water and ice and let them cool before you peel them.
  • Fried duck eggs—I fry my duck eggs just like chicken eggs. They tend to stay more compact and thicker, so they take a bit longer to fry through.
  • Baking with duck eggs—I love using duck eggs in cakes, pies, cookies, custards, and other baked items. The white of duck eggs have more protein and will whip up higher, giving you lighter, taller baked goods. If the duck eggs you are using are much larger than your normal chicken eggs, try using 2 duck eggs when a recipe calls for 3 chicken eggs.

Three Duck Egg Recipes

I want to give you three recipes for using duck eggs. If you just try out these recipes, I’m sure you will want to continue cooking with duck eggs whenever you can. Not only are they an excellent source of healthy nutrition, they are also so tasty!

1. Homemade Duck Egg Mayo—

If you think homemade mayo using chicken eggs is delicious, just wait until you taste this homemade mayo using duck eggs. There are many different methods for making homemade mayo, but the one I like best makes use of my immersion blender. I find it easier and faster, and the mayo thick and creamy when it’s done.

Ingredients: 1 large duck egg, juice of half a lemon (about 1 TBSP), about a half teaspoon of Dijon or whole-grain mustard, ½ tsp sea salt, and ¼ tsp. white pepper, 1 cup light olive oil (or perhaps ½ cup extra virgin olive oil and ½ cup avocado oil).

Directions: Put all the ingredients is a wide mouth Mason jar. Let the ingredients sit while the oils rise to the top. Put your immersion blender in the jar sitting firmly on the bottom. Without raising it, turn it on high so the mayo will begin to emulsify. Once it starts to look like real mayo (less than a minute) you can move the immersion blender up and down to mix in any oil not yet emulsified. Place your thick, delicious mayo in a covered jar and keep in the refrigerator. It will last about one week.

2. Duck Egg Crustless Quiche—

We love to use our homegrown veggies, raw milk and duck eggs in a delicious quiche. We serve these for just about any meal, and the recipe can vary depending on what garden veggies we have available at the time.

Basic Ingredients: 3-4 duck eggs, about 1 ½ cups raw goat or cow milk, about a cup of homemade goat milk mozzarella cheese, sea salt and pepper to taste. Optional ingredients: freshly harvested Kale, Spinach or Chard, diced freshly harvested tomatoes, green onions, Shitake mushrooms just picked, fresh herbs.

Directions: Preheat the oven to 400 degrees. Beat the eggs, beat in the milk and stir in the cheese and salt and pepper, Stir in any of your optional fillings. Lightly grease a casserole dish. Bake about 20-30 minutes, removing the quiche when it is firm in the middle and the edges are just starting to brown. Let it sit a few minutes while you set the table and call your family, then slide a knife around the edges, slice and serve.

3. Garden Veggie and Duck Egg Breakfast Muffins—

Here’s another really good way to use your garden veggies and duck eggs in a breakfast muffin. You can vary the veggies according to what you have freshly harvested.

Ingredients: 1 ½ cups garden veggies (zucchini, summer squash, eggplant, spinach, kale), 2 Shitake mushrooms, diced (other mushrooms are fine), about ⅓ cup fresh juice from your garden tomatoes (or sauce you have already made), 6 duck eggs, fresh herbs (basil, parsley, rosemary, etc.), sea salt to taste.

Directions: Preheat the oven to 350 degrees. Use 6 extra-large muffin cups (I like to use a silicone muffin pan). Fill the muffin cups about ⅓ full with a diced mixture of the veggies and mushrooms. Put a teaspoon of the tomato juice or sauce on top of the veggie mix. Crack a duck egg on top of each muffin cup. Season the egg with some dried herbs and sea salt. Bake for 15 minutes or until the whites are set and the yokes partially baked. Remove from oven and let sit a couple minutes. You can serve these warm or cold. Store your leftovers in a covered container in the fridge.

I know you are going to discover that duck eggs are an awesome treat…kind of a ramped-up version of chicken eggs. We love our duck eggs, and think you will too.

Duck Eggs Vs Chicken Eggs

Sources

  1. https://countrysidenetwork.com/daily/poultry/eggs-meat/egg-facts-duck-eggs-vs-chicken-eggs/
  2. https://articles.mercola.com/omega-3.aspx
  3. https://modernfarmer.com/2015/06/everything-you-need-to-know-about-duck-eggs/


Filed Under: chickens, Homesteading

4 Reasons to Pay Your Kids and Stop Giving Allowances

June 10, 2016 by Jackie Ritz 1 Comment

If you have young children, I’m sure you have discovered, as we have, that they aren’t necessarily born with an active, self-governing work ethic. We have tried several different methods to get our kids to do the simple things like pick up their clothes, make their beds, so simple household chores for us, and even the basic things like brush their teeth and comb their hair. Most of these methods have been appallingly ineffective, and left both the parents (us) and the kids (them) frustrated, grouchy, and vindictive. Then we discovered these 4 reasons to pay your kids and stop giving allowances. 

I want to give you a glimpse of the method that works for us in this blog post, and tell you how it has been a real game changer for us. Our kids’ attitudes have greatly improved, and they are learning the value of reward for work (AKA the value of the dollar). We have started giving our kids $1 when they complete their preassigned morning chores, and $1 for completing their preassigned evening chores.

The method I want to introduce to you was developed by Dave Ramsey and his daughter, Rachel Cruze. I heard Rachel speak in Orlando a few months ago at the doTERRA Leaders Convention and was so intrigued by what she shared. Rachel and her father, Dave Ramsey, have prepared a Smart Money Smart Kids teaching series that include their Smart Money Smart Kids book , a Smart Money Smart Kids workbook, and six practical, video-based lessons that give parents a step-by-step approach to teaching their kids about working spending, saving, giving, debt and contentment. They believe that this teaching tool will help their kids learn to make wise money choices and build character qualities so they will win not only with money, but also in life.

Because this method has been so successful in our parenting experience, I want to share a brief glimpse at each of these principles. I’m sure there are some of you who are struggling, as we did, with nearly daily arguments and frustrations as we tried to get our kids to learn to be responsible for the simple chores they needed to accomplish to share in the responsibility for our balanced, thriving, and happy home environment.

Dave Ramsey gives his own personal experience in these words:


While we have never perfectly executed the money-smart principles we teach in this book, we have succeeded in raising money-smart kids. Of all the successes, accolades, and fame I have been blessed with, what I am most proud of are my children. Sharon and I have three competent, confident, poised, and wonderful adult children. They are winning at their spiritual walks, their marriages, and their careers, and all of them handle money well.

The basic principles used in this method include:

  1. Work—It’s NOT a four-letter word
  2. Spend—When it’s gone, it’s gone
  3. Save—Wait for it
  4. Give—It’s not yours anyway
  5. Budgeting—Tell it what to do
  6. Debt—It IS a four-letter work
  7. College—Don’t graduate from I.O.U.
  8. Contentment—The war for your child’s heart
  9. Family—Put the FUN in Dysfunctional
  10. Generational Handoff—Blessings or Curses

Because we have younger children that we are teaching right now, we are not focusing on all of these principles right now. But I do want to highlight the four that are most important for us right now:

Work—It’s NOT a Four-letter Word

One of the most important lessons we can teach our children is to be hard workers. Teaching our children to work helps them to learn early that work creates discipline, and when you have discipline in your life, you are a healthier person.

Frank and I have certainly learned that lesson. Managing a very successful home-based business while caring for our farm with its nearly one hundred animals, gardens and homesteading lifestyle, plus blogging, writing books, and, most importantly, raising self-governed, happy children is certainly hard work.

But there’s no better feeling that completing all the various work that goes into just one day on the farm and in the business, and falling down on the sofa with my feet up, or soaking in a tub of hot water, and feeling completely exhausted—yet completely fulfilled.

We want our children to learn to recognize that same wonderful feeling of fulfillment for hard work done. They certainly won’t feel that way after sitting in front of the TV or PlayStation all day in the middle of a room littered with dirty dishes, thrown off clothes, and toys all over the place.

13177809_10153887919252013_2013262708165319980_n

But completing some preassigned chores like making their beds, picking up their rooms, completing some simple farm chores, and helping with the dishes will create a sense of accomplishment, something they can feel good about. It’s that feeling of accomplishment that will give them the confidence that they can go out and win at whatever they tackle.

Teaching our children to work is a necessary skill for life. It is setting them up to succeed, not setting them up to fail. It’s a habit that will stick to them for life.

Train up a child in the way he should go, and when he is old he will not depart from it. – Proverbs 22:6

This method does not incorporate the “allowance system.” Due to widespread use of the allowance system, there’s a whole generation that has grown up thinking money is free. They expect their parents to keep paying the bills until they are adults, and then often believe the government exists to take care of them as adults.

We are trying to teach our children this general rule: Work, get paid; don’t work, don’t get paid. Once your kids understand that money comes from work, they won’t be able to spend money on a toy without considering how much work went into actually making that money. We recently were able to observe how our two young children are learning this principle when we took them on a business trip to Savannah and Orlando with us. They each had several dollars of earnings with them, and we watched as they carefully assessed each thing they were tempted to buy by looking at their money and realizing how much less they would have if they spent some foolishly.

When it comes to the work chores you give to your children, start them young, but be sure you are giving them age-appropriate chores. I recommend you review my post on “Household Chores for Kids Under Seven.” Remember that kids are not born with the work ethic. Character traits of tolerance, perseverance and self-discipline are learned—and must be taught by us parents. It’s up to us to teach our kids the difference between wanting and getting, and how to postpone gratification in order to accomplish and succeed later as an adult.

When you are teaching your children that completing a work chore equals pay it is important to pay them soon after they complete the chores. That is why we pay our children for their work both morning and evening. Younger children cannot understand the concept of delayed payment. Older children might be able to wait to “payday” at the end of the week. Choose an amount of payment that works for your family. Our family is able to pay $1 at a time, but if this is too much for you, or you have too many children to afford $1 each, help them to understand that you are paying them according to your ability. Learning that will make them more responsible family members.

Spend—When It’s Gone, It’s Gone

This principle is one that my little ones learned very quickly. They had a couple of pretty anxious, frustrating experiences where they spent their money on foolishness, and then when they wanted something else desperately they tried begging: “Please, Mom, I really neeed this!” They even tried, “I’ll pay you back, I promise!”

Learning not to waste money on impulse is a very important lesson, and one that even very young kids can learn. Dave Ramsey says parents will learn quickly that, “it takes tremendous strength and resolve to suffer the consequences of their decision.”

To help your children learn that money has limits, Ramsey suggests teaching your children to use the envelope system. As parents we use that system for our own budgeting purposes—we label envelopes for each monthly expense, such as mortgage, food, tithing, entertainment, etc., and put a budgeted amount in each envelope. Once that envelope is empty, there’s no more for that particular expenditure until the next month.

We have taught our children to do the same thing. They have envelopes (mason jars) for giving, toys, saving, and a couple other things they like to use their money for. With younger children it’s important for them to SEE their money, which is why we use mason jars instead of envelopes at the time. As they learn to use this system, we have discovered that one of them is a natural spender, and the other is a natural saver. There’s nothing wrong with either characteristic, but it is very important for your children to learn to recognize which category fits them, and to learn how to be wise spenders or savers, and to spend their money wisely. You can greatly encourage your children in this by letting them watch your wise example.

Save—Wait for It

Learning to spend wisely is just the first step—if we want to raise our children to be successful with money, we’ve got to teach them to save.  Americans are certainly not a nation of savers. Research shows that adults are failing with money because of the money habits they developed as children. Saving is a behavior that comes from experience, not knowledge. Ramsey says:


After decades of coaching adults who have messed up financially, as well as those who have become wealthy, I am more convinced than ever that behavior is the primary indicator of successful wealth building. If you want to know if someone will win with money, all you have to do is look at his behavior and the character that drives that behavior. An adult’s ability to work well with people, have extreme integrity, and display emotional and spiritual maturity are key to building wealth and keeping it. Great talent might cause someone to get rich, but it usually flames out if he doesn’t know how to behave like a grown-up.

You are teaching behaviors that become character traits when you teach your children wise spending, saving, and giving behaviors. These character traits will teach them how to win at life.

Give—It’s Not Yours Anyway

One of the most important lessons we can teach our children is that money is not theirs. We believe that God owns everything, and He asks us to manage it for Him. Our children will be less selfish as adults if we teach them to view wealth as a responsibility, not a meal ticket. Their futures will be brighter if they learn to live with a spirit of abundance, rather than a spirit of lack. Teach them that they don’t own money—they are simply managers or stewards of it.

Our kids are growing up in a me, me, me culture. The antidote for selfishness isn’t a theory; it’s an action, and that action is giving. Teach your children giving by example. Because our children have seen us put an envelope with a check in the offering at church every time we are there, consistent giving has become much easier for them. It’s easier for adults to do their giving online in many instances, but your children will see the principle of giving reinforced much better by watching you write out that check, put it in that envelope, and put the envelope in the offering bag.

Our little ones watched as Frank and I went through the process of eliminating debt. They learned the lesson of waiting and saving through that process, and they also learned that it was important of us to learn to be givers, not takers. They have assisted us in our essential oil business by stuffing the envelopes with the giveaways we send to our team members, and are growing up in a family that values giving.

We have enjoyed creating opportunities for us to give as a family. We’ve taken part in “Angel Tree” programs at Christmas time when we give gifts to needy people. Teaching our children to understand that giving really matters is helping us to raise children who get great joy from giving money as well as getting it.

If you are not religious and do not give to your church, consider giving to a charity that your child can chooses!

Get Started NOW

We encourage you to get started now on this important parenting opportunity of teaching your children to be wise managers of money. It takes time, hard work and discipline to teach your kids to manage money wisely, but you’ll get the reward of watching as your grown kids go out on their own—confident, money-smart, and ready to take on the world.

Snag the book to guide you through all this here. 

Filed Under: essential oils, family

Three Steps to Starting Your First Veggie Garden

May 5, 2016 by Jackie Ritz 1 Comment

When we began dreaming of moving out of our suburban lifestyle to a piece of God’s great country “out there” where we could plant our roots and start living a self-sustaining lifestyle, we had a lot of wants and wishes, but very little know-how! We knew we wanted to be homesteaders, but what does that really mean? Through our rose-colored glasses we could see beautiful rows of growing organic vegetables and fruits, and pastures filled with grass-fed, free-range poultry and animals. But if you had asked us then, “What is the first thing you need to do to make homesteading a reality?”, we would not have been able to answer that question.

So I understand all too well the paralyzing doubts and fears of really being able to make that happen. If you are dreaming of having a garden filled with organic, nutritious fresh vegetables, but don’t know how or where to start, I want to give you three steps to starting your your first veggie garden  to build your confidence that you can do it. All you need is a little piece of land (or some containers sitting on your patio) and a bit of helpful start-up information. It’s really not that difficult to get started. Let’s look at the basic steps you need to take to go from dreaming to doing.

  1. Determine how much land—either actual land or soil in pots—you have available for your garden, and prepare it appropriately for your plants.
  2. Start small—choose three to five veggies or fruits you most want to grow yourself—and get them ready to plant in your garden.
  3. Be consistent in caring for your plants—which includes watering, weeding, feeding, and keeping out the garden pests.

Those are three pretty simple steps to take, but you need a little bit of know-how before you will be successful with any of those steps. So let’s look a little closer at each step.

1. Preparing your land

There are some important things to consider about the land you have. It’s important to know that almost all vegetables need about six hours of full sun each day. Be sure the land where you want to plant your garden receives as much sun as that. You also need to know what type of soil you have. You can take a sample of your soil to your county extension office, and they will tell you what your soil lacks and how to amend it. Or you can test your own soil with a Mason Jar Soil test. You can find complete directions for this self-soil-test here. You can also grab a Rapitest Soil Tester from your local garden store or purchase it online here. 

If you do not have the perfect combination of clay, silt, and sand—which is pretty rare—you will need to amend your soil with some organic materials. These materials may include yard trimmings, compost, crop residues, and manures. This handy guide you can download will be helpful to you. 

One of the easiest and most helpful tools you can have for successful gardening is your own organic compost material. Compost is the single most important supplement you can give your garden soil. There are many guides available online to help you get started with your own compost bin, including this one. Your first year of gardening, you will need to purchase compost through your garden store or online. 

This year we decided to try out raised row gardening. It’s super easy and requires some straw, soil amendments, and compost. It requires you planting your seeds or transplants in straw rows. Old World Garden has a great blog post series on raised row gardening that you can read here. 

You will want to add 2-3 inches of soil amendments to your soil. In most cases this will involve loosening the dirt and mixing the organic soil amendments into the dirt. Be sure you are working with moist soil. If your soil is either too wet or too dry you will not get the best mixture of soil for growing your plants.

You will also want to plan your garden. You will want to make the best use of the land you have available. For example, you should place plants with similar water, fertilizer, and sun exposure requirements together. You will also want to be sure you are leaving enough room between your rows (approximately 2 feet) to allow you to walk between, to lay your hose for watering, and to push a small wheelbarrow for weeding waste. You can find a lot of great tips online, including a free “Vegetable Garden Planner” software program here. 

2. Choosing your garden plants

Choosing your garden plants doesn’t have to mean growing the same vegetables your grandmother…or your neighbor…or the gardener with the perfect garden…grows. Plan the design with the types of food your family likes to eat! My family loves tomatoes, so this year we planted 21 tomato plants! Remember that gardening is a matter of trial and error, so choose the plants that are easiest to grow when you are just beginning. Some of the easiest vegetables to grow are lettuce, peppers, tomatoes, and cucumbers. Some plants, like lettuce and sunflowers, are easy to grow from seeds, but an easier method for the beginner gardener is buying young plants, or transplants, and plant them in your prepared soil. Transplants are available in your garden store!

You may decide to grow the vegetables you need for a simple salad. Lettuces grow quickly, and are easy to harvest. They take up very little space. Tomatoes are probably the most popular vegetable for beginners, and can be supported with a stake or cage as they grow. Try the smaller varieties of tomatoes, such as cherry and grape tomatoes. Plant some basil next to your tomato plants to naturally repel tomato pests. Cucumbers grow almost like weeds, and also are easily staked for support. Just remember to purchase tomato, pepper and cucumber stakes early and insert them into the ground to support your plants BEFORE the roots get too big. You don’t want to stake them too late or you risk damaging the roots. 

You may also want to try some root vegetables, like carrots, turnips, and radishes. You can plant them early in the spring and leave them until the fall. Green beans and zucchini are also easy to grow. Maybe you have some room to add some bell peppers or jalapenos to flavor your home-grown salad.

3. Give consistent care to your garden.

To have a successful harvest in your garden, you need to add four chores to your gardening schedule: watering, weeding, feeding, and keeping out the garden pests. Let’s consider each of these chores.

You want to be sure your plants—and their roots—stay moist. In order to keep your garden well watered, follow these tips:

  • Focus on the root zone. Wetting the foliage is a waste of water and can promote the spread of disease. This is why I prefer a soaker hose for my garden. You can even add a timer to your soaker hose and forget about it!
  • Water only when needed. Too much water is just as damaging as too little.
  • Water deeply and thoroughly. Your soil should be moist to a depth of 6-12 inches.
  • Water in the morning. It’s much more difficult for plant diseases to get a foothold when the foliage is dry.
  • Use the right tool. Use a soaker hose or create a drip irrigation system instead of a sprinkler.1

Weeding can seem like the chore that never ends. But there are some simple strategies to maintain a well-groomed garden. If you decide to do the raised row gardening, you will find that you have much less weeds! 

  • Let sleeping weeds lie. Only the weed seeds in the top 2 inches of your soil will germinate and grow. Dig only when you need to, and cover the freshly dug soil with mulch after you dig.
  • Mulch, mulch, mulch. Mulch keeps the soil cool and moist and deprives weeds of light. I wait till my plants are about 6-10 inches tall and then spread straw on the top of the soil and use it as mulch. You don’t need to spend lots of money on expensive mulch. Straw works great!
  • Weed when the weeding is good. “Pull when wet, hoe when dry” is wise advice. After a drenching rain, put on your garden gloves and get started. Try using an old fork to twist out weed roots, or an old steak knife to cut the weeds popping up through the mulch. Be sure to chop off weed heads before they go to seed.
  • Mind the gaps between plants. Close plant spacing will choke out emerging weeds with shade, but while the plants are growing, be sure to weed between them.
  • Water the plants, not the weeds. Keep your soaker hoses close to the plants, and let the nearby weeds go thirsty.

The key to a good garden is a good soil. Just like we need nourishment, so do plants. Understanding just a little bit about feeding your plants can help them grow big and strong and healthy. Organic and natural fertilizers add essential nutrients to the soil where they become available to the plants over time. There are three essential micronutrients your plants need: nitrogen, phosphorus, and potassium.

You can make your own organic fertilizer with some of the common items found in your kitchen or around your house. There is much good information online about how to do this, including this great resource, which provides four easy homemade fertilizer recipes.  Here is a list of some of these common ingredients:

  • Aquarium water
  • Banana
  • Blackstrap molasses
  • Coffee grounds
  • Cooking water
  • Egg shells
  • Epsom salts
  • Fireplace or fire pit ash
  • Gelatin
  • Green Tea
  • Hair
  • Matches

If you lack the confidence for making your own organic fertilizer, be sure that you purchase your organic fertilizers from a company that produces awesome, trustworthy organic fertilizers. Follow the recommendation of an experienced gardener, or a well-researched list of reputable organic fertilizer producers. You can find one good resource here. 

Be prepared to do a little warfare against those garden pests that want to take over your veggies and prevent you from ever getting your first good harvest. Be sure to read my earlier post about Natural Remedies for Garden Pests.  There are twelve bothersome garden pests to be aware of, and I give you helpful information for dealing with each. These 12 garden pests are:

  • Slugs
  • Squash bugs
  • Aphids
  • Imported cabbageworms
  • Squash vine borers
  • Japanese beetles
  • Tomato hornworms
  • Cutworms
  • Grasshoppers
  • Cucumber beetles
  • Corn earworms
  • Whiteflies

If you are eager to have a healthy, organic garden, you will want to limit your plants’ exposure to unhealthy chemicals. There are ways to deal naturally with garden pests, and you will want to incorporate these methods into your gardening efforts. In addition to the information I share in my earlier blog post, there are good suggestions online, including here. 

Once you are prepared with this information, all that’s left for you to do it simply BEGIN! By harvest time you will be surprised by the generous supply of fresh, organic, homegrown vegetables you have produced yourself. You’ve just taken one giant leap into your dream of becoming a modern homesteader, and  your family will be able to enjoy the healthy bounty from your garden.

Sources

  1. https://www.gardeners.com/how-to/when-to-water/8108.html 
  2. https://www.keeperofthehomestead.com/blog/5-ways-to-start-homesteading-today
  3. https://www.bhg.com/gardening/yard/garden-care/ten-steps-to-beginning-a-garden/#page=1
  4. https://preparednessmama.com/starting-a-garden/
  5. https://www.vegetable-gardening-online.com/planning-a-vegetable-garden.html
  6. https://lifehacker.com/the-seven-easiest-vegetables-to-grow-for-beginner-garde-1562176780

Filed Under: essential oils, Gardening, Homesteading, Living Sustainably

No Time for Making Bone Broth?

April 10, 2016 by Jackie Ritz 1 Comment


20160402-IMG_1867

You didn’t really think I *always* made my own bone broth, did you? You did?! Awww, that’s so cute….but I wish you could have a peak into my crazy mama world. Total transparency here, I’m a happy-hot-busy-mess.  I’ll admit, I love making bone broth when I have a chicken carcass laying around, but there are times when I don’t always have it on hand. Or I’m too busy and don’t have time to defrost it for a recipe I’m throwing together while I have HANGRY kids tearing at my ankles.  

So what do I use during these crazy mama moments? 

Kettle & Fire Bone Broth baby! 

Crazy Mamas, like myself, turn to Kettle & Fire Bone Broth when: 

  • They want bone broth from happy organic hens who are pasture-raised and spend all day pecking for bugs and enjoying the sunshine. 
  • They want CHICKEN FEET in their broth! Y’all…chicken feet creates the most beautiful gelatin and collagen which keeps our joints and our gut healthy! If your broth ain’t gellin’, you got no reason sellin’ (other store-bought bone broths). 
  • They want a bone broth that is locally sourced here in the USA so they can support small family farms who are working their butts off to provide sustainable and organic foods.
  • They care about the ingredients and spices that go into the bone broth. Take a look at the ingredients in Kettle & Fire Chicken Bone Broth.

Ingredients: Chicken Bone Broth (Filtered Water, Organic Chicken Bones, Organic Apple Cider Vinegar), Chicken Broth, Organic Celery, Organic Roasted Poblano Pepper, Organic Green Pepper, Organic Onion, Organic Carrots, Organic Garlic, Organic Scallions, Organic Tomato Puree, Organic Herbs (Parsley, Thyme, Rosemary, Basil, Bay Leaves) Organic Spices, Organic Black Pepper, Sea Salt.

Kettle & Fire Bone Broth sets the standard in the “brothery world“. Their bone broth is slow-simmered for over 20 hours, which allows the marrow, collagen and amino acids time to render into the broth so you get the added benefits. Kettle & Fire combine the highest-collagen content bones (knuckle, patella, femur, and feet bones) with only organic vegetables, sea salt, and herbs. This means no artificial ingredients, no preservatives, and no additives. And if, by some rare chance, you don’t like it, Kettle & Fire have a 100% money back guarantee. 

Since most busy people don’t have the time to make bone broth at home, I felt it was important to share with you this secret that I have been keeping. Kettle & Fire has hundreds of 5 star ratings (9,800+ customers) and I’m confident you are going to love this bone broth. 

Normally, Kettle & Fire only sells their product at FULL retail price at Whole Foods Market and on their site. Since I’m such a fan of this stuff, I reached out to the good folks at Kettle & Fire and they gave me an offer to pay forward to you. It’s pretty easy, really. Just click here to get 20% OFF your order of Kettle & Fire bone broth! 

Bone Broth Giveaway

Filed Under: Natural Living, Nutrition

The Ketogenic Diet 101: A Detailed Beginner’s Guide

April 10, 2016 by Jackie Ritz 28 Comments


I’m about to embark on my 3rd time starting a ketogenic diet. I see great results every time I get back to doing keto and I thought I would share this awesome article by my friends over at Authority Nutrition. This article was originally published by Authority Nutrition and is being republished on my website with permission. Here’s a YouTube video we did on the Ketogenic diet.


The ketogenic diet is a low-carb, high-fat dietthat offers many health benefits.

Over 20 studies show that this type of diet can help you lose weight and improve health (1).

Ketogenic diets may even have benefits against diabetes, cancer, epilepsy and Alzheimer’s disease (2, 3, 4, 5). 

This article is a detailed beginner’s guide to the ketogenic diet.

It contains everything you need to know.

What is a Ketogenic Diet?

The ketogenic diet (often termed keto) is a very low-carb, high-fat diet that shares many similarities with the Atkins and low-carb diets.

It involves drastically reducing carbohydrate intake, and replacing it with fat. The reduction in carbs puts your body into a metabolic state called ketosis.

When this happens, your body becomes incredibly efficient at burning fat for energy. It also turns fat into ketones in the liver, which can supply energy for the brain (6, 7).

Ketogenic diets can cause massive reductions in blood sugar and insulin levels. This, along with the increased ketones, has numerous health benefits (6, 8, 9, 10, 11).

Bottom Line: The ketogenic diet (keto) is a low-carb, high-fat diet. It lowers blood sugar and insulin levels, and shifts the body’s metabolism away from carbs and towards fat and ketones.

Different Types of Ketogenic Diets

There are several versions of the ketogenic diet, including:

  • Standard ketogenic diet (SKD): This is a very low-carb, moderate-protein and high-fat diet. It typically contains 75% fat, 20% protein and only 5% carbs (1).
  • Cyclical ketogenic diet (CKD): This diet involves periods of higher-carb refeeds, such as 5 ketogenic days followed by 2 high-carb days.
  • Targeted ketogenic diet (TKD): This diet allows you to add carbs around workouts.
  • High-protein ketogenic diet: This is similar to a standard ketogenic diet, but includes more protein. The ratio is often 60% fat, 35% protein and 5% carbs.

However, only the standard and high-protein ketogenic diets have been studied extensively. Cyclical or targeted ketogenic diets are more advanced methods, and primarily used by bodybuilders or athletes.

The information in this article mostly applies to the standard ketogenic diet (SKD), although many of the same principles also apply to the other versions.

Bottom Line: There are several versions of the ketogenic diet. The standard ketogenic diet (SKD) is the most researched and most recommended.

Ketogenic Diets Can Help You Lose Weight

Weight Scale

A ketogenic diet is an effective way to lose weight and lower risk factors for disease (8, 9, 10, 11, 12, 13).

In fact, research shows that the ketogenic diet is far superior to the recommended low-fat diet (2, 14, 15, 16).

What’s more, the diet is so filling that you can lose weightwithout counting calories or tracking your food (16).

One study found that people on a ketogenic diet lost 2.2 times more weight than those on a calorie-restricted low-fat diet. Triglyceride and HDL cholesterol levels also improved (17).

Another study found that participants on the ketogenic diet lost 3 times more weight than those on the Diabetes UK’s recommended diet (18).

There are several reasons why a ketogenic diet is superior to a low-fat diet. One is the increased protein intake, which provides numerous benefits (14, 19, 20).

The increased ketones, lowered blood sugar levels and improved insulin sensitivity may also play a key role (21, 22, 23, 24, 25, 26).

For more details on the weight loss effects of a ketogenic diet, read this article: A Ketogenic Diet to Lose Weight and Fight Disease.

Bottom Line: A ketogenic diet can help you lose much more weight than a low-fat diet. This often happens without hunger.

Ketogenic Diets for Diabetes and Prediabetes

Blood Glucose Meter and Strips

Diabetes is characterized by changes in metabolism, high blood sugar and impaired insulin function (27). 

The ketogenic diet can help you lose excess fat, which is closely linked to type 2 diabetes, prediabetes and metabolic syndrome (28, 29, 30).

One study found that the ketogenic diet improved insulin sensitivity by a whopping 75% (29).

Another study in patients with type 2 diabetes found that 7 of the 21 participants were able to stop all diabetes medications (28).

In yet another study, the ketogenic group lost 24.4 lbs (11.1 kg), compared to 15.2 lbs (6.9 kg) in the higher-carb group. This is an important benefit when considering the link between weight and type 2 diabetes (2, 31).

Additionally, 95.2% of the ketogenic group was also able to stop or reduce diabetes medication, compared to 62% in the higher-carb group (2).

This article has more details about low-carb diets and diabetes.

Bottom Line: The ketogenic diet can boost insulin sensitivity and cause fat loss, leading to drastic improvement for type 2 diabetes and prediabetes.

Other Health Benefits of the Ketogenic Diet

Older Male Doctor

The ketogenic diet actually originated as a tool for treating neurological diseases, such as epilepsy.

Studies have now shown that the diet can have benefits for a wide variety of different health conditions:

  • Heart disease: The ketogenic diet can improve risk factors like body fat, HDL levels, blood pressure and blood sugar (32, 33).
  • Cancer: The diet is currently being used to treat several types of cancer and slow tumor growth (4, 34, 35, 36).
  • Alzheimer’s disease: The diet may reduce symptoms of Alzheimer’s and slow down the disease’s progression (5, 37, 38).
  • Epilepsy: Research has shown that the ketogenic diet can cause massive reductions in seizures in epileptic children (3).
  • Parkinson’s disease: One study found that the diet helped improve symptoms of Parkinson’s disease (39).
  • Polycystic ovary syndrome: The ketogenic diet can help reduce insulin levels, which may play a key role in polycystic ovary syndrome (40).
  • Brain injuries: One animal study found that the diet can reduce concussions and aid recovery after brain injury (41).
  • Acne: Lower insulin levels and eating less sugar or processed foods may help improve acne (42).

However, keep in mind that research into many of these areas is far from conclusive.

Bottom Line: A ketogenic diet may provide many health benefits, especially with metabolic, neurological or insulin-related diseases.

Foods to Avoid

White Rice in a Glass Bowl

In short, any food that is high in carbs should be limited. 

Here is a list of foods that need to be reduced or eliminated on a ketogenic diet:

  • Sugary foods: Soda, fruit juice, smoothies, cake, ice cream, candy, etc.
  • Grains or starches: Wheat-based products, rice, pasta, cereal, etc.
  • Fruit: All fruit, except small portions of berries like strawberries.
  • Beans or legumes: Peas, kidney beans, lentils, chickpeas, etc.
  • Root vegetables and tubers: Potatoes, sweet potatoes, carrots, parsnips, etc.
  • Low-fat or diet products: These are highly processed and often high in carbs.
  • Some condiments or sauces: These often contain sugar and unhealthy fat.
  • Unhealthy fat: Limit your intake of processed vegetable oils, mayonnaise, etc.
  • Alcohol: Due to its carb content, many alcoholic beverages can throw you out of ketosis.
  • Sugar-free diet foods: These are often high in sugar alcohols, which can affect ketone levels in some cases. These foods also tend to be highly processed.

Bottom Line: Avoid carb-based foods like grains, sugars, legumes, rice, potatoes, candy, juice and even most fruits.

Foods to Eat

Thumbs Up Man With Salmon Avocado and Almonds

You should base the majority of your meals around these foods:

  • Meat: Red meat, steak, ham, sausage, bacon, chicken and turkey.
  • Fatty fish: Such as salmon, trout, tuna and mackerel.
  • Eggs: Look for pastured or omega-3 whole eggs.
  • Butter and cream: Look for grass-fed when possible.
  • Cheese: Unprocessed cheese (cheddar, goat, cream, blue or mozzarella).
  • Nuts and seeds: Almonds, walnuts, flaxseeds, pumpkin seeds, chia seeds, etc.
  • Healthy oils: Primarily extra virgin olive oil, coconut oil and avocado oil.
  • Avocados: Whole avocados or freshly made guacamole.
  • Low-carb veggies: Most green veggies, tomatoes, onions, peppers, etc.
  • Condiments: You can use salt, pepper and various healthy herbs and spices.

It is best to base your diet mostly on whole, single ingredient foods. Here is a list of 44 healthy low-carb foods.

Bottom Line: Base the majority of your diet on foods such as meat, fish, eggs, butter, nuts, healthy oils, avocados and plenty of low-carb veggies.

A Sample Ketogenic Meal Plan For 1 Week

Meat

To help get you started, here is a sample ketogenic diet meal plan for one week:

Monday

  • Breakfast: Bacon, eggs and tomatoes.
  • Lunch: Chicken salad with olive oil and feta cheese.
  • Dinner: Salmon with asparagus cooked in butter.

Tuesday

  • Breakfast: Egg, tomato, basil and goat cheese omelet.
  • Lunch: Almond milk, peanut butter, cocoa powder and stevia milkshake.
  • Dinner: Meatballs, cheddar cheese and vegetables.

Wednesday

  • Breakfast: A ketogenic milkshake (try this or this).
  • Lunch: Shrimp salad with olive oil and avocado.
  • Dinner: Pork chops with Parmesan cheese, broccoli and salad.

Thursday

  • Breakfast: Omelet with avocado, salsa, peppers, onion and spices.
  • Lunch: A handful of nuts and celery sticks with guacamole and salsa.
  • Dinner: Chicken stuffed with pesto and cream cheese, along with vegetables.

Friday

  • Breakfast: 3-cheese omelet with tomatoes.
  • Lunch: Leftover stuffed chicken from the night before.
  • Dinner: Steak, egg, mushrooms and salad.

Friday

  • Breakfast: Sugar-free yogurt with peanut butter, cocoa powder and stevia.
  • Lunch: Beef stir-fry cooked in coconut oil with vegetables.
  • Dinner: Bun-less burger with bacon, egg and cheese.

Saturday

  • Breakfast: Ham and cheese omelet with vegetables.
  • Lunch: Ham and cheese slices with nuts.
  • Dinner: White fish, egg and spinach cooked in coconut oil.

Sunday

  • Breakfast: Fried eggs with bacon and mushrooms.
  • Lunch: Burger with salsa, cheese and guacamole.
  • Dinner: Steak and eggs with a side salad.

Always try to rotate the vegetables and meat over the long term, as each type provides different nutrients and health benefits.

For tons of recipes, check out this link: 101 Healthy Low-Carb Recipes.

Bottom Line: You can eat a wide variety of tasty and nutritious meals on a ketogenic diet.

Healthy Ketogenic Snacks

Cheese

In case you get hungry between meals, here are some healthy, keto-approved snacks:

  • Fatty meat or fish.
  • Cheese.
  • A handful of nuts or seeds.
  • Cheese with olives.
  • 1–2 hard-boiled eggs.
  • 90% dark chocolate.
  • A low-carb milk shake with almond milk, cocoa powder and nut butter.
  • Full-fat yogurt mixed with nut butter and cocoa powder.
  • Strawberries and cream.
  • Celery with salsa and guacamole.
  • Smaller portions of leftover meals.

Bottom Line: Great snacks for a keto diet include pieces of meat, cheese, olives, boiled eggs, nuts and dark chocolate.

Tips for Eating Out on a Ketogenic Diet

It is not very hard to make most restaurant meals keto-friendly when eating out.

Most restaurants offer some kind of meat or fish-based dish. Order this, and replace any high-carb food with extra vegetables.

Egg-based meals are also a great option, such as an omelet or eggs and bacon.

Another favorite is bun-less burgers. You could also leave the bun and swap the fries for vegetables instead. Add extra avocado, cheese, bacon or eggs.

At Mexican restaurants, you can enjoy any type of meat with extra cheese, guacamole, salsa and sour cream.

For dessert, ask for a mixed cheese board or double cream with berries.

Bottom Line: When eating out, select a meat, fish or egg-based dish. Order extra veggies instead of carbs or starches, and have cheese for dessert.

Side Effects and How to Minimize Them

Three Pill Bottles

Although the ketogenic diet is safe for healthy people, there may be some initial side effects while your body adapts.

This is often referred to as “keto flu” – and is usually over within a few days.

Keto flu includes poor energy and mental function, increased hunger, sleep issues, nausea, digestive discomfort and decreased exercise performance.

In order to minimize this, you can try a regular low-carb diet for the first few weeks. This may teach your body to burn more fat before you completely eliminate carbs.

A ketogenic diet can also change the water and mineral balance of your body, so adding extra salt to your meals or taking mineral supplements can help.

For minerals, try taking 3,000–4,000 mg of sodium, 1,000 mg of potassium and 300 mg of magnesium per day to minimize side effects.

At least in the beginning, it is important to eat until fullness and to avoid restricting calories too much. Usually a ketogenic diet causes weight loss without intentional calorie restriction.

Bottom Line: Many of the side effects of starting a ketogenic diet can be limited. Easing into the diet and taking mineral supplements can help.

Supplements For a Ketogenic Diet

Although no supplement is necessary, some can be useful.

  • MCT oil: Added to drinks or yogurt, this provides energy and helps increase ketone levels.
  • Minerals: Added salt and other minerals can be important when starting out, due to shifts in water and mineral balance.
  • Caffeine: Caffeine can have benefits for energy, fat loss and performance.
  • Creatine: Creatine provides numerous benefits for health and performance. This can help if you are combining a ketogenic diet with exercise.
  • Whey: Use half a scoop of whey protein in shakes or yogurt to increase your daily protein intake.

Bottom Line: Certain supplements can be beneficial on a ketogenic diet. These include MCT oil and minerals.

Frequently Asked Questions

Man Putting Salt on Meat

Here are answers to some of the most common questions about the ketogenic diet.

1. Can I ever eat carbs again?

Yes. However, it is important to eliminate them initially. After the first 2–3 months, you can eat carbs on special occasions — just return to the diet immediately after.

2. Will I lose muscle?

There is a risk of losing some muscle on any diet. However, the high protein intake and high ketone levels may help minimize muscle loss, especially if you lift weights.

3. Can you build muscle on a ketogenic diet?

Yes, but it may not work as well as on a moderate-carb diet. More details: Low-Carb/Ketogenic Diets and Exercise Performance.

4. Do I need to refeed or carb load?

No. However, a few higher-calorie days may be beneficial every now and then.

5. How much protein can I eat?

Protein should be moderate, as a very high intake can spike insulin levels and lower ketones. Around 35% of total calorie intake is probably the upper limit.

6. What if I am constantly tired, weak or fatigued?

You may not be in full ketosis or be utilizing fats and ketones efficiently. To counter this, lower your carb intake and re-visit the points above. A supplement like MCT oil or ketones may also help.

7. My urine smells fruity? Why is this?

Don’t be alarmed. This is simply due to the excretion of byproducts created during ketosis.

8. My breath smells. What can I do?

This is a common side effect. Try drinking naturally flavored water or chewing sugar-free gum or snagging some peppermint oil and dropping it in your mouth. 

9. I heard ketosis was extremely dangerous. Is this true? 

People often confuse ketosis with ketoacidosis. The former is natural, while the latter only occurs in uncontrolled diabetes.

Ketoacidosis is dangerous, but the ketosis on a ketogenic diet is perfectly normal and healthy.

10. I have digestion issues and diarrhea. What can I do?

This common side effect usually passes after 3–4 weeks. If it persists, try eating more high-fiber veggies. Magnesium supplements can also help with constipation.

A Ketogenic Diet is Great, But Not For Everyone

A ketogenic diet can be great for people who are overweight, diabetic or looking to improve their metabolic health.

It may be less suitable for elite athletes or those wishing to add large amounts of muscle or weight.

And, as with any diet, it will only work if you are consistent and stick with it in the long-term.

That being said, few things are as well proven in nutrition as the powerful health and weight loss benefits of a ketogenic diet.


Filed Under: Dining out, Ketogentic, Paleo Education

« Previous Page
Next Page »

Footer

Our Blog

The Paleo Mama blog provides simple answers for healthier families through research, tutorials, recipes, and simple remedies for daily needs!

  • Health
  • Essential Oils
  • Recipes
  • Remedies
  • Natural Living
  • Meal Plans

Stick around!

You’ll get instant access to a library of natural remedies and real, paleo food, including our ebooks and free guides we send out.

  • Home
  • Disclosure/Disclaimer
  • Privacy Policy
  • Advertise
  • Contact Me

Copyright © 2025 · Wellness Pro on Genesis Framework · WordPress · Log in