• Skip to primary navigation
  • Skip to content
  • Skip to primary sidebar
  • Skip to footer

The Paleo Mama

Homegrown and Handmade

  • About
  • Blog
    • Podcast
  • Meal Plans
  • Essential Oils
  • Our Farm
    • Great Pyrenees Puppies
    • Goats
      • Goats for Sale
      • Goat Sales Policy
      • Nigerian Dwarf Bucks
        • Ranchocabra Lunar Eclipse

Jackie Ritz

Homemade Body Wash and Toothpaste

March 30, 2012 by Jackie Ritz 10 Comments

I’ve been buying Kirk’s castile soap for my family. It’s very safe, hypoallergenic, and has like 5 ingredients in it. I love that it’s coconut based too! The only thing though, is that we have been going through almost a bar every week. I am used to body wash…liquid soap. I’m not digging the bar soap. So, I found a recipe online on how to turn a bar soap into body wash! Score! I love Dr. Bronner’s liquid castile soap, but it’s kind of expensive. I keep it on hand to clean the kids with, and to mop the floor with. A little goes a long way with Dr. Bronner’s, but I had 2 bars of Kirk’s soap so I thought I would see how a homemade recipe would turn out. I modified this recipe I found online and here is what I did.

First I grated the bar of soap.

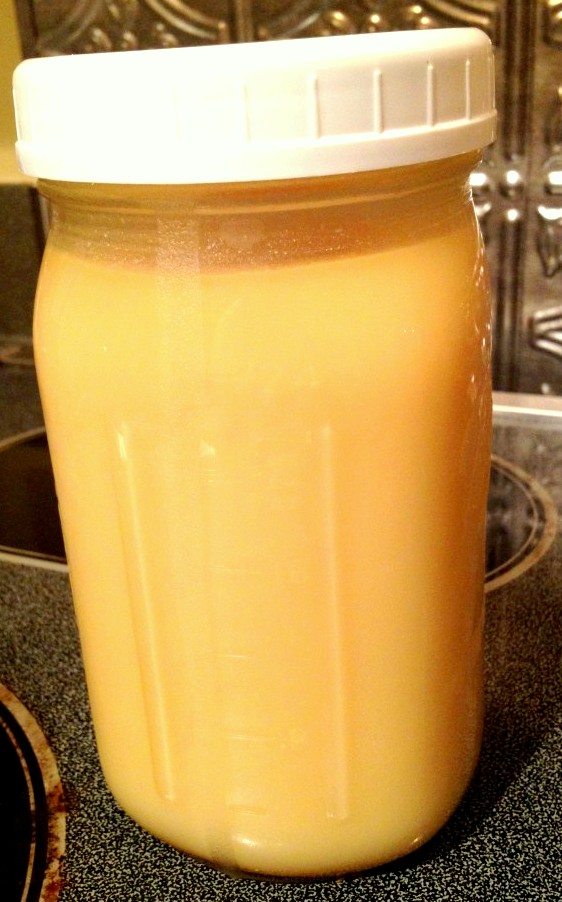
Then I put 6 cups of water in a pot and turned it on. Once it was almost boiling, I added in the grated soap (about 2 cups). I stirred it until it was melted and set it aside to cool for about an hour.

At this point I added in a few TB of coconut oil and about 15 drops of Lavender essential oil. It made a quart-sized mason jar and a pint-sized jar!

I used some of this the other day when showering. It’s nice and works well.  If you’ve ever used Dr. Bronner’s liquid castile soap, then you know that natural liquid body wash has a more “watery” consistency. I am on the look-out for those foaming hand soap dispensers because I would really like to use this soap I made for washing hands too. It should foam up nicely with one of those foaming dispensers!

Homemade Toothpaste

On to homemade toothpaste! Ok so this was a big step for me. To make something I lather on my body is one thing, but to make something that I actually put inside my mouth is another. Then I realized how silly this logic is. I’m trying to live more sustainably, so I need to trust myself more and trust that God gave us all we needed when He made us and the earth. I’m really trying to live more sustainably for many reasons. One, I want to be ready in the even of a Zombie Apocalypse. Two, I want to never run out of things and have to run to the store. And three, I want to show my kids to be dependent on themselves and not the grocery store. So, I found a recipe on Pinterest that uses: 5 Tbs baking soda -4 Tbs coconut oil -About 10 drops of essential oil -Container (Make sure it has a lid. Baking soda will absorb smells if left to open air.) -*You can also add a bit of stevia or other natural sweetener if you’re used to a sweeter toothpaste. I added some stevia and it did make it more palatable. It is definitely different tasting. I didn’t have any peppermint essential oil so I used my lavender essential oil. Gross! It smells good but the taste is hard to take. However, I am going to use it for myself. I know my husband will never use it. He couldn’t even use the Tom’s toothpaste without gagging. I really do like how clean it makes my teeth feel. It doesn’t bubble up and lather like commercial toothpaste does, but those do that because of all the toxic chemicals in it.

I’m really happy with all my homemade, natural products! I’m ordering a few “peri” bottles from Amazon to store them in. I have a bunch of glass mason jars in the shower right now and we all know how dangerous that can be.

All-in-all, I’m excited about my all my new products I’m making. I’m on my first week of doing the “No Poo” hair method, which is using no shampoo to wash with, however, that is a whole new post in itself. I am documenting it and after a month or so I will update you all!

Filed Under: About Me, DIY, Living Sustainably, Natural Living Tagged With: body wash, castile soap, dr. bronner's, homemade body soap, homemade toothpaste, no poo, toothpaste

Cavemama’s Facial Skin Care Regime

March 27, 2012 by Jackie Ritz 5 Comments

I’ve tried to get back to a more natural way when it comes to skin care. I, especially, am very cautious what I put on my children’s skin. Commercial skin care products, even the very expensive ones, have so many chemicals in them that are so harmful for your skin. Your skin is what protects you from outside invaders, but when you are applying products that have chemicals in them, the invaders are getting a free ride inside your body.

For awhile now I have been doing the Oil Cleansing Method for my facial skin care, and I must say, I will NEVER go back to buying any other form of skin care products. For starters, this method is washing your face with oil. Yes…oil. Seems absurd, I know, throwing oil on your already oily face. But, oil cleanses oil. Oil moisturizes. Oil softens. Oil cleanses. Oil is natural, made by the earth. Oil has ONE ingredient…oil. There are several kinds of oil that you can use. I use a mixture of Olive Oil and Castor oil. Castor oil is an amazing cleansing agent (look at my son! He was cleaned out of me with the use of castor oil! lol!). I do a 60% Castor oil, 40% Olive Oil mix. I put it in an old bottle and shake it up before I use it.

I splash some water on my face and put a quarter-size amount of the oil mixture on my hand. Then I rub the oil all over my face. I rub it into my pores in a circular motion. Then I get a washcloth and put it under HOT water. I lay the washcloth over my face and let the steam open my pores. You’re supposed to keep it on for about a minute or so, but I am usually in such a hurry to get myself ready that it only stays on my face for a couple seconds. Then I take the washcloth and rub the oil into my skin. I do circular motions again and rub the oil off. I do this until all the oil is rubbed into my pores as much as possible and my face is no longer oily. I pat dry with a towel and I’m done! My face is soft, never needs anything more! I do this every night and in the mornings I just splash water on my face.

Commercial cleansers strip oil away from our face, leaving it dry and tight. We need our facial oil! It was put there for a reason. When I used a 4 step facial program, my face would get so oily in the mid afternoon. I used to carry around those things you can dab the oil off your face with. My oil glands went into overdrive producing so much oil because the cleansers were stripping it away. Now, I have balance to my skin. And my skin looks good! I get compliments on it quite often!

Up close and personal picture of my face. No makeup on. Meet Snuggles, our rescue kitty!

Filed Under: Natural Living Tagged With: castor oil, natural skin care, Oil cleansing method, olive oil, skin care

Chocolate Dipped Strawberry Smoothie

March 27, 2012 by Jackie Ritz 2 Comments

Had a craving for chocolate tonight and all I could find in my pantry was cacao powder (which by the way is just frickin delicious). Accepting this challenge I began to throw things in my blender and, I have to say, I have come up with an amazing, chocolate-craving busting smoothie that is so healthy!

Ingredients:

1.5 cups of coconut milk (or almond milk).
6-7 frozen strawberries (can use fresh, just add in ice cubes)
1/2 frozen banana
1.5 TB cocoa powder

Add a couple drops of liquid stevia. I used my chocolate raspberry stevia and it enhanced the chocolatiness!!

Optional add ins: free-range egg yolks, coconut oil, and ice cubes if you use fresh strawberries

Throw everything in a blender, except ice cubes, and blend till smooth. Take a peak and add in ice cubes to get it to the thickness you desire.

Enjoy!!!

Other recipes you might like:

Spirulina Smoothie

Bulletproof Coffee

2 Minute Mug Brownie

Pumpkin Pie in a Cup Smoothie

20120326-204619.jpg

Filed Under: My Recipes, Nutrition Tagged With: paleo, smoothie, strawberry, vegan

I Rendered Lard!

March 26, 2012 by Jackie Ritz 11 Comments

all-done-lard-e13327214053441-768x1024

Before eating Paleo, we were “real food” eaters, following the guidelines and traditions of the Weston A. Price foundation and Nourishing Traditions cookbook. The use of lard was introduced to me as being healthy 3-4 years ago. Before that, you wouldn’t be able to convince me it was beneficial. However, I am now a believer in pig fat and cow fat (tallow). Not only is lard the original shortening that our grandmothers used to use, but it is also very high in Vitamin D, and anyone who has had their vitamin D levels checked recently, can tell you that we all are lacking in this essential vitamin.

Good lard is only 40% SATURATED fat, with 48% MONOUNSATURATED and 12% POLYUNSATURATED fat. Another interesting point to make is that lard’s fatty-acid composition is very comparable to breast milk which is 48% SATURATED 35% MONOUNSATURATED and 10% POLYUNSATURATED.

WE NEED SATURATED FAT IN OUR DIET: “It makes up over half of all cell membranes and gives cells stiffness and integrity. Bones require about 50% of the dietary fat to be saturated so calcium can be absorbed. SF lowers Lipoprotein-a in the blood, an inflammatory marker directly associated with the risk of heart disease. SF protects the liver from alcohol, toxins and drugs and they enhance the immune system. Omega 3 fats are retained in the tissue when the diet is rich in SF. Heart muscle contains rich deposits of stearic acid and palmitic fatty acids as they are foods the heart muscle uses and which are drawn upon in time of stress. Many SF have antimicrobial properties and protect us from harmful pathogens in the intestine. There is no scientific evidence to back up claims that SF causes “artery clogging” in fact arterial plaque is only 26% SF the rest unsaturated fat, over half of the plaque is polyunsaturated fat!

WE NEED CHOLESTEROL- it is only found in animal fat. In spite of being falsely accused of being the cause of atherosclerosis, heart attack and stork, cholesterol is actually a necessary substance in every body. It is a strong anti-oxidant and free radical scavenger. This is why cholesterol levels go up as we get older since we need more protection. Cholesterol makes up a large portion of the brain, is the root of all corticosteroids and hormones in the body, it is the precursor to vitamin D. It keeps our skin soft and moist, and makes the bile which we need to digest fat. Mother’s breast milk is very high in it (which should tell us something!). Our bodies make over 2000mg daily whereas a maximum of only 100mg can be absorbed from the diet, so it’s pretty clear how shaky and wrong the connection of heart disease to dietary cholesterol intake. It is oxidative stress that causes cholesterol to elevate in the bloodstream in response to excessive free radicals. In the skin, uv light causes the production of free radicals, known carcinogens and aging factor, which damage the vital phospholipids of the skin unless the cholesterol is there in adequate supplies to protect it. Cholesterol is required for proper function of serotonin (the “feel good” brain chemical) such that low cholesterol levels are associated with aggression, violence, depression and suicidal tendencies. Cholesterol lowering drugs, especially the statins, are intrinsically toxic to the liver, they deplete CoQ10, an enzyme needed by all muscles by (note that the heart is a muscle), and ultimately leaves us dangerously exposed to oxidizers, free radicals and other damaging agents” (quoted from here).

Ok, so enough trying to make you a believer, here’s my process of rendering lard:

1. First I pulled the frozen lard and chopped it into pieces.

Pork fatback from local, pastured piggies.

All chopped up.

2. I used my dutch oven and put the chopped lard on my stove top and cooked it on medium-low heat. I stirred every few minutes until the big portion of the lard was cooked and melted.

Just started melting


about 15 minutes into cooking

3. This took about 20 minutes. At about this point you will start to see the “cracklings” form. This is when everything starts spattering, so be careful. Once the cracklings are done splattering all over, they will begin to rise to the top of the bowl. This means you’re done!

All done and cracklings rose to the top

4. Next, I placed a colander over a bowl and poured my hot bowl of rendered lard into it. The cracklings were caught by the colander and the lard drained through into my bowl.

cracklings

5. I transferred to a mason jar and admired my beautiful fat. The lard was yellowish/brownish color when hot and turned a nice, smooth white color once it cooled!

Just drained lard…hot and brownish in color
Cooling my lard. Picture taken a couple of hours after I put it in the mason jar. See how it’s changing colors!
Still cooling and changing into a beautiful white color. Picture taken 12 hours after the whole process.

These cracklings or pork rinds are delicious and a wonderful Paleo alternative to bread crumbs (all crunched up). My daughter couldn’t get enough!!!

What do I do with my lard?

  • I use it to fry homemade chicken nuggets.
  • I use it in place of shortening in baking recipes.
  • I use it to saute vegetables.

***I have also rendered tallow the same way and it turned out delicious!

Filed Under: Cholesterol, DIY, Living Sustainably, Nutrition, Paleo Toddler, Shopping Local Tagged With: cholesterol, diy, fatback, pig, pork, rendering lard

Silk-dyed Easter Eggs

March 21, 2012 by Jackie Ritz 3 Comments

These were so much fun to make! A little intricate, but so worth it. They came out beautiful!

This is a project that takes a few days, especially if you don’t have any of the supplies you need. I started accumulating old men’s silk ties, boxers, and women’s silk blouses. I went to Goodwill and another consignment shop that was near me and I bought a bunch of different men’s ties in cool designs. It must be 100% silk for the pattern to transfer onto the egg.

The benefit of using silk dye (or acid dye) is that it isn’t poisonous like all those other dyes out there. You can actually eat these eggs after you dye them.

Items you’ll need: silk fabric, kitchen twine or twistie ties, white eggs, vinegar, 100% cotton sheet and some vegetable oil.

Step 1: Gather, gather, gather! Raid your husband’s closet and take those old ties he never wears. Go to your nearby consignment shop. One tie makes 2 eggs. So if you are making 24 eggs then you need 12 ties.

Step 2: This is the tedious step that you might want to do beforehand, especially if you have little hands helping. You need to unravel the ties. So, cut the thread and start taking the tie apart.

Step 3: Cut the fabric into squares. Make sure they are big enough to cover the whole egg and have enough fabric left to tie it together. Then wrap them around the egg, as tight and as flat as you can without crushing it, with the fabric inside out (bright pattern is against the egg). Secure the kitchen twine at the top of the egg. Here’s a picture of my eggs all tied up:

Step 4: Cut your white cotton sheet into squares and then wrap the cotton squares around each egg.  This keeps the dye from each egg bleeding onto the other eggs. I forgot to take a picture of this step. Sorry. I did, however, save on the tieing of twine and used twistie ties.

Step 5: Very carefully place each egg in the bottom of a big pot. Only put them in one layer. You might need to use 2 pots or do them in batches. Cover the eggs with water, with 1/2 inch of water on the top. Then add 1/4 cup of white vinegar into the pot. Bring to a boil, then simmer for 20 minutes.

Step 6: Take the eggs out and set on paper towels to cool and let the color set. No peaking!

Step 7: Unravel the eggs and behold the beauty!!! Wipe them dry with a paper towel and then rub a little vegetable oil on them (this is the only thing I have used vegetable oil on in years!).

All done! I got so many comments on them. They are so beautiful and people will think you are so artistic! Little do they know!!!


Filed Under: DIY Tagged With: easter eggs, eggs, silk dye

Ground Beef Stroganoff

February 25, 2012 by Jackie Ritz 60 Comments

This is so good, I just can’t keep it to myself anymore! I make it 2-3 times every month. It’s just so delicious and comforting. I adapted this recipe from a non-Paleo recipe I saw on here. It’s so nourishing and 100% Paleo! You can make it Primal by using sour cream instead of coconut milk cream. Hope you like it!

_MG_4107

Ingredients:

  • 2 TB of Butter or Ghee
  • 2 TB of extra-virgin olive oil or coconut oil, divided
  • 1 lg Onion, diced
  • 8 ounces of sliced white mushrooms (slice em’ thick)
  • 1 pound of ground beef
  • 2 TB of tomato paste
  • 1.5 ts thyme
  • 1.5 ts rosemary
  • 4 cloves of garlic
  • 1 TB arrowroot powder
  • 1.5 cup beef stock (I usually use my homemade chicken stock since I make a batch every week)
  • 2/3 cup thick coconut cream (this is the cream off the top of a can of coconut milk). I recommend Native Forest  for this because it separates really good in the can.
  • 1/2 ts of sea salt
  • 1/2 ts black pepper
  • cooked Cauliflower Rice, Sliced Zucchini “noodles”, sweet potato noodle, or Spaghetti Squash

Directions:

In a skillet, melt the butter/or Ghee with 1 TB of olive/or coconut oil. Add the mushrooms and onions, and saute until slightly softened and browned around the edges. Remove to a plate.

_MG_4059

_MG_4073

Brown ground beef in 1 TB of olive oil until no longer pink. Return onions and mushrooms to pan. Add tomato paste, thyme, rosemary, and garlic. Saute’ for about 3 minutes to allow the flavors to develop. Reduce heat to medium. Sprinkle arrowroot powder over meat mixture and stir to combine until arrowroot is completely mixed in. Add beef stock and stir to mix in.

_MG_4085

Sauce will begin to thicken as it comes to a simmer.

Reduce heat and simmer for about 5 minutes. Remove from heat and let cool for a couple minutes.

Stir in the thick coconut cream.

_MG_4098

Serve over cooked Cauliflower Rice, sliced zucchini noodles, sweet potato noodle, or roasted Spaghetti Squash with some roasted vegetables on the side!

We made it with sweet potato noodles this time which my kids LOVED!

_MG_4139 _MG_4128


_MG_4058

Filed Under: Grassfed Beef, My Recipes, Nutrition Tagged With: beef recipes, grassfed beef, mushrooms, paleo, primal, recipes, stroganoff

« Previous Page
Next Page »

Primary Sidebar

  • Facebook
  • Instagram
  • Pinterest
  • RSS
  • YouTube

Hi, I'm Jackie Ritz and welcome to The Paleo Mama! I'm a published author, certified herbalist, and voracious researcher of natural medicine and nutrition. I'm glad you're here and I hope you stick around for awhile!

Recent Posts

  • When God Says Pause: Why I Took a 5-Year Break from My Online Business
  • How to Quit Facebook but Keep Your Business Profile
  • Leaving the City for the Country
  • Natural Way to Heart Health

MEAL PLANS

Biblically clean meal plans that are for those love to cook real food

Read More

Footer

Our Blog

The Paleo Mama blog provides simple answers for healthier families through research, tutorials, recipes, and simple remedies for daily needs!

  • Health
  • Essential Oils
  • Recipes
  • Remedies
  • Natural Living
  • Meal Plans

Stick around!

You’ll get instant access to a library of natural remedies and real, paleo food, including our ebooks and free guides we send out.

  • Home
  • Disclosure/Disclaimer
  • Privacy Policy
  • Advertise
  • Contact Me

Copyright © 2025 · Wellness Pro on Genesis Framework · WordPress · Log in